When I send DNS request, I will get some response. At this time, I had some question if this answer come from cached information or not. Someone think like me.


When the DNS server can recurse (RA is set)

1. Even if the query is recursive or not, the DNS which recived refer to local cache to find out the A record.

2. If the DNS is not authoritative, it will be return cached.


Please Look at these Packets.

There are 2 answers. One is CNAME which has 300 TTL time, other is A which 30 TTL time. I try again. And then

Now, I can see CNAME which has 300 TTL time and A which 29 TTL time. 

In my test environment, I have DNS and GSLB. It has the role each like below. I dig to Authoritative DNS.

Thus, 

1. Authoritative DNS return the TTL time for CNAME. This is the configuration value. 

- In the response packet, Authoritative flag is set.

2. Authoritative DNS recurse to GSLB and cache the answer and return to client. So this TTL time will be counted down.

- In the response packet, Recursion Available is set. (The DNS can recurse)


The best way to find out the answer come from cached is watching "TTL time will be counted down or not".


This is the other case, I will try dig to "8.8.8.8" which is google DNS server. Even if there are lots of DNS server behind 8.8.8.8.

In this result above, Recursion Available is set, so the DNS is expected to cache answer. However, this is not Authoritative. Therefore, the CNAME and A should be counted down.


So far, I send recursive query. However, I want to see the same result with iterative query. In this post, I explained how to generate iterative query. I will use "dig +norecurse". Please note below


1. "dig with norecurse" show the result by DNS properies.

- Some DNS show the next query information, even if it has cached record.

- Some DNS show the cached answer.

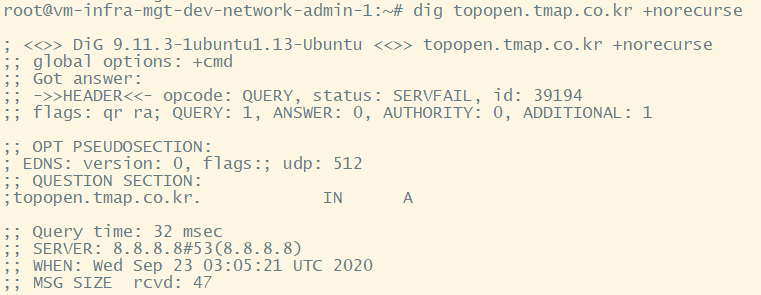
- Some DNS show "server failed" result


Because of this, I did not recommend to use "dig with norecurse". Anyway, I will show when it works. I used same DNS server target.

When dig with no-recurse works, It show CNAME with counted TTL time down and A with counted TTL time down. With result, this DNS server has cached record value.


I have already told that different type of result can be shown with "norecurse" option. I will send query "www.google.com" to different DNS servers.
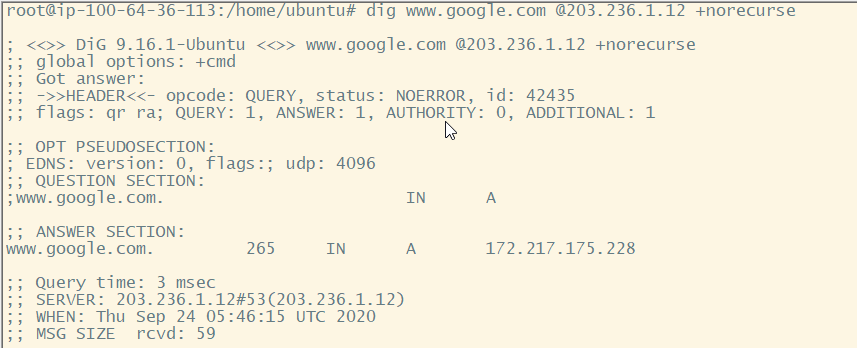
 

At first, Cached A record information is returned from DNS server. At this time, I can expect this DNS server has the cache. Please look at the next case,
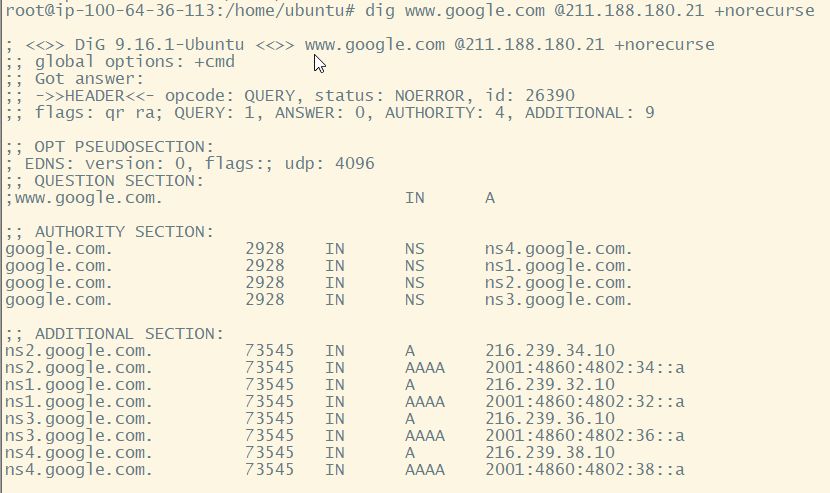
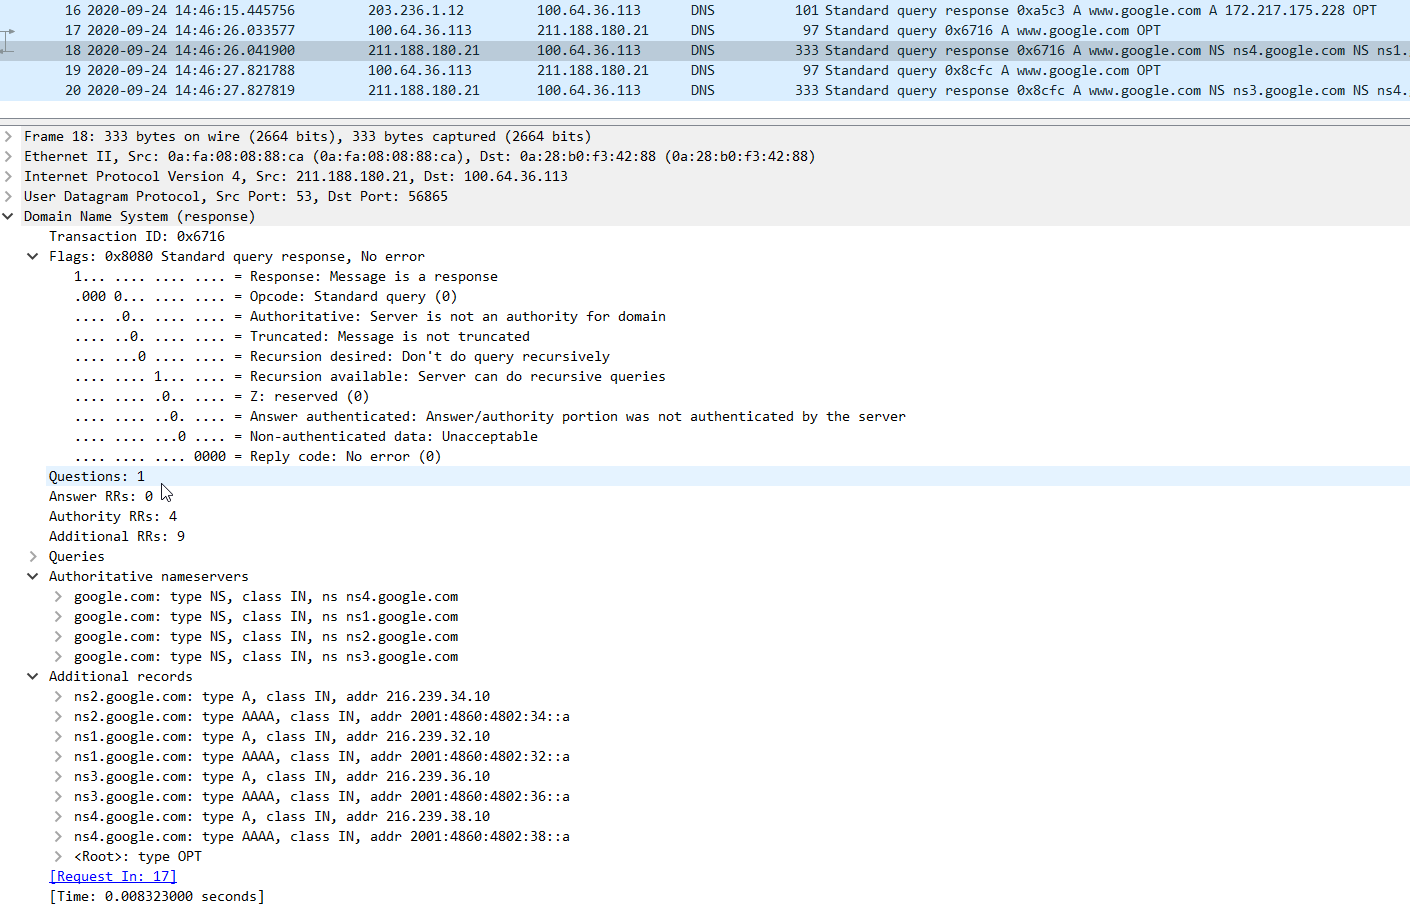
There is no Answer field. There are next DNS server information to query. This is the reason why I do not recommend this norecursion option. Sometime, I can see the server fail like below.

This is my result. It is OK to use "norecurse" option for checking the cached return. However, it can can show different result what I do not expect. 


1. See the response packet field : RA is set

2. See the TTL time count down.


This is the prove to cached.


Reference

[ 1 ] superuser.com/questions/523917/dns-queries-returning-no-answer-section

[ 2 ] superuser.com/questions/681680/dns-making-iterative-requests/681710

[ 3 ] www.slashroot.in/difference-between-iterative-and-recursive-dns-query

[ 4 ] www.ateamsystems.com/tech-blog/using-dig-to-find-domain-dns-ttl/

Sometimes, I need to use "dig trace" command. I have known that it trace the DNS hop by hop. In this post, I will see the Packet level with this command.


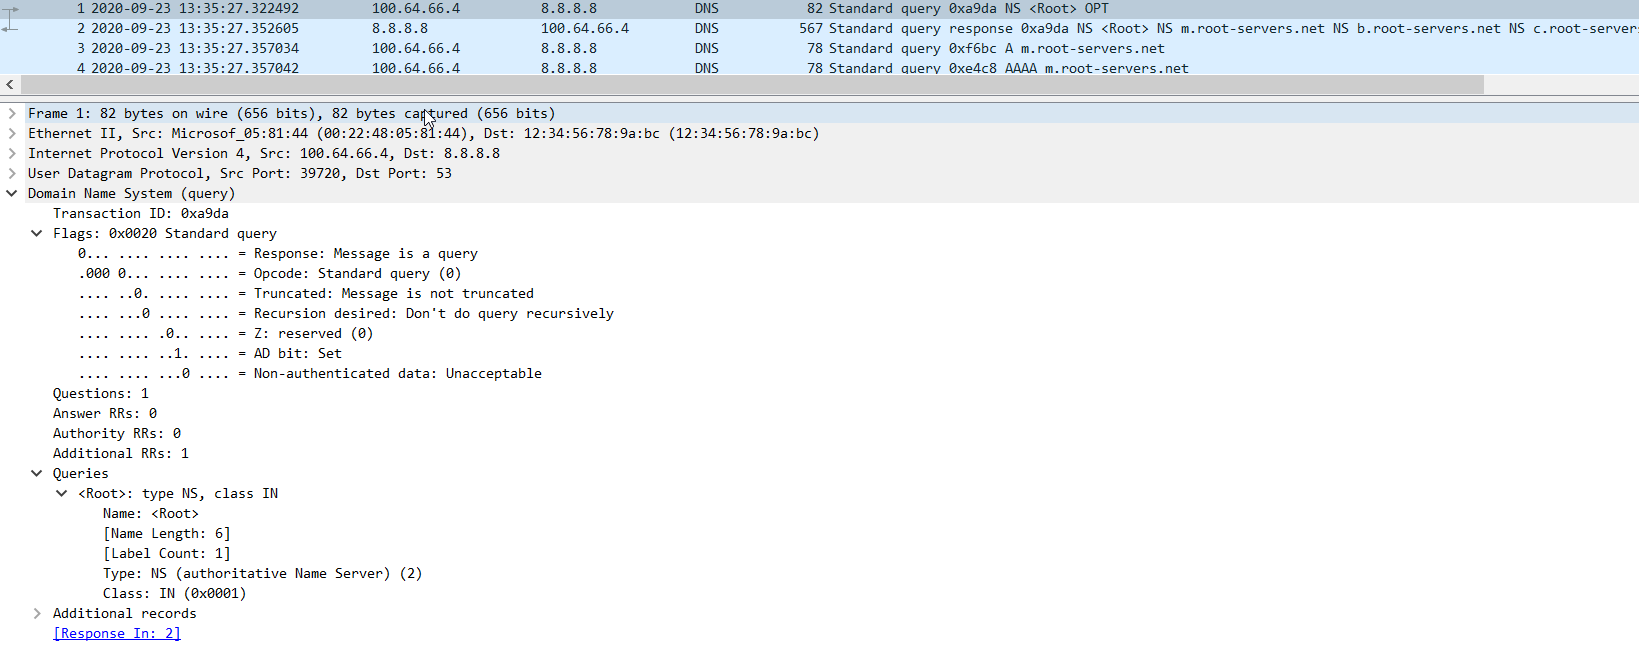
1. First Packet of dig trace.


The first packet is look like. 

There are 3 properties. 


1. "Recursion Desired" is not set (I have alread posted about recursion and iterative flags.)

2. The request is not for A record. it is NS.

3. This request is for "root" domain such "dot ."


By 2 property. the DNS response NS answer. After then, the client start to send A and AAAA request to the same DNS.

In this case, Client send A and AAAA for m.root-servers.net. The DNS does not response. After 5 second, it will retry.

In the result, I can see "couldn't get address for m.root-server.net" (Anyway this is not normal case)

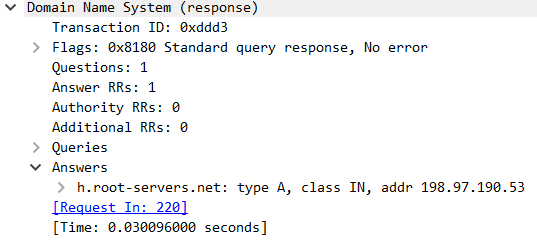
The below is normal case. It request A and AAAA requests to all of targets which the response of the first NS request.

There is the things important to see. In wireshark, I estimate the time from request and response. 

The client choose the fastest one. In this sample, it will be "198.97.190.53". 


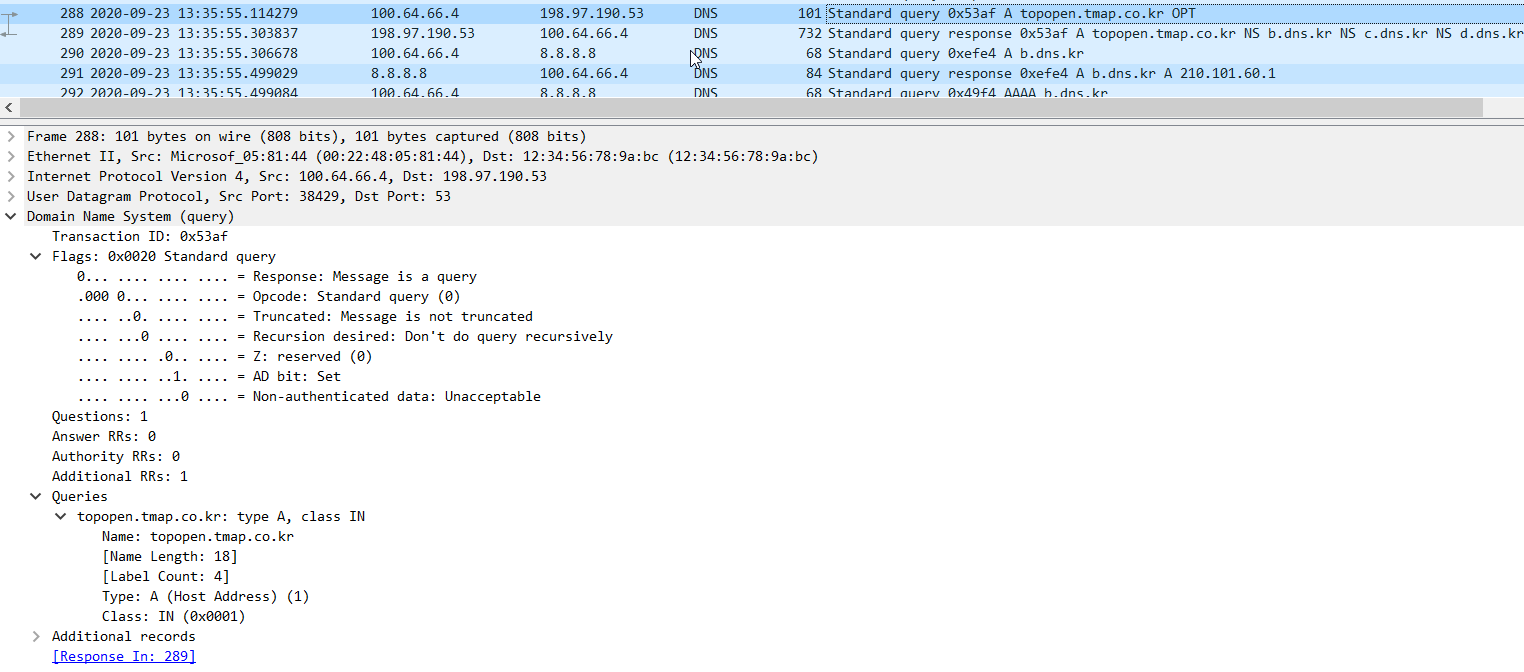
2. Second Reqeust for target domain


I think this is first step for the domain what I lookup. I have known that "198.97.190.53" is the namesever for next step. Therefore, I send the A record request to this DNS server.

Please not that "This is A record request with no-recursion". The below is the response packet.

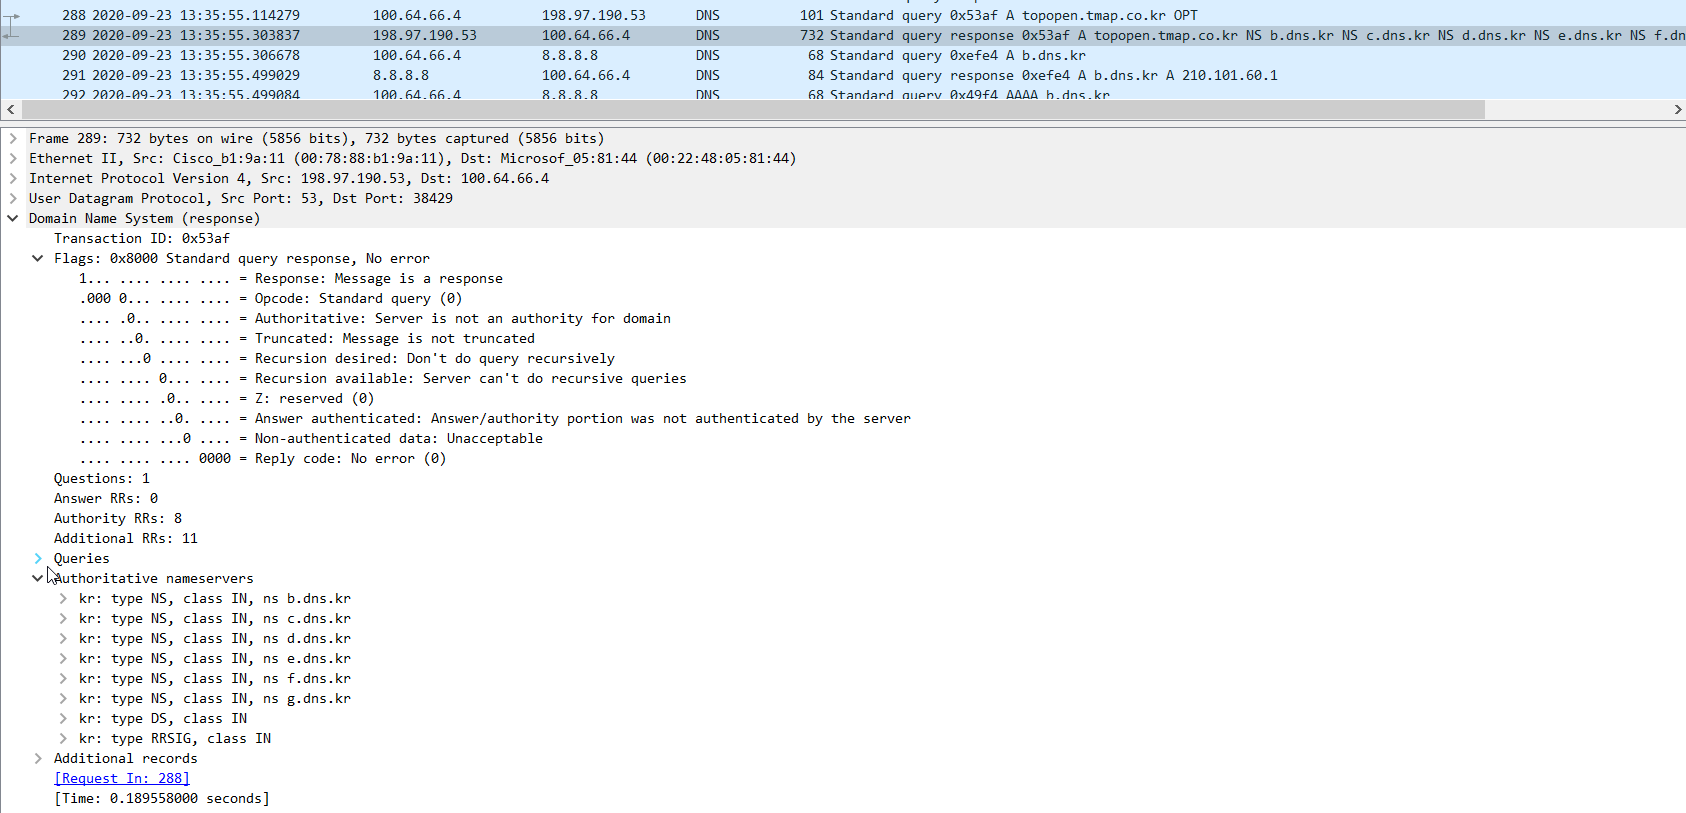
There is no answer field in this response. Also, this server does not recursion available and is not Authoritative.

The DNS response with "Authoritative nameserver" list to client. The client must request other DNS server to find out.

Client send the nameserver (8.8.8.8) to find out A record for this nameserver list received. This is almost same with first one.

During these step, the client also choose the fastest one. At this time, it is "210.101.60.1"

With this value, the client try again.

However, there is no answer filed at this time. There are "authoritative nameservers list" again. Client will repeate above step.


3. Finally Request for A record.


The client send the A record request without recursion to 211.188.180.21 name server. It response like below.

At this time, there is "answer filed". Becuse of this, dig trace will be stoped. However, this is not A record. It is CNAME record with "authoritative nameservers" for this CNAME.

(Please note that "Authoritative is set" even if the A record is not responsed.) This measn that CNAME is valuable like A record.

Client must repeat this CNAME domain request again. It is the same above step.


[ Reference ]


[ 1 ] createnetech.tistory.com/60


In the past, I posted "how to configure bind9". During writing, I did not understand fully the concept of the recursion, even if there are simple explain like others.

I will see the some packet in this post. It is much easier.


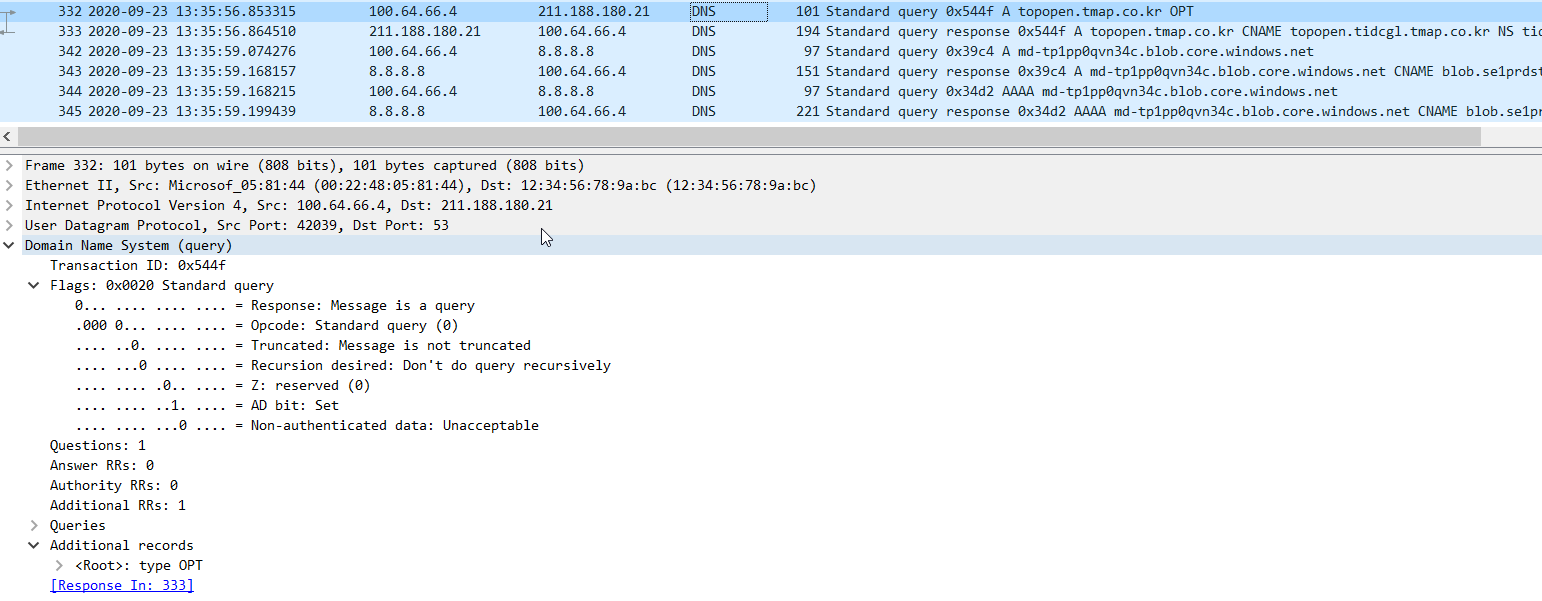
1. General DNS Standard Query (Default Reqeust)


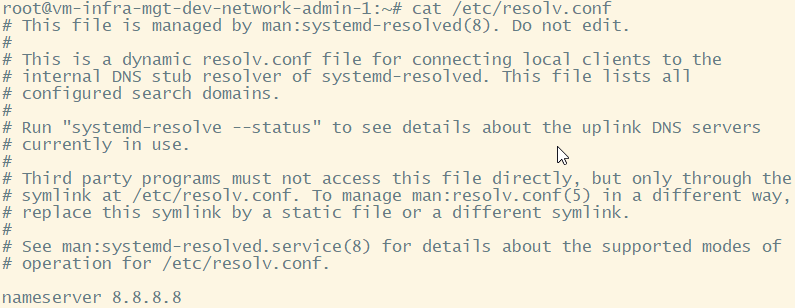
Normally, the servers are set the "/etc/resolv.conf" file to customize DNS server. In my case, I set "8.8.8.8" as the resolver.

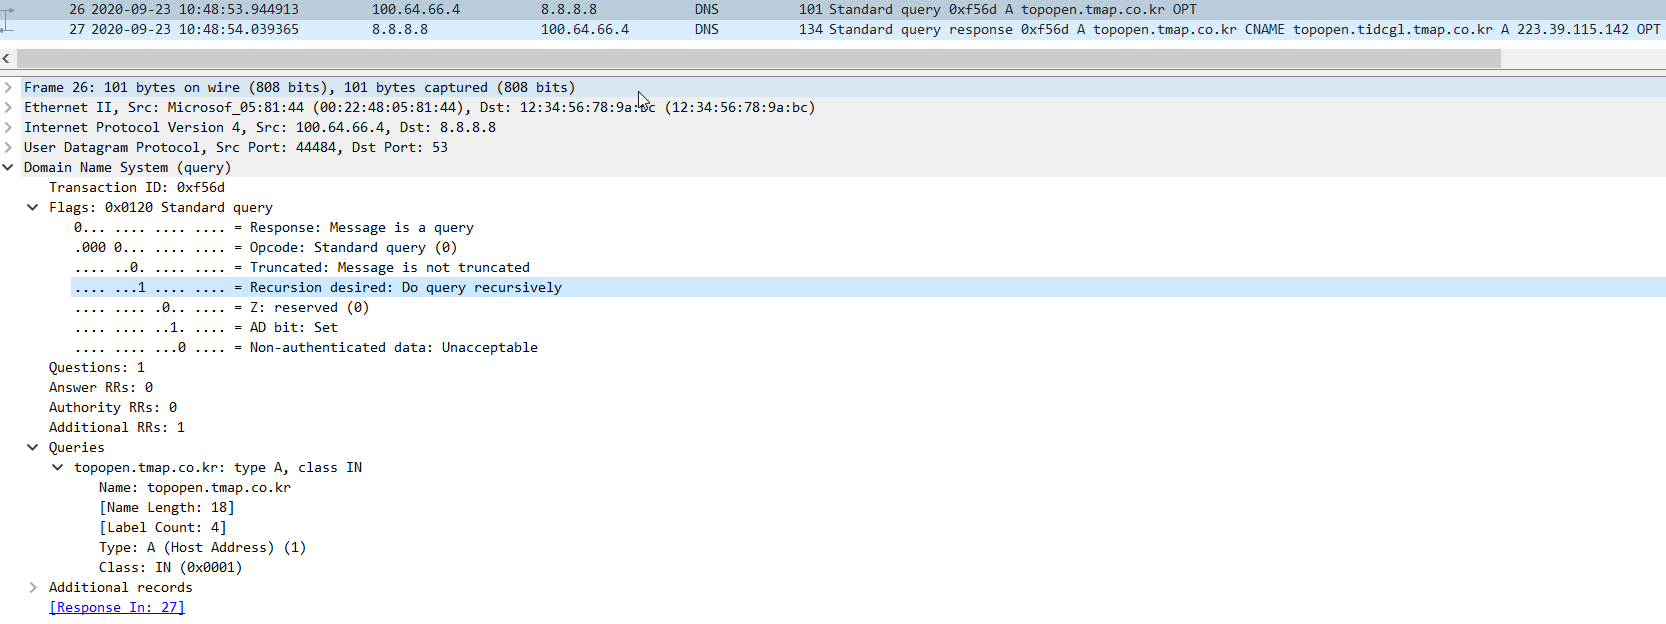
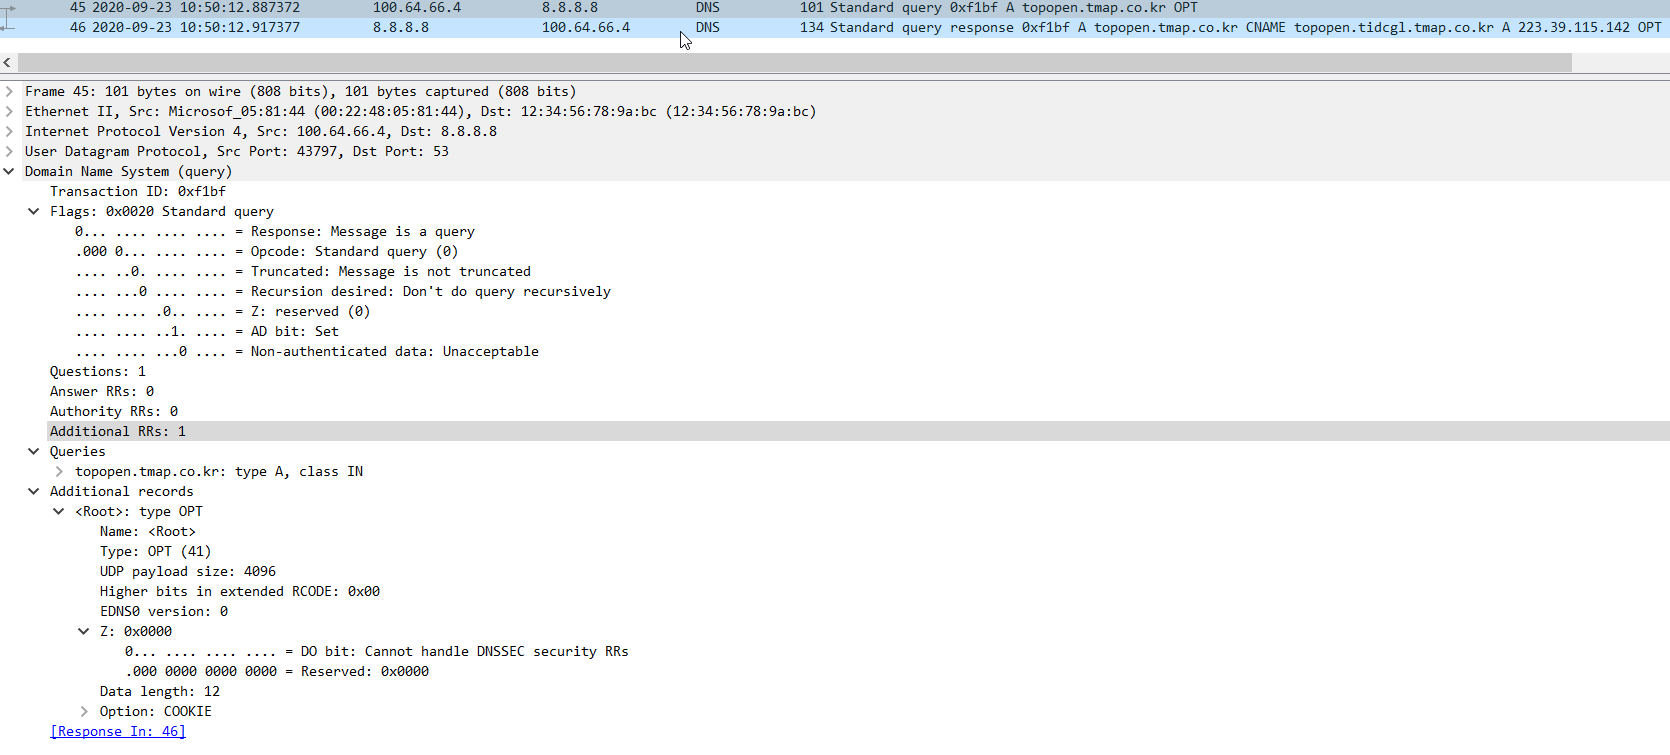
It is everything which I can do simply. And then I use without any recognization. This is the Request Packet

In DNS packet, there is flags field. "Recursion Desired is set". This is what I want to find. Because of this, the DNS server (the request packeted is received) will try to recurse. 

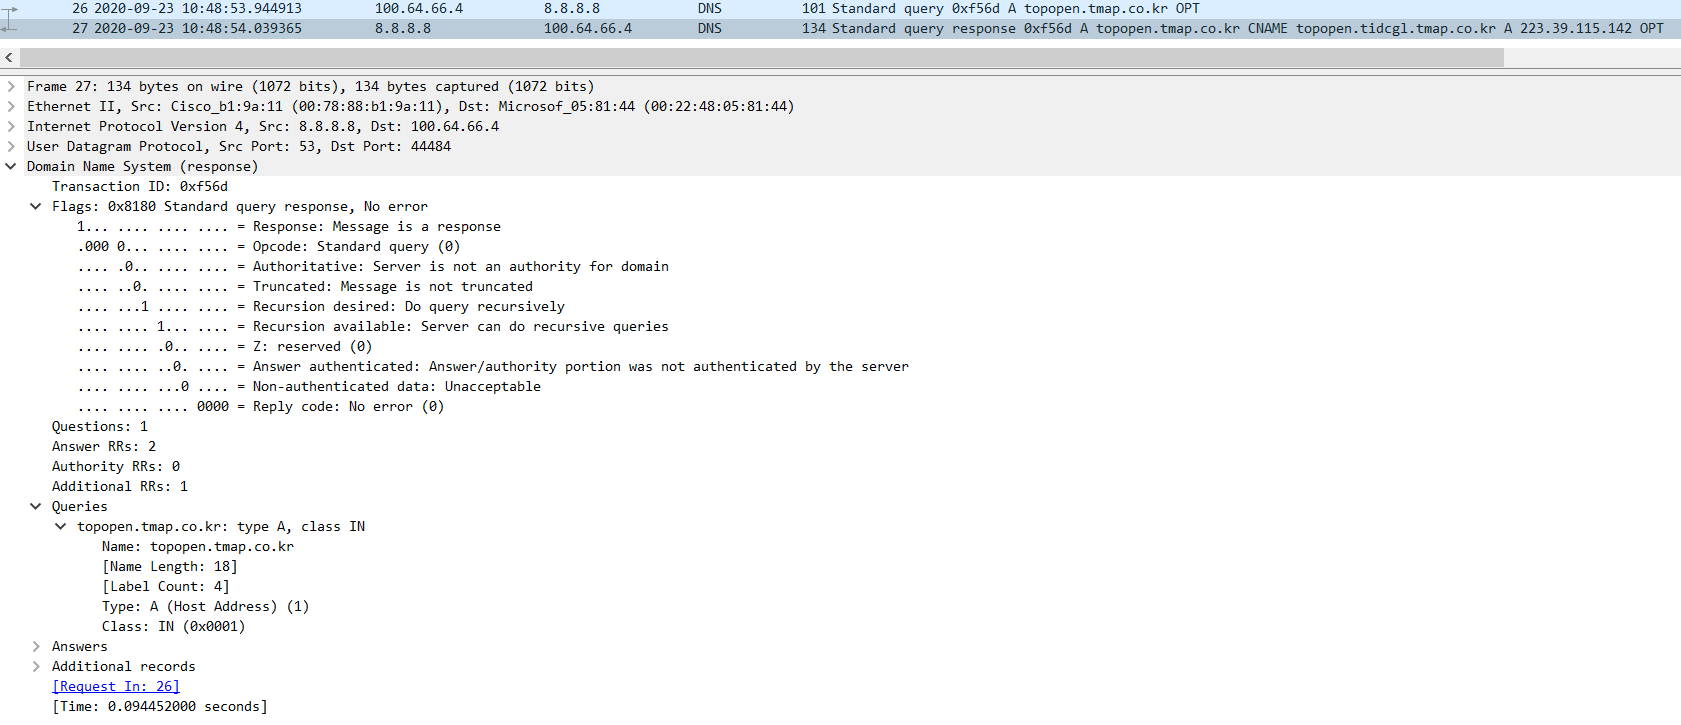
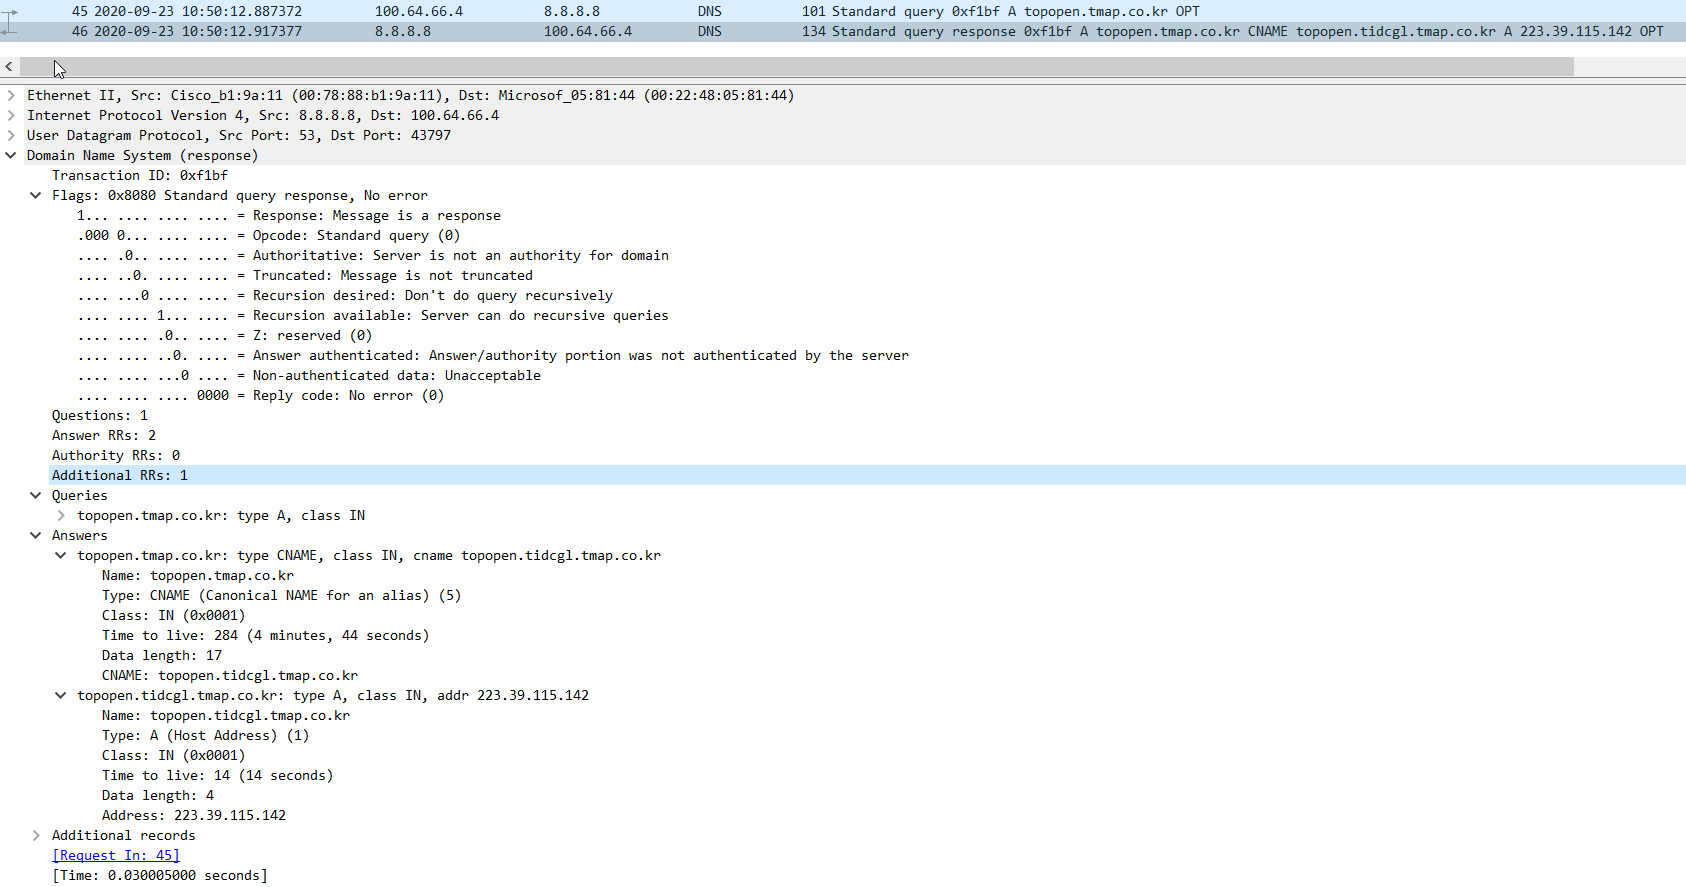
In the received packet, there are lot of informations. I can estimate DNS properites such as "Authoritative" and "Recursion option".

This is the Default Reqeust Packet. Therefore, the DNS will do recursion and caching.


2. No Recursion DNS Reqeust (Iterative Request)


At this time, I want to send "no recursion DNS request". I mean iterative request. The simple way is to use "dig" command with "norecursion". Please look the manual page.

I will try "dig +norecurse" like below.

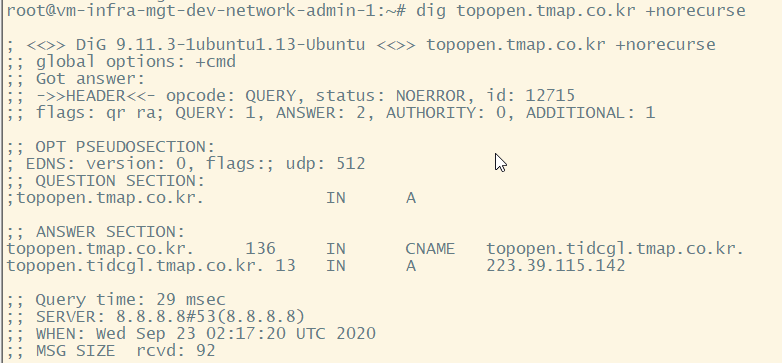
That is so strange. There is no answer for A record. "This imply that there is no cached A record for this domain", Becuase this DNS server does not do recursion. If the DNS has the cached A record. It looks like below.

In this case, the DNS has the cached A record. It returned the response. Look at the packet.

With "norecursion", "Recursion desired flag" is not set. This is the important factor to understand. 

In the response, the flags values are same as the above. Please look at the Answer. This means that "DNS server (8.8.8.8) give me 2 types of answers, first is CNAME and second is A record for the CNAME". This A record is cached value. Because This DNS server can recursion by the flag.


Reference 

[ 1 ] help.fasthosts.co.uk/app/answers/detail/a_id/1276/~/what-is-recursive-dns-and-why-is-it-not-recommended%3F


Window size value : This is the value to receive from other side. (Window size is advertising the RCV buffer space available for the device, how much memory is allocated for the session)


The maximum field for TCP window size = 65535 or 0xFFFF because it is a 2 byte field.  There is a method to make it bigger by negotiating the window using the scaling option. 


I can see in the SYN packet option – Window Scale = 7.  This tells the server it wants to use this option and multiply the window size by 128. And Server agree in the SYN+ACK with the same option = 7.  This tells the client it also will be using the scaling option.

Window scale number 7 means that 2^7 = 128. This number is never changed until fininshing converstation.


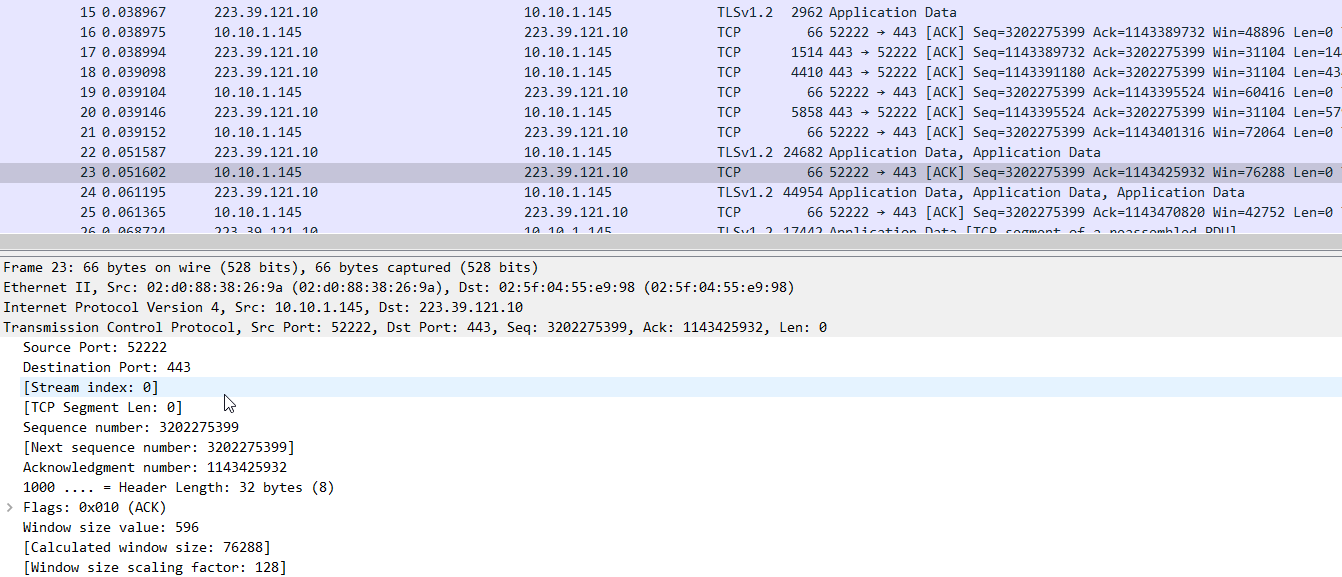
After this negotiation, I can look at packet 3 in the TCP section at the Window you will see it shows (211 x 128 = 27008) 

From Server, I can see the window scale option is enabled like below


And middle of the packets, I can see the widnow size more than 65535. 76288 is the sample to use scale option. 


This is normal case to show how the scale option is used.


[Without Window scaling option Case]


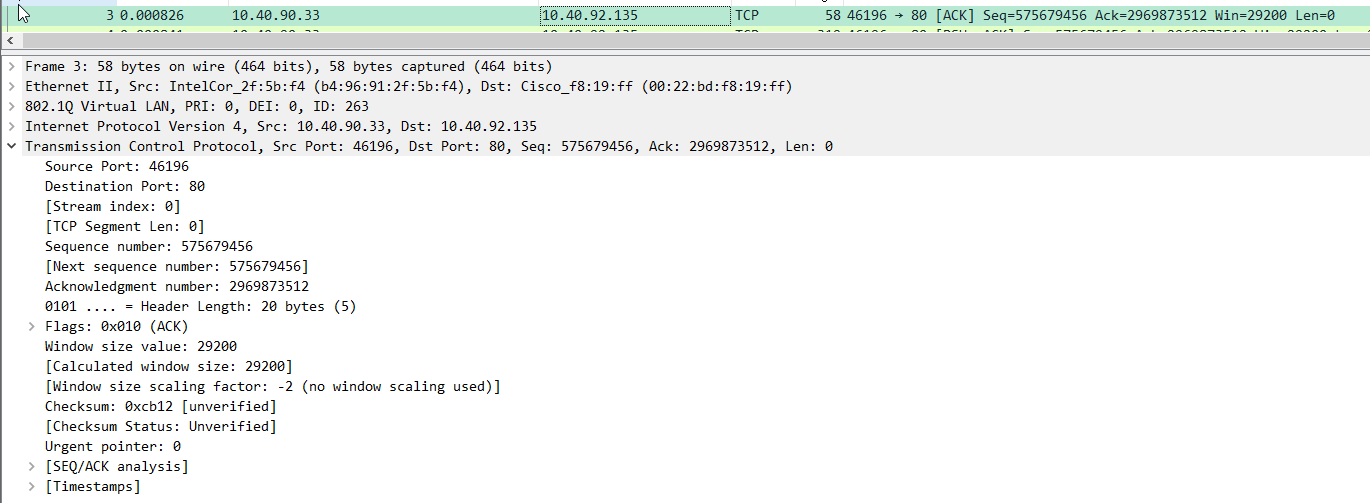
This is the sample case to show what the window scale dose not work. In the first syn packet, there is the option. However the syn-ack paket does not have this option like below.

This below is syn-ack packet. There is no window scale option.

So, the last ack packet decide to send packet without the window scale option.

In wireshark, -2 mean that there is no window scale option definition. Please note that -2 always means "no window scale option". If there is no packet syn, syn-ack and ack due to capturing middle of packets, the wireshark determind -2 even if the window size is more than 65535.


Sometimes, I need to see the packet with wireshark tool. I have to calculate sequence numbers. I have learned the IP packet size is 1540 (MSS is 1460). However, I can see the more size in the packet. This post is good for me.


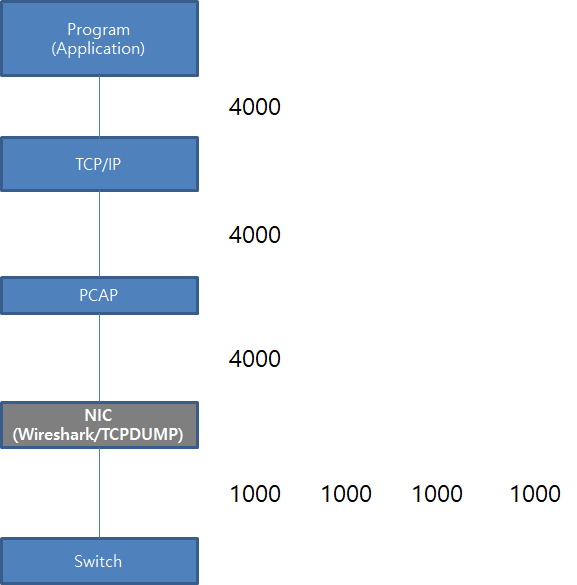
This is whole diagram to understand my situation. This is the reason why I need to capture the packet with switch port.


Please look at the first Syn packet. There is MSS is 8961. In blow, I wrote the MSS size is 1460. However, the wireshark show more than 8961. 


How to calculate sequence number of the TCP/IP packets?

How to calculate sequence number of the TCP/IP packets? I am the network engineer. Recently, I have some change to remember the sequence number of the TCP/IP packets. Someone include me think that t..

createnetech.tistory.com

Thus, this is not perfect number. 


[ Reference ]

[ 1 ] https://packetbomb.com/how-can-the-packet-size-be-greater-than-the-mtu/

[ 2 ] https://createnetech.tistory.com/25?category=672583


1. Simple OSPF Parameters to Use

Before configuring the OSPF, I will handle some concept necessary to configure. For interface configuration, there is some term of network type. In this blog, those are compared simply.

In the above, DR/BDR terms are shown. If you did not study about the OSPF, it is not easy. DR has the role to share the OSPF information between the routers and switches. In this blog, it show simple diagram to explain about these.

DR make simple to share routing table information. Because of this, it is useful in Broadcast network. Howerver, I confuse about the Point to Multipoint concept. It looks like Broadcast. I refers this blog. It is different I need to annount the neighbor IP address with "Neighbor" or "Frame-relay" options.


2. Unnumbered Interfaces | net.ipv4.conf.<interface name>.rp_filter value=0

In fact, I did not realize this concept. I met the error message "Please remove network command first" during configure OSPF with FRR. In this post, there are some explain about this.

Unnumberd Interface improve the performance. I need to edit "net.ipv4.conf.<interface name>.rp_filter value=0" in the "/etc/sysctl.conf"

Because of this "unnumbered interface existance", FRRouting give some limitation. After network definition in router ospf part, I can not activate the interface for OSPF.


Reference

[ 1 ] https://docs.cumulusnetworks.com/cumulus-linux-37/Layer-3/Open-Shortest-Path-First-OSPF/

[ 2 ] https://www.freeccnaworkbook.com/workbooks/ccna/configuring-ospf-network-types

[ 3 ] https://www.fir3net.com/Networking/Protocols/ospf-the-dr-and-bdr-roles.html

[ 4 ] https://packetlife.net/blog/2008/jun/19/ospf-network-types/

[ 5 ] http://www.getnetworking.net/tutorials/ospf-point-to-multipoint-over-frame-relay

[ 11 ] https://www.cisco.com/c/en/us/td/docs/ios-xml/ios/iproute_ospf/configuration/xe-16/iro-xe-16-book/iro-cfg.html

Recently, I have some chance to study about the FRRouting. At that time, I do not have any Linux server. Thus, I decide that I use AWS Spot instance. After installation, I set up the OSPFv2 environment with simple configuration. However I can not estabilish the OSPF neighbor. 


1. Simple OSPFv2 Configuration of FRRouting

I have 2 hosts which is direct connected each other. In fact, these hosts are located in the same subnet of the VPC.

Host #1 Host #2
ip-10-11-0-200# show running-config 
Building configuration...

Current configuration:
!
frr version 7.3
frr defaults traditional
hostname ip-10-11-0-200
log syslog informational
no ipv6 forwarding
service integrated-vtysh-config
!
interface ens5
 ip address 10.11.0.200/24
 ip ospf hello-interval 1
!
interface lo
 ip address 1.1.1.1/32
!
router ospf
 ospf router-id 1.1.1.1
 network 10.11.0.0/24 area 0.0.0.0
!
line vty
!
end
ip-10-11-0-229# show running-config 
Building configuration...

Current configuration:
!
frr version 7.3
frr defaults traditional
hostname ip-10-11-0-229
log syslog informational
no ipv6 forwarding
service integrated-vtysh-config
!
interface ens5
 ip address 10.11.0.229/24
 ip ospf hello-interval 1
!
interface lo
 ip address 1.1.1.2/32
!
router ospf
 ospf router-id 1.1.1.2
 network 10.11.0.0/24 area 0.0.0.0
!
line vty
!
end

In FRRouting, I need one of configurations, "network <ip address> area <area-id>" and "ip ospf area <area-id>". In my case, I used "network <ip address> area <area-id>".


2. Multicast for OSPFv2

Have you ever heard about the multicast packet for OSPFv2? It is necessary factor to establish the connection.

[ Correct Multicast Relationship]
15:35:33.303082 IP 10.11.0.200 > 224.0.0.5: OSPFv2, Hello, length 44
15:35:34.275218 IP 10.11.0.229 > 224.0.0.5: OSPFv2, Hello, length 48

On the same broadcast domain, I can see the both packets from the sender. However, I can not see all of things over AWS VPC network. It look like below

15:40:05.381662 IP 10.11.0.200 > 224.0.0.5: OSPFv2, Hello, length 44
15:40:06.381928 IP 10.11.0.200 > 224.0.0.5: OSPFv2, Hello, length 44

AWS does not support multicast default.


2. Enable the multicast feature for AWS VPC

Recently, AWS improve their feature of VPC with transit gateway. In this instruction, AWS show how to enable the multicast, even if there is limitation.

It is only 1 multicast source is possible. Because of this, I can not make success to establish OSPFv2 default. I need to request increase the quota. 


2-1. Create transit gateway with Multicast

The below is the result of creation. There is "Multicast support" option. (Please note that this feature is not opened on all of the regions, In my case, I use Virginia region.)

2-2. Attach the VPC to Transit Gateway.

I need to attach the transit gateway with mulitcast domain to the VPC.

2-3. Associate the subnet in VPC to the transit Gateway.

I have to assign the subnet which make multicast work to multicast domain. This multicast domain is created by transit gateway.

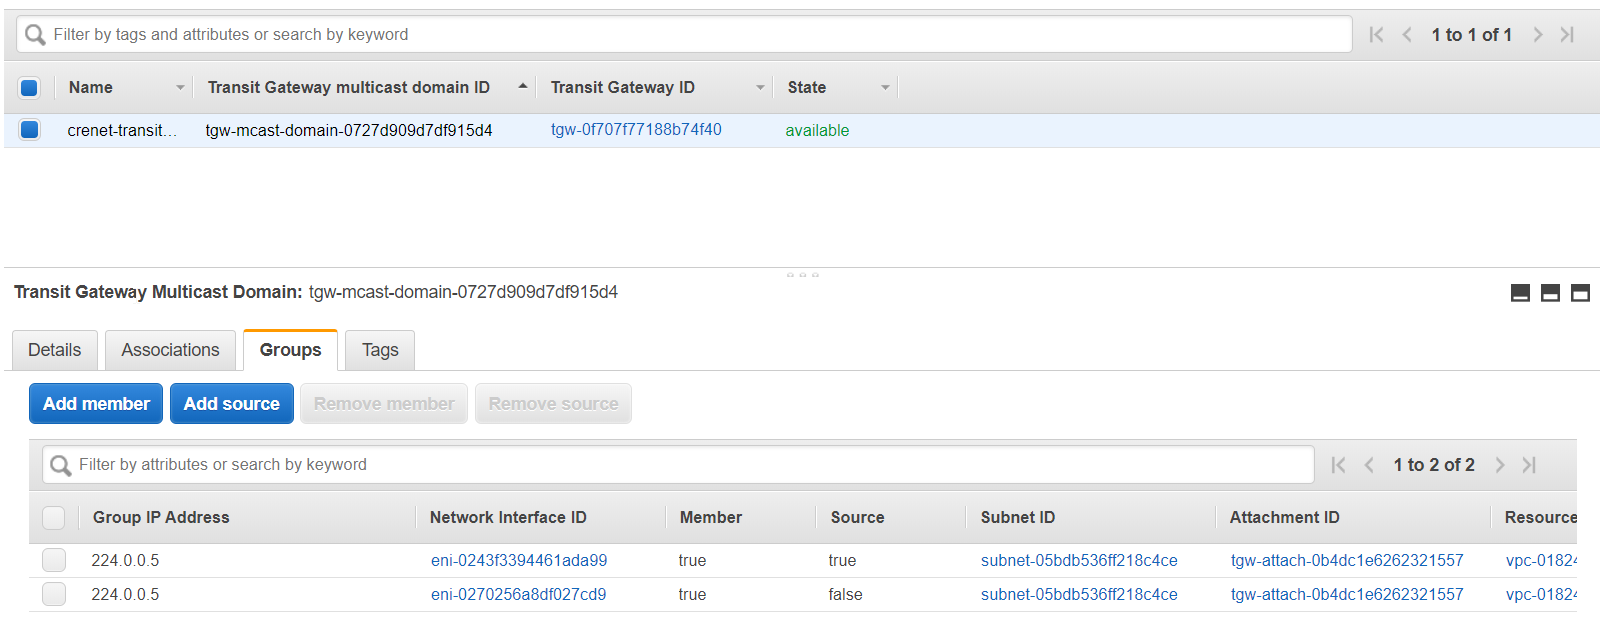
2-4. Register the source and member for multicast.

The definition of the source and memeber is below. 

For the OSPFv2, each host should be source and member. Thus I need 2 source and 2 member. However, I can not make 2 source at this time by limitation of AWS

"224.0.0.5" is the Multicast Group Address for OSPFv2. 


3. The result after enabling Multicast

Even if the multicast does not activate fully. I can verify the multicast effect. Host #1 is source and member. Host #2 is only member. Thus Host #2 can not transfer the mulitcast over VPC network. 


[Host #1 Packets]
16:03:01.614874 IP 10.11.0.200 > 224.0.0.5: OSPFv2, Hello, length 44
16:03:02.615055 IP 10.11.0.200 > 224.0.0.5: OSPFv2, Hello, length 44
16:03:03.615173 IP 10.11.0.200 > 224.0.0.5: OSPFv2, Hello, length 44
16:03:04.615295 IP 10.11.0.200 > 224.0.0.5: OSPFv2, Hello, length 44
16:03:05.615409 IP 10.11.0.200 > 224.0.0.5: OSPFv2, Hello, length 44
16:03:06.615963 IP 10.11.0.200 > 224.0.0.5: OSPFv2, Hello, length 44
16:03:07.615972 IP 10.11.0.200 > 224.0.0.5: OSPFv2, Hello, length 44

root@ip-10-11-0-200:~# vtysh 

Hello, this is FRRouting (version 7.3).
Copyright 1996-2005 Kunihiro Ishiguro, et al.

ip-10-11-0-200# show ip ospf neighbor 

Neighbor ID     Pri State           Dead Time Address         Interface                        RXmtL RqstL DBsmL
[Host #2 Packets]
15:59:34.565227 IP 10.11.0.200 > 224.0.0.5: OSPFv2, Hello, length 44
15:59:34.566696 IP 10.11.0.229 > 224.0.0.5: OSPFv2, Hello, length 48
15:59:35.565246 IP 10.11.0.200 > 224.0.0.5: OSPFv2, Hello, length 44
15:59:35.566705 IP 10.11.0.229 > 224.0.0.5: OSPFv2, Hello, length 48
15:59:36.565372 IP 10.11.0.200 > 224.0.0.5: OSPFv2, Hello, length 44
15:59:36.566724 IP 10.11.0.229 > 224.0.0.5: OSPFv2, Hello, length 48
15:59:37.565376 IP 10.11.0.200 > 224.0.0.5: OSPFv2, Hello, length 44

root@ip-10-11-0-229:~# vtysh 

Hello, this is FRRouting (version 7.3).
Copyright 1996-2005 Kunihiro Ishiguro, et al.

ip-10-11-0-229# show ip ospf neighbor 

Neighbor ID     Pri State           Dead Time Address         Interface                        RXmtL RqstL DBsmL
1.1.1.1           1 Init/DROther      39.950s 10.11.0.200     ens5:10.11.0.229                     0     0     0

This is the what I learned from the Test.

Reference

[ 1 ] https://docs.aws.amazon.com/vpc/latest/tgw/working-with-multicast.html

[ 2 ] https://docs.aws.amazon.com/vpc/latest/tgw/transit-gateway-quotas.html

[ 3 ] https://docs.aws.amazon.com/vpc/latest/tgw/tgw-multicast-overview.html

A few years ago, I have read about Quagga. It is software router which can install on the Linux such as Ubuntu. I have heard about this FRRouting which is next generation of the Quagga. In this post, I will configure some feature from FRRouting.


1. Installation

I will use Ubuntu 18.04. In this instruction, there are steps to install for Debian Linux. 

By the instruction, It will be work. 

After installation, I can check the the directory created in "/etc/frr/" like below.


2. Crash Log File.

This is the directory, "/var/tmp/frr/<daemon>[-<instance>].<pid>/crashlog" which I have refer.


3. Daemon Configuration.

After I start the FRR with "/etc/init.d/frr start" command, I can check the listen Port. I can see "staticd" and "zebra" daemon are loaded. This is the basic daemon.

When I want to more routing protocol, there are 2 things necessary, configuration file such as bgpd.conf and activate the protocol. 

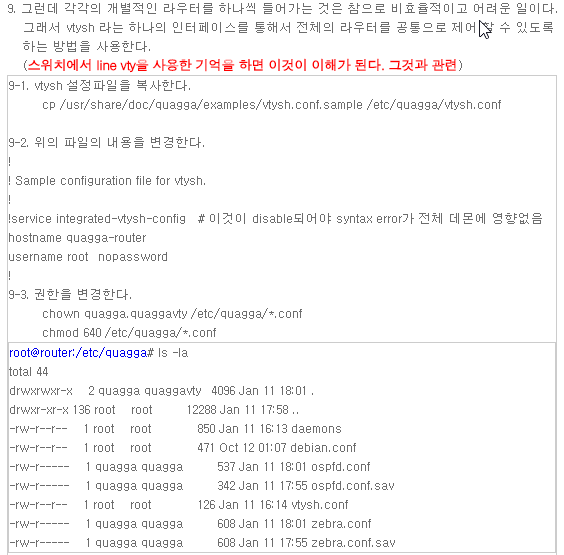
The configuration sample files are located under the "/usr/share/doc/frr/examples/zebra.conf.sample". (Please not that those file has ownership by "frr". Thus I need to update with "chown frr.frr zebra.conf".)

When I handle the Quagga at first time, There are something difficult to use it. It is "Intergrated-vtysh-config". I need each configuration file to load each routing protocol. This means that I have to edit each file.

I think that FRR improve this part rather than before. Please read this. there are "frr.conf" file.

If this file "frr.conf" is existed, each configuration file will not be loaded. I have to remove "frr.conf" to load each file.

4. How to save configurartion file on VTY Shell mode.

In FRR, VTY Shell (Intergrated mode) is useful. However, there are something import. Basically, the routing protocol works on each daemon with each configuration file. It is not simple to load from common configuration file "frr.conf" to each daemon. This relationship make some consideration about the save file.

I configure "service intergrated-vtysh-config" in frr.conf and try to save with "write intergrated" insted "write file"

4. Enable BGP Feature of FRRouting

In "/etc/frr/daemon" filel there is the step to define the protocol what I want. In my case, I will active BGP Protocol It looks like below.

root@ip-10-10-0-134:~# cat /etc/frr/daemons   
bgpd=yes
ospfd=no
ospf6d=no 

At this time, I only activate BGP Protocol.


5. Configure Internal BGP with Route Reflector.

In this post, I handle similar environment with bird opensource. I think it will be good comparison. This .


Host #1 (Top) Host #2 (Left side of Bottom) Host #3 (Right side of Bottom)
ip-10-10-0-64# show running-config 
Building configuration...

Current configuration:
!
frr version 7.3
frr defaults traditional
hostname ip-10-10-0-64
log syslog informational
no ipv6 forwarding
service integrated-vtysh-config
!
router bgp 65001
 bgp router-id 10.10.0.64
 neighbor 10.10.0.107 remote-as 65001
 neighbor 10.10.0.134 remote-as 65001
 !
 address-family ipv4 unicast
  neighbor 10.10.0.107 route-reflector-client
  neighbor 10.10.0.134 route-reflector-client
 exit-address-family
!
line vty
!
end
ip-10-10-0-107# show running-config 
Building configuration...

Current configuration:
!
frr version 7.3
frr defaults traditional
hostname ip-10-10-0-107
log syslog informational
no ipv6 forwarding
service integrated-vtysh-config
!
interface lo
 ip address 1.1.1.1/32
 ip address 1.1.1.2/32
!
router bgp 65001
 bgp router-id 10.10.0.107
 neighbor 10.10.0.64 remote-as 65001
 !
 address-family ipv4 unicast
  redistribute connected
 exit-address-family
!
line vty
!
end
ip-10-10-0-134# show running-config 
Building configuration...

Current configuration:
!
frr version 7.3
frr defaults traditional
hostname ip-10-10-0-134
log syslog informational
no ipv6 forwarding
service integrated-vtysh-config
!
interface lo
 ip address 2.2.2.1/32
 ip address 2.2.2.2/32
!
router bgp 65001
 bgp router-id 10.10.0.134
 neighbor 10.10.0.64 remote-as 65001
 !
 address-family ipv4 unicast
  redistribute connected
 exit-address-family
!
line vty
!
end


6. Result

After configuration, I can verify the result. It works well like below.

Host #1 (Top)
ip-10-10-0-64# show ip bgp summary 

IPv4 Unicast Summary:
BGP router identifier 10.10.0.64, local AS number 65001 vrf-id 0
BGP table version 6
RIB entries 9, using 1656 bytes of memory
Peers 2, using 41 KiB of memory

Neighbor        V         AS MsgRcvd MsgSent   TblVer  InQ OutQ  Up/Down State/PfxRcd
10.10.0.107     4      65001      10      12        0    0    0 00:04:38            3
10.10.0.134     4      65001       6       7        0    0    0 00:01:01            3

Host #2 (Left side of Bottom)
ip-10-10-0-107# show ip bgp summary 

IPv4 Unicast Summary:
BGP router identifier 10.10.0.107, local AS number 65001 vrf-id 0
BGP table version 5
RIB entries 9, using 1656 bytes of memory
Peers 1, using 20 KiB of memory

Neighbor        V         AS MsgRcvd MsgSent   TblVer  InQ OutQ  Up/Down State/PfxRcd
10.10.0.64      4      65001      12      10        0    0    0 00:04:34            2

Host #3 (Right side of Bottom)
ip-10-10-0-134# show ip bgp summary 

IPv4 Unicast Summary:
BGP router identifier 10.10.0.134, local AS number 65001 vrf-id 0
BGP table version 6
RIB entries 9, using 1656 bytes of memory
Peers 1, using 20 KiB of memory

Neighbor        V         AS MsgRcvd MsgSent   TblVer  InQ OutQ  Up/Down State/PfxRcd
10.10.0.64      4      65001       6       5        0    0    0 00:00:53            3

Host #2 and Host #3 are not connected directly. However, there can understand each other.

Host #2 (Left side of Bottom)
ip-10-10-0-107# show ip route
Codes: K - kernel route, C - connected, S - static, R - RIP,
       O - OSPF, I - IS-IS, B - BGP, E - EIGRP, N - NHRP,
       T - Table, v - VNC, V - VNC-Direct, A - Babel, D - SHARP,
       F - PBR, f - OpenFabric,
       > - selected route, * - FIB route, q - queued route, r - rejected route

K>* 0.0.0.0/0 [0/100] via 10.10.0.1, ens5, src 10.10.0.107, 00:16:04
C>* 1.1.1.1/32 is directly connected, lo, 00:07:08
C>* 1.1.1.2/32 is directly connected, lo, 00:07:04
B>* 2.2.2.1/32 [200/0] via 10.10.0.134, ens5, 00:04:47
B>* 2.2.2.2/32 [200/0] via 10.10.0.134, ens5, 00:04:47
C>* 10.10.0.0/24 is directly connected, ens5, 00:16:04
K>* 10.10.0.1/32 [0/100] is directly connected, ens5, 00:16:04

Host #3 (Right side of Bottom)
ip-10-10-0-134# show ip route
Codes: K - kernel route, C - connected, S - static, R - RIP,
       O - OSPF, I - IS-IS, B - BGP, E - EIGRP, N - NHRP,
       T - Table, v - VNC, V - VNC-Direct, A - Babel, D - SHARP,
       F - PBR, f - OpenFabric,
       > - selected route, * - FIB route, q - queued route, r - rejected route

K>* 0.0.0.0/0 [0/100] via 10.10.0.1, ens5, src 10.10.0.134, 00:15:39
B>* 1.1.1.1/32 [200/0] via 10.10.0.107, ens5, 00:04:32
B>* 1.1.1.2/32 [200/0] via 10.10.0.107, ens5, 00:04:32
C>* 2.2.2.1/32 is directly connected, lo, 00:05:16
C>* 2.2.2.2/32 is directly connected, lo, 00:05:13
C>* 10.10.0.0/24 is directly connected, ens5, 00:15:39
K>* 10.10.0.1/32 [0/100] is directly connected, ens5, 00:15:39


Reference 

[ 1 ] http://docs.frrouting.org/en/latest/ 

[ 2 ] https://deb.frrouting.org/

[ 3 ] https://blog.naver.com/happy_jhyo/70155768908

[ 4 ] http://docs.frrouting.org/en/latest/vtysh.html

[ 5 ] https://github.com/FRRouting/frr/issues/966

[ 6 ] https://createnetech.tistory.com/55

[ 7 ] https://createnetech.tistory.com/53?category=672584


In this post, I handled the External BGP routing. In this part, I will address Internal BGP routing which is working on the same AS number. This is the my environment

Top of the hosts will be the router as reflector. And the others are reflector-client. For this senario, I will set up the internal BGP routing between "router-reflector and router-reflector-client"


1. Configure Internal BGP routing.

Host #1 (Top)

Host #2 (Left bottom)

Host #3 (Right bottom)

protocol direct {

#        interface "*";

        interface "ens5";

}

protocol bgp tohost1{

        import all;

        export all;

        local as 65001;

        neighbor 10.10.0.159 as 65001;

}

protocol bgp tohost2{

        import all;

        export all;

        local as 65001;

        neighbor 10.10.0.205 as 65001;

}

protocol direct {

#        interface "*";

        interface "ens5";

}

protocol static static_bgp {

        route 1.1.1.1:255.255.255.255 via 10.10.0.159;

        route 1.1.1.2:255.255.255.255 via 10.10.0.159;

}

protocol bgp {

        import all;

        export where proto = "static_bgp";

        local as 65001;

        neighbor 10.10.0.49 as 65001;

}

protocol direct {

#        interface "*";

        interface "ens5";

}


protocol static static_bgp {

        route 2.2.2.1:255.255.255.255 via 10.10.0.205;

        route 2.2.2.2:255.255.255.255 via 10.10.0.205;

}

protocol bgp {

        import all;

        export where proto = "static_bgp";

        local as 65001;

        neighbor 10.10.0.49 as 65001;

}

In these configuration, there is something important. "Protocol direct" option is necessary value for this internal BGP routing protocol. Without this option, I can see the result like below. "Unreachable" is shown.

bird> show route

1.1.1.1/32         unreachable [bgp1 13:45:49 from 10.10.0.159] * (100/-) [i]

1.1.1.2/32         unreachable [bgp1 13:45:49 from 10.10.0.159] * (100/-) [i]

With this option, I can see the correct routing table with "birdc" command

bird> show route

1.1.1.1/32         via 10.10.0.159 on ens5 [tohost1 15:10:46] * (100/0) [i]

2.2.2.2/32         via 10.10.0.205 on ens5 [tohost2 15:10:47] * (100/0) [i]

1.1.1.2/32         via 10.10.0.159 on ens5 [tohost1 15:10:46] * (100/0) [i]

2.2.2.1/32         via 10.10.0.205 on ens5 [tohost2 15:10:47] * (100/0) [i]

10.10.0.0/24       dev ens5 [direct1 15:10:42] * (240)

bird> 


2. Configure Router Reflector 


Now I will edit the TOP host to work as the router. It is simple. I insert the "rr client" option into the BGP configuration like below.

protocol direct {
#        interface "*";
        interface "ens5";
}

protocol bgp tohost1{
        import all;
        export all;
        rr client;
        local as 65001;
        neighbor 10.10.0.159 as 65001;
}

protocol bgp tohost2{
        import all;
        export all;
        rr client;
        local as 65001;
        neighbor 10.10.0.205 as 65001;
}

After then, I can see the routing table on Host #1 and Host #2

Host #1

Host #2

root@ip-10-10-0-159:~# birdc

BIRD 1.6.8 ready.

bird> show route

1.1.1.1/32         via 10.10.0.159 on ens5 [static_bgp 15:17:59] ! (200)

2.2.2.2/32         via 10.10.0.205 on ens5 [bgp1 15:18:03 from 10.10.0.49] * (100/0) [i]

1.1.1.2/32         via 10.10.0.159 on ens5 [static_bgp 15:17:59] ! (200)

2.2.2.1/32         via 10.10.0.205 on ens5 [bgp1 15:18:03 from 10.10.0.49] * (100/0) [i]

10.10.0.0/24       dev ens5 [direct1 15:17:59] * (240)

                   via 10.10.0.49 on ens5 [bgp1 15:18:03] (100/0) [i]

root@ip-10-10-0-205:~# birdc

BIRD 1.6.8 ready.

bird> show route

2.2.2.2/32         via 10.10.0.205 on ens5 [static_bgp 15:23:13] * (200)

1.1.1.1/32         via 10.10.0.159 on ens5 [bgp1 15:23:17 from 10.10.0.49] * (100/0) [i]

2.2.2.1/32         via 10.10.0.205 on ens5 [static_bgp 15:23:13] * (200)

1.1.1.2/32         via 10.10.0.159 on ens5 [bgp1 15:23:17 from 10.10.0.49] * (100/0) [i]

10.10.0.0/24       dev ens5 [direct1 15:23:13] * (240)

                   via 10.10.0.49 on ens5 [bgp1 15:23:17] (100/0) [i]

Now I can send ICMP each other.

Host #1 Host #2

Now I can use the Internal BGP and Router Reflector option.


Reference 

[ 1 ] https://createnetech.tistory.com/52?category=679927

[ 2 ] https://saidvandeklundert.net/2015-06-14-bird-bgp-route-reflection/ 

[ 3 ] www.bird.network.cz/?get_doc&v=20&f=bird-6.html#ss6.3


Recently, I need to study about Calico over Kubernetis. In fact, I like Flannel rather than this. However, this Calico is also best practice. During start this Calico, I read about the Brid. In this post, I will how to install and configure this Bird.


1. What is Bird?

In this site, it is explained "what kinds of dynamic routing is supported?". It is working on Linux also. In my environment, I will use Ubuntu.


2. Install the Bird

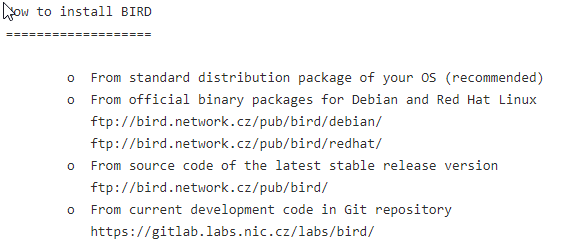
I will follow this instruction, It show the best way to install like below. I will use first one.

To add the repository for bird, I refer to this instruction,

# sudo add-apt-repository ppa:cz.nic-labs/bird
# sudo apt-get update
# apt-get install bird

After then, I can verify the version like below.


3. Configuration for Bird for the system

There are servaral configuration to work as the router or switch. First I will edit the system file "/etc/sysctl.conf"

# vi /etc/sysctl.conf
Uncomment the next line to enable packet forwarding for IPv4
net.ipv4.ip_forward=1

# sysctl -p /etc/sysctl.conf
net.ipv4.ip_forward = 1

I will edit some configure for logging in "/etc/bird/bird.conf". In this file, it is look like below default. I will follow this instruction.

# Change this into your BIRD router ID. It's a world-wide unique identification
# of your router, usually one of router's IPv4 addresses.
router id 198.51.100.1;

# The Kernel protocol is not a real routing protocol. Instead of communicating
# with other routers in the network, it performs synchronization of BIRD's
# routing tables with the OS kernel.
protocol kernel {
        scan time 60;
        import none;
#       export all;   # Actually insert routes into the kernel routing table
}

# The Device protocol is not a real routing protocol. It doesn't generate any
# routes and it only serves as a module for getting information about network
# interfaces from the kernel. 
protocol device {
        scan time 60;
}

# logging
log syslog { debug, trace, info, remote, warning, error, auth, fatal, bug };
log stderr all;
log "/var/log/bird.log" all;

The bold above will be added. However, sometimes you will get the error message like below. Thus In my case I will update file properties.

# chmod 777 /var/log/bird.log

Now I can start this bird.

# systemctl restart bird
# systemctl enable bird

# ps aux | grep -i bird
bird       796  0.0  0.2  15724  2556 ?        Ss   07:33   0:00 /usr/sbin/bird6 -f -u bird -g bird
root      1167  0.0  0.1  14856  1116 pts/0    S+   07:37   0:00 grep --color=auto -i bird

4. Configure the simple BGP routing

This is my environment. I have 2 instance, which have IP address like below. I need to edit "/etc/bird/bird.conf" file

In the default configuration, there is something important variable. 

protocol kernel {
        scan time 60;
        import none;
#       export all;   # Actually insert routes into the kernel routing table
}

# The Device protocol is not a real routing protocol. It doesn't generate any
# routes and it only serves as a module for getting information about network
# interfaces from the kernel. 
protocol device {
        scan time 60;
}

For the Simple BGP configuration, I will follow this sample instruction. I will try to configure I-BGP which mean each host has same as number. 

Host #1 Host #2
# BGP Routing Protocol
protocol static static_bgp { 
        route 1.1.1.1:255.255.255.255 via 10.10.0.159; 
        route 1.1.1.2:255.255.255.255 via 10.10.0.159; 
}

protocol bgp {
        import all;
        export where proto = "static_bgp";

        local as 65001;
        neighbor 10.10.0.205 as 65001;
}

# BGP Routing Protocol 
protocol static static_bgp { 
        route 2.2.2.1:255.255.255.255 via 10.10.0.205; 
        route 2.2.2.2:255.255.255.255 via 10.10.0.205; 
}

protocol bgp {
        import all;
        export where proto = "static_bgp";

        local as 65001;
        neighbor 10.10.0.159 as 65001;
}

In my senario, I will announce the loopback IP address into the BGP routing protocol. "export" is look like "redestribute" option. In the above there is some important option "import" and "export". In this instruction, there is some explain like below.

I need to install into the BGP routing table which received. I need to edit "import all". Now I can verify the status with "birdc" command.

Host #1

Host #2

root@ip-10-10-0-159:~# birdc

BIRD 1.6.8 ready.

bird> show route

1.1.1.1/32         via 10.10.0.159 on ens5 [static_bgp 12:08:06] * (200)

2.2.2.2/32         via 10.10.0.205 on ens5 [bgp1 12:08:11] * (100) [AS65002i]

1.1.1.2/32         via 10.10.0.159 on ens5 [static_bgp 12:08:06] * (200)

2.2.2.1/32         via 10.10.0.205 on ens5 [bgp1 12:08:11] * (100) [AS65002i]

root@ip-10-10-0-205:~# birdc

BIRD 1.6.8 ready.

bird> show route

2.2.2.2/32         via 10.10.0.205 on ens5 [static_bgp 12:07:51] * (200)

1.1.1.1/32         via 10.10.0.159 on ens5 [bgp1 12:08:11] * (100) [AS65001i]

2.2.2.1/32         via 10.10.0.205 on ens5 [static_bgp 12:07:51] * (200)

1.1.1.2/32         via 10.10.0.159 on ens5 [bgp1 12:08:11] * (100) [AS65001i]

I can see the BGP routing table "1.1.1.1", "1.1.1.2", "2.2.2.1" and "2.2.2.2" are updated. Also I can see the status with "show protocols all" command

bird> show protocols all 

name     proto    table    state  since       info

kernel1  Kernel   master   up     12:08:06    

  Preference:     10

  Input filter:   ACCEPT

  Output filter:  REJECT

  Routes:         0 imported, 0 exported, 0 preferred

  Route change stats:     received   rejected   filtered    ignored   accepted

    Import updates:              0          0          0          0          0

    Import withdraws:            0          0        ---          0          0

    Export updates:              6          0          6        ---          0

    Export withdraws:            0        ---        ---        ---          0

device1  Device   master   up     12:08:06    

  Preference:     240

  Input filter:   ACCEPT

  Output filter:  REJECT

  Routes:         0 imported, 0 exported, 0 preferred

  Route change stats:     received   rejected   filtered    ignored   accepted

    Import updates:              0          0          0          0          0

    Import withdraws:            0          0        ---          0          0

    Export updates:              0          0          0        ---          0

    Export withdraws:            0        ---        ---        ---          0

static_bgp Static   master   up     12:08:06    

  Preference:     200

  Input filter:   ACCEPT

  Output filter:  REJECT

  Routes:         2 imported, 0 exported, 2 preferred

  Route change stats:     received   rejected   filtered    ignored   accepted

    Import updates:              2          0          0          0          2

    Import withdraws:            0          0        ---          0          0

    Export updates:              0          0          0        ---          0

    Export withdraws:            0        ---        ---        ---          0

bgp1     BGP      master   up     12:08:11    Established   

  Preference:     100

  Input filter:   ACCEPT

  Output filter:  (unnamed)

  Routes:         2 imported, 2 exported, 2 preferred

  Route change stats:     received   rejected   filtered    ignored   accepted

    Import updates:              2          0          0          0          2

    Import withdraws:            0          0        ---          0          0

    Export updates:              4          2          0        ---          2

    Export withdraws:            0        ---        ---        ---          0

  BGP state:          Established

    Neighbor address: 10.10.0.205

    Neighbor AS:      65002

    Neighbor ID:      10.10.0.205

    Neighbor caps:    refresh enhanced-refresh restart-aware llgr-aware AS4

    Session:          external AS4

    Source address:   10.10.0.159

    Hold timer:       186/240

    Keepalive timer:  52/80


5. Installing over the Kernal Routing table

Even if bird has the routing table, I can not see the routing table over the system. 

root@ip-10-10-0-159:~# netstat -nr

Kernel IP routing table

Destination     Gateway         Genmask         Flags   MSS Window  irtt Iface

0.0.0.0         10.10.0.1       0.0.0.0         UG        0 0          0 ens5

10.10.0.0       0.0.0.0         255.255.255.0   U         0 0          0 ens5

10.10.0.1       0.0.0.0         255.255.255.255 UH        0 0          0 ens5

Because of this, It is not easy to verify the status if this routing work or not. I need to edit "/etc/bird/bird.conf"

protocol kernel {

        scan time 60;

        import all;

        export all;

}

After then, the routing table will be like below.

Host #1

Host #2

root@ip-10-10-0-159:~# netstat -nr

Kernel IP routing table

Destination     Gateway         Genmask         Flags   MSS Window  irtt Iface

0.0.0.0         10.10.0.1       0.0.0.0         UG        0 0          0 ens5

1.1.1.1         10.10.0.159     255.255.255.255 UGH       0 0          0 ens5

1.1.1.2         10.10.0.159     255.255.255.255 UGH       0 0          0 ens5

2.2.2.1         10.10.0.205     255.255.255.255 UGH       0 0          0 ens5

2.2.2.2         10.10.0.205     255.255.255.255 UGH       0 0          0 ens5

10.10.0.0       0.0.0.0         255.255.255.0   U         0 0          0 ens5

10.10.0.1       0.0.0.0         255.255.255.255 UH        0 0          0 ens5

root@ip-10-10-0-205:~# netstat -nr

Kernel IP routing table

Destination     Gateway         Genmask         Flags   MSS Window  irtt Iface

0.0.0.0         10.10.0.1       0.0.0.0         UG        0 0          0 ens5

1.1.1.1         10.10.0.159     255.255.255.255 UGH       0 0          0 ens5

1.1.1.2         10.10.0.159     255.255.255.255 UGH       0 0          0 ens5

2.2.2.1         10.10.0.205     255.255.255.255 UGH       0 0          0 ens5

2.2.2.2         10.10.0.205     255.255.255.255 UGH       0 0          0 ens5

10.10.0.0       0.0.0.0         255.255.255.0   U         0 0          0 ens5

10.10.0.1       0.0.0.0         255.255.255.255 UH        0 0          0 ens5

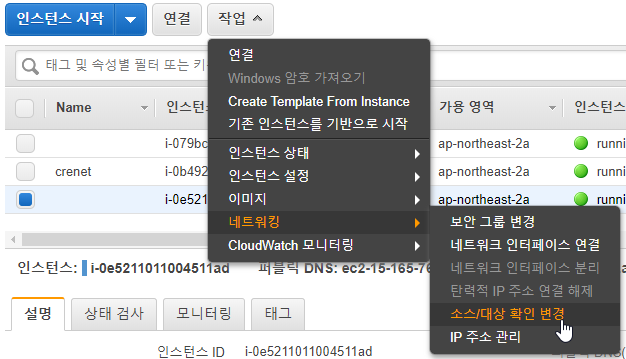
I will use the AWS instance. To verify I need to change the option, "source and destination checking option". This option will drop the packet when the source and destination does not match.

And then, I can transfer ICMP packet like below.

Host #1 Host #2

This is the simple BGP routing with Bird. If I have chance to learn more deep-dive. I will handle about it next time. 

Reference 

[ 1 ] https://bird.network.cz/

[ 2 ] https://gitlab.labs.nic.cz/labs/bird

[ 3 ] https://launchpad.net/~cz.nic-labs/+archive/ubuntu/bird

[ 4 ] https://bird.network.cz/pipermail/bird-users/2011-September/002425.html

[ 5 ] https://blog.marquis.co/configuring-bgp-using-bird-on-ubuntu-14-04lts/

[ 6 ] https://skyenet.tech/bird/


+ Recent posts