Recently, I have some chance to study about the FRRouting. At that time, I do not have any Linux server. Thus, I decide that I use AWS Spot instance. After installation, I set up the OSPFv2 environment with simple configuration. However I can not estabilish the OSPF neighbor. 


1. Simple OSPFv2 Configuration of FRRouting

I have 2 hosts which is direct connected each other. In fact, these hosts are located in the same subnet of the VPC.

Host #1 Host #2
ip-10-11-0-200# show running-config 
Building configuration...

Current configuration:
!
frr version 7.3
frr defaults traditional
hostname ip-10-11-0-200
log syslog informational
no ipv6 forwarding
service integrated-vtysh-config
!
interface ens5
 ip address 10.11.0.200/24
 ip ospf hello-interval 1
!
interface lo
 ip address 1.1.1.1/32
!
router ospf
 ospf router-id 1.1.1.1
 network 10.11.0.0/24 area 0.0.0.0
!
line vty
!
end
ip-10-11-0-229# show running-config 
Building configuration...

Current configuration:
!
frr version 7.3
frr defaults traditional
hostname ip-10-11-0-229
log syslog informational
no ipv6 forwarding
service integrated-vtysh-config
!
interface ens5
 ip address 10.11.0.229/24
 ip ospf hello-interval 1
!
interface lo
 ip address 1.1.1.2/32
!
router ospf
 ospf router-id 1.1.1.2
 network 10.11.0.0/24 area 0.0.0.0
!
line vty
!
end

In FRRouting, I need one of configurations, "network <ip address> area <area-id>" and "ip ospf area <area-id>". In my case, I used "network <ip address> area <area-id>".


2. Multicast for OSPFv2

Have you ever heard about the multicast packet for OSPFv2? It is necessary factor to establish the connection.

[ Correct Multicast Relationship]
15:35:33.303082 IP 10.11.0.200 > 224.0.0.5: OSPFv2, Hello, length 44
15:35:34.275218 IP 10.11.0.229 > 224.0.0.5: OSPFv2, Hello, length 48

On the same broadcast domain, I can see the both packets from the sender. However, I can not see all of things over AWS VPC network. It look like below

15:40:05.381662 IP 10.11.0.200 > 224.0.0.5: OSPFv2, Hello, length 44
15:40:06.381928 IP 10.11.0.200 > 224.0.0.5: OSPFv2, Hello, length 44

AWS does not support multicast default.


2. Enable the multicast feature for AWS VPC

Recently, AWS improve their feature of VPC with transit gateway. In this instruction, AWS show how to enable the multicast, even if there is limitation.

It is only 1 multicast source is possible. Because of this, I can not make success to establish OSPFv2 default. I need to request increase the quota. 


2-1. Create transit gateway with Multicast

The below is the result of creation. There is "Multicast support" option. (Please note that this feature is not opened on all of the regions, In my case, I use Virginia region.)

2-2. Attach the VPC to Transit Gateway.

I need to attach the transit gateway with mulitcast domain to the VPC.
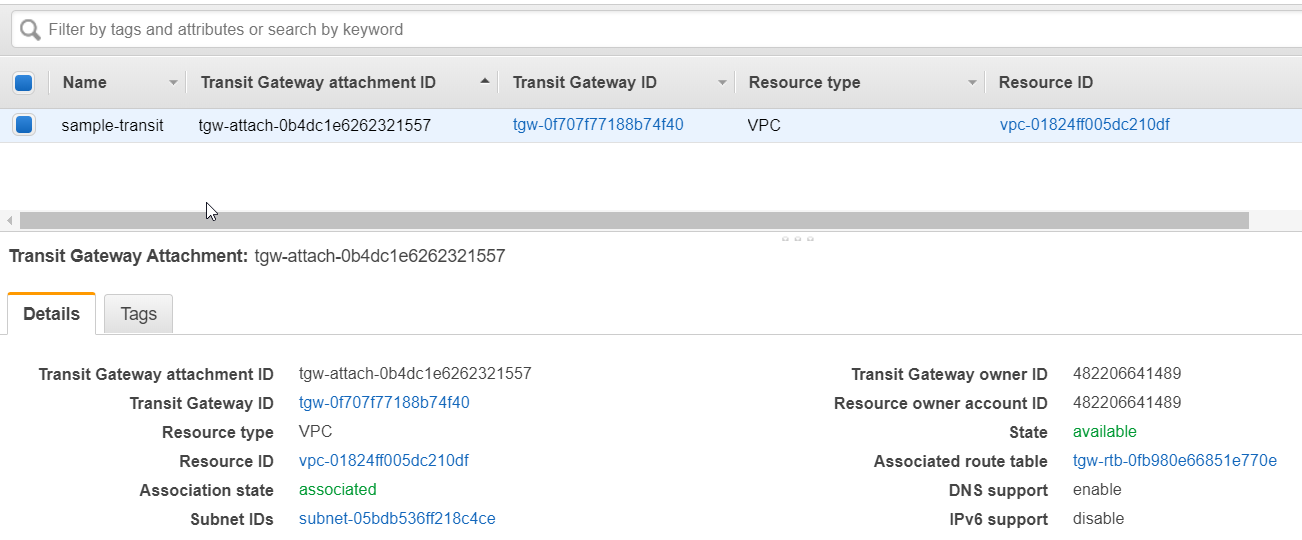
2-3. Associate the subnet in VPC to the transit Gateway.

I have to assign the subnet which make multicast work to multicast domain. This multicast domain is created by transit gateway.

2-4. Register the source and member for multicast.

The definition of the source and memeber is below. 

For the OSPFv2, each host should be source and member. Thus I need 2 source and 2 member. However, I can not make 2 source at this time by limitation of AWS

"224.0.0.5" is the Multicast Group Address for OSPFv2. 


3. The result after enabling Multicast

Even if the multicast does not activate fully. I can verify the multicast effect. Host #1 is source and member. Host #2 is only member. Thus Host #2 can not transfer the mulitcast over VPC network. 


[Host #1 Packets]
16:03:01.614874 IP 10.11.0.200 > 224.0.0.5: OSPFv2, Hello, length 44
16:03:02.615055 IP 10.11.0.200 > 224.0.0.5: OSPFv2, Hello, length 44
16:03:03.615173 IP 10.11.0.200 > 224.0.0.5: OSPFv2, Hello, length 44
16:03:04.615295 IP 10.11.0.200 > 224.0.0.5: OSPFv2, Hello, length 44
16:03:05.615409 IP 10.11.0.200 > 224.0.0.5: OSPFv2, Hello, length 44
16:03:06.615963 IP 10.11.0.200 > 224.0.0.5: OSPFv2, Hello, length 44
16:03:07.615972 IP 10.11.0.200 > 224.0.0.5: OSPFv2, Hello, length 44

root@ip-10-11-0-200:~# vtysh 

Hello, this is FRRouting (version 7.3).
Copyright 1996-2005 Kunihiro Ishiguro, et al.

ip-10-11-0-200# show ip ospf neighbor 

Neighbor ID     Pri State           Dead Time Address         Interface                        RXmtL RqstL DBsmL
[Host #2 Packets]
15:59:34.565227 IP 10.11.0.200 > 224.0.0.5: OSPFv2, Hello, length 44
15:59:34.566696 IP 10.11.0.229 > 224.0.0.5: OSPFv2, Hello, length 48
15:59:35.565246 IP 10.11.0.200 > 224.0.0.5: OSPFv2, Hello, length 44
15:59:35.566705 IP 10.11.0.229 > 224.0.0.5: OSPFv2, Hello, length 48
15:59:36.565372 IP 10.11.0.200 > 224.0.0.5: OSPFv2, Hello, length 44
15:59:36.566724 IP 10.11.0.229 > 224.0.0.5: OSPFv2, Hello, length 48
15:59:37.565376 IP 10.11.0.200 > 224.0.0.5: OSPFv2, Hello, length 44

root@ip-10-11-0-229:~# vtysh 

Hello, this is FRRouting (version 7.3).
Copyright 1996-2005 Kunihiro Ishiguro, et al.

ip-10-11-0-229# show ip ospf neighbor 

Neighbor ID     Pri State           Dead Time Address         Interface                        RXmtL RqstL DBsmL
1.1.1.1           1 Init/DROther      39.950s 10.11.0.200     ens5:10.11.0.229                     0     0     0

This is the what I learned from the Test.

Reference

[ 1 ] https://docs.aws.amazon.com/vpc/latest/tgw/working-with-multicast.html

[ 2 ] https://docs.aws.amazon.com/vpc/latest/tgw/transit-gateway-quotas.html

[ 3 ] https://docs.aws.amazon.com/vpc/latest/tgw/tgw-multicast-overview.html

How to use AWS AppStream 2.0?


Have you ever used "Google Docs"? In this case, there is no host like PC. AppStream make like this. I can access my application from outside, such as Internet. AppStream has some advantage and disadvantage. It is simple to access and manage. Also it is more secure. Because the user can not do other things on this host. However, It is not easy to deploy with right size, even if AWS offer auto-scaling. I need to how much use can be used at the same time. Most of this post are referenced by this.


1. Create Image


AppStream is auto-scaling system. Thus, I need customized standard image to deploy.  In this image, I can install my application. It will be deployed. Please note that I will set this instance to create image over the subnet which can communicate with Internet, however the real-instance can be located over the private subnet which can not communicate with Internet. In Images, there are 2 category, Image Registry and Image Builder. At the first, I will select Image Builder to create my image which is installed for terminal. Launch Image Builder. 


Now, I need to select basic OS to create my image. In my case, I will choose Windows 2012 R2, which is named wit "Base-Image-Builder-06-12-2018". Please note this image can be different by the AWS Region.


Insert the image name and select the type for CPU and Memory. These parameters can not changed after first creation. Thus, I need another images when I need other size of instance.


Select the network which the instance attach to. Please note that this is the network only for image creation. When the real-system is deployed, I can define the network. I will touch at the next time. In this case, I need to download terminal tools from Internet. Thus, this instance will be located over the subnet which can communicate with Internet.


The subnet should be routed with NAT gateway. AppStream does not assign EIP. Thus, It is not possible to download from Internet, if the instance is located over the sunbet with Internet gatway.


Review and Launch.


2. Connect Image


Now, I need to install my application on the launched image. After status change from Pending to Running, I can connect this image.


After connect, I can see the screen like below. I need to select user to login. At this time, I will select "Administrator" at the first.


Now, I can see the windows which is login with "Administrator" account. Open the CMD and Run "ipconfig" to see the network interface information. There are 2 interface. "11.8.48.79" is interface which is one of VPC subnet network. "198.19.168.187" is the interface which offer the display for users. "198.19.168.187" interface is controlled by AWS managed. Most of traffic is pass through the "11.8.48.79" interface. I can download some files from this interface.


On the desktop, there is firefox. Open this and write "https://www.putty.org/". In my case, I will download "Putty" for the sample application.


After download the file, (Default, the downloaded file will be located in documents directory), Install this application.


Please remember the installation path for the next step. In this case, the putty is installed under "C:\Programs". After installation, close all of windows. In the desktop, I can see the "Image Assistant". This application help me to register my application for the AWS AppStream.


AppStream 2.0 Image Assistant application should be run. Follow the step by this application.


3. AppStream 2.0 Image Assistant.


I need to register my application for AppStream 2.0. Click "Add App", Find out the running file. 


"App Launch Setting" menu is opened. In this instruction, there are more information about this. "Launch Parameters" and "Working Directory" are depend on my application. In this case, I will leave blank.. Just click "Save"


Click "Next"


This is important step. In this part, I can customize my application. I need to re-login with Template User. In this mode, I can define my application how to work. Click "Switch User"


Select "Template User"


After login, I can change OS configuration and Application settings. In my case, I will register sample session information. "my-sample" session information is updated over my application.


Also, I can run this application with what I want to do. I open SSH to my sample host.


I have done all of things. In the desktop, there is Images Assistant is located. Run it. And back to main with Administrator account.


Select "Administrator" and login again.


After login, I can see "Save settings" button activated. Click this button and click "Next"


Now, I have to verify if this application work correctly. I will switch user with "user" account.


Select "Test User"


After login, I can run "Putty" again. And I can confirm that "my-sample" session in configuration is remained.


Run "Images Assistant" in the desktop, and go back to main with "Administrator" account.


Select "Administrator" again.


Now, I am ready to finish. Launch.


After complete to launch, click continue.


Fill with image name.


Review and Create Image.


The viewer will be disconnected. And the building image will be started.


It will take about 10~20 minutes. And then, I can see the my image on AWS console.


4. Snapshotting Image. 


During the time, I can see the AWS console to check the status. In the "Image Registry", there is "image" which is creating. 


In "Image Builder", my based image has the status "Snapshotting". Please note that I can not do any action in this "Snapshotting" status.


I can expect that "Snapshotted image" is registered in Image Registry.


5. Delete Image in "Image Builder" (Optional)


There is no relationship between image in registry and image in builder. So, I can delete and remove this image in the builder. If you have change to make another type of image include configuration, I will remain this image. However, this is not necessary in this post. I also show the relationship between them.


After the status is "Stopped", I can delete this image.


6. Create fleet.


I have a image which I want to deploy. I need to define the network to deploy. The fleet has this kinds of role. Create Fleet.


Insert Name for this fleet.


I can see my image which has been created. Select the image and Next.


From here, network and security, capacity for scaling are defined. Select type of CPU and RAM for this instance. This is not changeable. If I want to change, I need to create another fleet. In fleet type, there are 2 modes, "On-Demand" and "Always-on". I want to save my money, so I will select "On-Demand"


Maximum session duration means "User can stay during this time once". Disconnect timeout means "After session finish, this instance can not re-assign to other user until this time spent". Minimum and Maximum capacity define the number of con-current session. AppStream offer auto-scaling, however, it take 10~20 minutes. It is too long, therefore, I need to define with proper number. In Scaling detail, this is the parameters to scale-out.


In here, the nework and security group is defined. I can locate AppStream instance into the subnet which does not communicate with Internet. In image builder step, I located at the subnet which communicate with Internet.


Review and Create.


Now I have a fleet.


7. Create Stack and Connect with Fleet


Stack has the role to define "User Pattern". Create Stack


Insert Name


I can define if I use Home Folders for each sessions. In my case, I do not want that the user remain their files on the instance. Because this instance will be shared with others. Default, it is enabled. However, I disable the option.


I can also user behavior such as "Copy and Pasts" usages. Just define what you want.


Review and Create.


After creation of stack, I need to associate fleet. In Actions, there is "Associate Fleet".


Select the fleet which is created before,


And confirm the stack details. If you want to remove fleet, you have to dis-associate this relationship at first.


8. Create User Pool.


In workspace, I need AD system. Fortunately AppStream offer this feature through AWS console. Create User.


Insert information for user. The Email address should be correct. The access link, account and temporary password are sent to this email address.


After creation of user, I need to associate with stack. I associate with the stack already created. 


Select the stack.


Look at the details, I will resend welcom email which is include access link.


I will received this email.


9. Accessing and Login the AppStream.


Click the Link which is include in email. New windows is opened like below.


After first login, I need to change my password.


Re-login and I can see like below. I registered the putty application only. Therefore, Putty Icon is appeared.


I can see the my application opened.


This is the AWS AppStream, I hope this post help you!


10. Troubleshooting


10-1. Remote User.


In the AWS console, I can not delete the user. It is only possible with API. I will use awscli command.


aws appstream delete-user --user-name xxxxxxx@xxxxxxx --authentication-type USERPOOL


10-2. Delete S3 bucket


AppStream can save Home folders and Application configuration in S3 bucket. This bucket will be created automatically. When I delete this S3 bucket, I can not make success. Because there are some limitation to protect S3 bucket. So I have to change this part at the first to remove.


After clear in Bucket Policy, I can remote this bucket.


Reference


[ 1 ] https://docs.aws.amazon.com/appstream2/latest/developerguide/tutorial-image-builder.html

[ 2 ] https://d1.awsstatic.com/product-marketing/AppStream2.0/Amazon%20AppStream%202.0%20Getting%20Started%20Guide%20April%202018.pdf

[ 3 ] https://docs.aws.amazon.com/appstream2/latest/developerguide/managing-network.html

[ 4 ] https://docs.aws.amazon.com/cli/latest/reference/appstream/delete-user.html

How to use AWS workspace?


Recently, I have some chance to do simple test for AWS workspace. Deploy is not difficult. However, there are some necessary factor to do best architecture.


1. Pre-requsite.


The AD system should be necessary, For this post, I will use AWS managed Microsoft AD service. I write a post which explain how to configure it. In directories, I can see the "Registered" directory.


2. Install and Configure for AWS workspace.


Launch Workspace at first.


Select the directory which I have create already. This directory offer user management service.


Select the user which I want to use. In my case, I will use AWS managed AD service. I have already created "crenetadmin" user in AD. Please note that, User information required First, Last name and E-mail address. (Please note a user can be assigned for single workspace only. I need other user for secondary worksapce.)


Select the OS type. In my case, I will select "Standard with WIndows 10".


Select "Running Mode", I will select "AutoStop" mode., which make the instance stopped when no usage is happend.


Review and Launch it.


3. Login and Run the AWS workspace.


In the detail after launching, I can see the client link "https://clients.amazonworkspaces.com/". From this, I can download client program. Also, weblogin is possible.


I have to remember the "Registration Code". Click "Web Access Login", and then I can see the Registration page.


On this page, I will insert Registration code.


If I meet this error message, I need client downloaded.


After download and Installation of AWS workspace client, I can see the I-con over desktop and I run it.


At the beginning, I can see the field to insert "Registration code". However, aT the left corner of the top, there are configuration button. Under this button, I can see "Manage Registrations". After Registration, I can see the login step.


With the username and password which are registered on AWS managed AD service. I can pass the next step. Select what I want.


Now, I can use workspace.


4. Troubleshooting and Deep-dive for AWS workspace.


However, this is so strange. I have not defined any network and security information. Look at the network interface information. 


This is other case. In this case, 11.5.80.110 is assigned.


There are 2 interface. "11.5.64.253" is the one of VPC network and "198.19.113.72" is new network which I have not known


And I try to send ICMP packets, one is for internet connection and the other is for internal connection. I will explain why this kinds of situation is happened. During the creation of the AWS managed Microsoft AD from this post, I selected 2 subnets. At this time, I selected subnets which is not possible for outbund traffic. Thus IP address for this workspace is assigned by this subnets. "11.5.64.253" is the one of IP address which the directory service have"198.19.113.72" is the secondary IP address, which make connection from the user with client and weblogin. Therefore, I need to consider this properties to architecture for this service.


5. Security and Service Port


If you are use the internet network to access this workspace, it does not matter. However, if you are inside of the company, sometimes you need to open the firewall security policy for this service. you make huge trouble. It is not easy. Please refer this link https://docs.aws.amazon.com/ko_kr/workspaces/latest/adminguide/workspaces-port-requirements.html


Reference 


[ 1 ] http://createnetech.tistory.com/27

[ 2 ] https://docs.aws.amazon.com/ko_kr/workspaces/latest/adminguide/workspaces-port-requirements.html

AWS Region ICMP and Inter Ability-Zone (AZ) Latency time estimation.


1. 2018. 11. 22


AWS_Region_ICMP.xlsx

AWS_InterAZ_ICMP.xlsx


How to make connection of Strongswan with Azure?


In this post, I will write the way how to create the connection using Strongswan for IPsec connection for Azure VPN connection. In AWS, it is not difficult, because AWS offer the configuration for Strongswan and Openswan. However, Azure does not offer it. Because of I can not know the Peer VPN status. it is not simple. 


1. About test environment.


My test environment is like below.


On-prem Host and VPN server <------> Internet <------> Azure VPN <------> Azure vNet <------> Azure Host


A) On-prem Host and VPN server - 10.0.0.0/8 

B) Azure Host - 172.21.0.0/16


2. Create local network gateway


Local network gateway means the on-premise site. Therefore, I need to insert on-premise network information into these fields.


A) IP address : On-premise VPN Device Public IP address.

B) Address space : On-premise Network range which is used.  


In my case, Address space should be "10.0.0.0/8". After generation, I can modify in the configuration of the resource. If I need to add more network range. I have add in here.


3. Create virtual network gateway


Virtual network gateway means the endpoint of Azure site. I insert the Azure vNet information into here. Before, I create the virtual network gateway. I need to create the "gateway subnet" where VPN instance is located in. In subnet of vNet, I can see the button "Gateway subnet".


Don't worry if I create the gateway subnet or not. If I don't, It will be created automatically. The menu for create virtual network gateway look like below.


A) SKU


SKU

S2S/VNet 

P2S

BW
VpnGw1

Max 30*

Max 128**650Mbps
VpnGw2Max 30*Max 128**1Gbps
VpnGw3Max 30*Max 128**1.25Gbps
BasicMax 10

Max 128

100Mbps

B) Virtual Network : The vNet which I want to connect with on-premise site.

C) Public IP address : Azure VPN Public IP address. (Note, I can not make static IP address


After creation, I can see that virtual network gateway and public IP address are created in my resource group like below.


4. Create connection


Now, I prepare each point for the Azure and On-premise site. I need to connect between them. So I will create connection. During this process, I need to select "local network gateway" and "virtual network gateway" which are created at above.


A) Shared key (PSK) : It is kind of the password. Therefore, I should be secret and shared with peers.


And I can see more detail. Also I can change PSK values


After connection, I can download the configuration file. 

It looks like


tidcne-s2s-connection-1.txt


5. Update the routing table.


Now, I prepared all of infrastructure. However, it is not perfect. Because of I need to control the traffic flow. I hope I remember "I choose Route-based, not Policy-based VPN". I need to update my routing table like below. In my route table, I need to watch the subnet which are associate. In my case, I want to all network to connect with my on-premise. therefore I associated all networks.


In route tap, I add the on-premise network range with "virtual network gateway" as next hop. In my case, 10.0.0.0/8 network should be transfer to the virtual network gateway.


6. Create on-premise VPN server.


From now, I create the on-premise VPN server which are installed with Strongswan. I use "apt-get". 


# apt-get install strongswan


# ipsec version

Linux strongSwan U5.3.5/K4.4.0-134-generic

Institute for Internet Technologies and Applications

University of Applied Sciences Rapperswil, Switzerland

See 'ipsec --copyright' for copyright information.


7. Configure packet forwarding enable.


# vi /etc/sysctl.conf

# Uncomment the next line to enable packet forwarding for IPv4

net.ipv4.ip_forward=1


# sysctl -p /etc/sysctl.conf

net.ipv4.ip_forward = 1


# cat /proc/sys/net/ipv4/ip_forward

1


8. Configure preshared key (PSK)


This PSK is similar with the password. It should be the same between peers. This information will be inserted into /etc/ipsec.secrets. The string is <leftside IPaddress> <rightside IPaddress> : PSK "xxxxxxxxx"


# vi /etc/ipsec.secrets

1xx.7x.3x.4x 1x.1xx.1xx.7x : PSK "xxxxxx_xxxx"


9. Configure IPsec configuration.


This is the IPsec configuration. I will add some information in /etc/ipsec.conf.


# vi /etc/ipsec.conf

conn azure

        authby=secret

        type=tunnel

        left=147.75.105.103 # My Public IP address

        leftsubnet=0.0.0.0/0 # My IP address space / protected network(s)

        right=52.231.73.164 #Azure Dynamic Gateway

        rightsubnet=172.21.0.0/24,172.21.1.0/24 #Azure Vnet prefixes

        auto=route

        keyexchange=ikev2 # Mandatory for Dynamic / Route-based gateway

        mark=100


There are some important things I need to focus. First, Azure only support ikev2. Second, I can write multiple subnet in left/rightsubnet field because the mode is ikev2. If I want to use ikev1, only first subnet before comma is valid. Third, mark field is necessary when the VPN should have multiple connection. This mark value is used to separate interface 


This is the Sample configuration for IKEv2

config setup

        # strictcrlpolicy=yes

        uniqueids = no


# Add connections here.


# Sample VPN connections

conn Tunnel1

        auto=start

        left=%defaultroute

        leftid=46.101.124.161

        right=52.231.191.30

        type=tunnel

        leftauth=psk

        rightauth=psk

        keyexchange=ikev2

        ike=aes256-sha1-modp1024

        ikelifetime=1h

        esp=aes256gcm128

        lifetime=1h

        keyingtries=%forever

        leftsubnet=0.0.0.0/0

        rightsubnet=0.0.0.0/0

        dpddelay=10s

        dpdtimeout=30s

        dpdaction=restart

        mark=100

Please Look  https://wiki.strongswan.org/projects/strongswan/wiki/IKEv2CipherSuites


10. Create virtual tunnel interface on VPN host.


If I remove "mark" value in /etc/ipsec.conf, All of packet are transferred over encryption by VPN. That is not what I want. I want to specific network traffic can transfer over VPN. This is the reason why I use mark and virtual tunnel interface is necessary. At first I need to merge the routing table because the strongswan create another route table to handle.


# vi /etc/strongswan.d/charon.conf

install_routes=no


I will create "tunnel interface" with "ip link add". Look at the below. I used the name "vti1" as interface name. Please, note that the mark values should be the same.


# sudo ip link add vti1 type vti local 147.75.105.103 remote 52.231.73.164 key 100

sudo ip link set vti1 up mtu 1419

sudo ip route add 172.21.0.0/24 dev vti1

sudo ip route add 172.21.1.0/24 dev vti1

sysctl -w "net.ipv4.conf.vti1.disable_policy=1"


11. Check the IPsec status.


Now, I can do all of things for the IPsec VPN connection. I can check the status for this with "ipsec status" command. 


# ipsec status azure

Routed Connections:

       azure{1}:  ROUTED, TUNNEL, reqid 1

       azure{1}:   0.0.0.0/0 === 172.21.0.0/24 172.21.1.0/24

Security Associations (1 up, 0 connecting):

       azure[1]: ESTABLISHED 76 minutes ago, 147.75.105.103[147.75.105.103]...52.231.73.164[52.231.73.164]

       azure{3}:  INSTALLED, TUNNEL, reqid 1, ESP SPIs: c4e7887b_i f62d7a96_o

       azure{3}:   0.0.0.0/0 === 172.21.0.0/24 172.21.1.0/24


On the GUI of Azure, I also can check the status for VPN connection.


12. Troubleshooting 


My Azure Host has the IP address with "172.21.1.4". Therefore, I try to ping on on-premise VPN host like below. However, there is no answer.


# ping 172.21.1.4

84 packets transmitted, 0 received, 100% packet loss, time 83664ms


So I dump the packet to analysis this issue. I can see the NONESP and ESP pakcets. Thus, the ICMP is sending to destination. 


# tcpdump -ni bond0 host 52.231.73.164

tcpdump: verbose output suppressed, use -v or -vv for full protocol decode

listening on bond0, link-type EN10MB (Ethernet), capture size 262144 bytes

07:30:44.805879 IP xxx.xxx.xxx.xxx.4500 > yy.yyy.yy.yyy.4500: NONESP-encap: isakmp: child_sa  inf2

07:30:44.806508 IP yy.yyy.yy.yyy.4500 > xxx.xxx.xxx.xxx.4500: NONESP-encap: isakmp: child_sa  inf2[IR]

07:30:50.168456 IP xxx.xxx.xxx.xxx > yy.yyy.yy.yyy: ESP(spi=0x60237774,seq=0xc), length 132

07:30:51.176661 IP xxx.xxx.xxx.xxx > yy.yyy.yy.yyy: ESP(spi=0x60237774,seq=0xd), length 132


I will give you answer for this issue. It is happen due to the source IP address. In this case, the ICMP packet will send to destination with interface IP address which is selected by routing table.  I will check my  network security group for Azure. I will add the interface IP address.


Please, note on-premise network range should be added in this network security group. Now I can do ping.


# ping 172.21.1.4

PING 172.21.1.4 (172.21.1.4) 56(84) bytes of data.

64 bytes from xxx.xxx.xxx.xxx: icmp_seq=1 ttl=42 time=191 ms

64 bytes from xxx.xxx.xxx.xxx: icmp_seq=2 ttl=42 time=192 ms


However, the IP address which is returned is not private IP address of the Azure host. It will be the Public IP address. Because, the source IP address from on-premise VPN host is the public IP address. So I will do some trick for this. I will use the SNAT like below.


# iptables -t nat -A POSTROUTING -d 172.21.0.0/24 -o vti1 -j SNAT --to-source 10.99.8.131

# iptables -t nat -A POSTROUTING -d 172.21.1.0/24 -o vti1 -j SNAT --to-source 10.99.8.131


Now, I will do ping again.


# ping 172.21.1.4

PING 172.21.1.4 (172.21.1.4) 56(84) bytes of data.

64 bytes from 172.21.1.4: icmp_seq=1 ttl=64 time=192 ms

64 bytes from 172.21.1.4: icmp_seq=2 ttl=64 time=193 ms


So, I have done all of things. I can have IPsec VPN connection between on-premise and Azure.


Reference 


[ 1 ] https://tscr.io/2018/01/03/azure-routed-vpn-with-strongswan-on-linux/

[ 2 ] https://docs.microsoft.com/ko-kr/azure/vpn-gateway/vpn-gateway-about-vpngateways

[ 3 ] https://wiki.strongswan.org/projects/strongswan/wiki/IKEv2CipherSuites

How to create Spot instance in Packet.net cloud?


I usually use this Packet.net cloud which offers the bare-metal public cloud. It is so much useful. AWS, Azure and GCP also offer public cloud. However, they base on the virtualization environment which make unknown issues. The cost is not cheap due to bare-metal offering. However, I don't worry about this cost, because they have spot instance. Please note, the instance will be removed without alarms and notification. Therefore it is not proper for the production.


1. Create new server.


I create the new server in my projects like below.


After "Click" the "New Server" button, I can see the "Deploy On Demand Servers", which insert some information to generate the servers.


2. Configure spot price.


When I deploy with information on the blanked field above figure, I can obtain the normal server which pay the full-cost. However, I do not want this in this post. I can see the "Options" button which is tagged with "SSH & USER DATA" 


After open the category, I can see the "Spot Market Options". When I insert the price which I want to pay, I can get the spot instance. Please note that the current bid is changeable. So I need to look this information more carefully. 


3. Deploy server.


Now, I am ready to deploy the spot instance. It is so simple. Now I can see the my processing status. I can see the "Type" information which is written with "Spot Instance"


4. Troubleshooting.


This is not about the Packet.net. I want to talk about Linux configuration. In my case, I usually use Ubuntu. After login, I can not "apt-get update", because of the repository issue. Most of usually, OS request to IPv4 address. However, IPv6 request is happend sometimes. In this case, I need to change some configuration. I have add single file in "/etc/apt/apt.conf.d/99force-ipv4"


# echo 'Acquire::ForceIPv4 "true";' | sudo tee /etc/apt/apt.conf.d/99force-ipv4

Acquire::ForceIPv4 "true";


After then, I can run "apt-get" something. However, if I can "apt-get" something without this above, I do not need this.


Reference 


[ 1 ] https://www.packet.com/

[ 2 ] https://unix.stackexchange.com/questions/9940/convince-apt-get-not-to-use-ipv6-method

How to Install AWS JAVA SDK in Ubuntu 16.04


In this post, I write the installation for AWS JAVA SDK. I followed this documentation 


1. Install the latest Oracle JAVA JDK.


I need to download "Oracle JAVA JDK" from here. I will install the JDK. JDK includes the JRE. In my case, I create "javase" directory where I download and extract downloaded file on. And I used "wget" command with options "--no-check-certificate" to obtain from download link.


# mkdir javase

# cd javase

wget --no-check-certificate --no-cookies --header "Cookie: oraclelicense=accept-securebackup-cookie" http://download.oracle.com/otn-pub/java/jdk/10.0.2+13/19aef61b38124481863b1413dce1855f/jdk-10.0.2_linux-x64_bin.tar.gz 


# tar xvfz jdk-10.0.2_linux-x64_bin.tar.gz


The extracted files are not for installation. They are the files to run and use. Therefore, I need to edit my ".bashrc". In my case, "java" and "javac" files are located in "/home/ubuntu/javase/jdk-10.0.2/bin". 


cat /home/ubuntu/.bashrc

# export PATH=$PATH:/home/ubuntu/javase/jdk-10.0.2/bin

source /home/ubuntu/.bashrc


Now, I can use the Oracle JDK. "java --version" show the version information.


# java --version

java 10.0.2 2018-07-17

Java(TM) SE Runtime Environment 18.3 (build 10.0.2+13)

Java HotSpot(TM) 64-Bit Server VM 18.3 (build 10.0.2+13, mixed mode)


And I also create sample code, "sample.java", in different directory. In my case, I create another directory which name is "projects". I write like below.   


# mkdir -p /home/ubuntu/projects

# vi Sample.java

package com.sample;


class Sample {

     public static void main(String[] args){

           System.out.println("Hello, JAVA");

     }

}


And compile and run the sample code, "javac -d . Sample.java". I used option "-d" because I defined the package in the sample code. After compile, I can confirm "Sample.class" file is located on that directory. And Run it.


# javac -d . Sample.java

# ls com/sample/Sample.class

com/sample/Sample.class


# java com/sample/Sample

Hello, JAVA


Now, I can do JAVA programming.


2. Set up for the AWS SDK.


I still can not use the AWS SDK, now. In this part, I will follow some instruction to setup for the AWS SDK. In this documentation, I need to choose builder, In my case I select "Apache Maven". To use the SDK with Apache Maven, I need to have Maven installed.


2-1. Download, Install and Run Maven


I follow in this documentation. I make directory for Maven, And Download and extract it.


# mkdir apache-mavena

# cd apache-mavena

# wget http://apache.tt.co.kr/maven/maven-3/3.5.4/binaries/apache-maven-3.5.4-bin.tar.gz

tar xvfz apache-maven-3.5.4-bin.tar.gz


In my case, "bin" is located in "/home/ubuntu/apache-maven/apache-maven-3.5.4/bin". I will add this path in my ".bashrc" file.


cat /home/ubuntu/.bashrc

export PATH=$PATH:~/.local/bin:/home/ubuntu/javase/jdk-10.0.2/bin:/home/ubuntu/apache-maven/apache-maven-3.5.4/bin

source /home/ubuntu/.bashrc


Now, I can confirm the version for marven with "mvn -v" command


# mvn -v

Apache Maven 3.5.4 (1edded0938998edf8bf061f1ceb3cfdeccf443fe; 2018-06-17T18:33:14Z)

Maven home: /home/ubuntu/apache-maven/apache-maven-3.5.4

Java version: 10.0.2, vendor: Oracle Corporation, runtime: /home/ubuntu/javase/jdk-10.0.2

Default locale: en_US, platform encoding: UTF-8

OS name: "linux", version: "4.4.0-1066-aws", arch: "amd64", family: "unix"


I think I prepare to use this. I will follow the rest of the instructions. 


2-2. Create a new Maven package


In this documentation, it shows Maven Archetype. I think this is similar with "create projects" of other program languages. 


# cd projects/

# mvn -B archetype:generate \

  -DarchetypeGroupId=org.apache.maven.archetypes \

  -DgroupId=com.sample.myapps \

  -DartifactId=app


[INFO] ------------------------------------------------------------------------
[INFO] BUILD SUCCESS
[INFO] ------------------------------------------------------------------------
[INFO] Total time: 54.510 s
[INFO] Finished at: 2018-09-12T21:02:15Z
[INFO] ------------------------------------------------------------------------

# ls -la app/
total 16
drwxr-xr-x 3 root root 4096 Sep 12 21:02 .
drwxr-xr-x 3 root root 4096 Sep 12 21:02 ..
-rw-r--r-- 1 root root  636 Sep 12 21:02 pom.xml
drwxr-xr-x 4 root root 4096 Sep 12 21:02 src


After run command above, I can see the "app" directory. In this directory, "pom.xml" and "src" directory are located. And I also can confirm there is "App.java" file under "/src/main/java/com/sample/myapps". To use the AWS SDK for Java in my project, I need to declare it in "pom.xml" file. In my case, I want to entire AWS SDK. Therefore I will add like below. (I can see the latest version in this document


# vi app/pom.xml

  <dependencies>

    <dependency>

      ....................

    </dependency>

    <dependency>

      <groupId>com.amazonaws</groupId>

      <artifactId>aws-java-sdk</artifactId>

      <version>1.11.407</version>

    </dependency>

  </dependencies>

</project>

ckag


Now, I configure to use AWS entire SDK. I can build if my configuration is correct or not with "mvn package". This command is for building the project.


# cd app/

# mvn package


After run command, I can see the AWS SDK downloaded. Please, note, you can meet some error "Source option 5 is no longer supported. Use 6 or later." and build fail. I solved this issue with adding 


# vi pom.xml

  <properties>

    <maven.compiler.source>1.6</maven.compiler.source>

    <maven.compiler.target>1.6</maven.compiler.target>

  </properties>


Now. Let's try to make some code. However, I have some question. "where is the main function to start coding?". In my case, main file is located in "./app/src/main/java/com/sample/myapps/App.java". Look at the this file.

vi app/src/main/java/com/sample/myapps/App.java

package com.sample.myapps;


/**

 * Hello world!

 *

 */

public class App

{

    public static void main( String[] args )

    {

        System.out.println( "Hello World!" );

    }

}


I have already built with this source. I can see the "class" file in the "/target/classes".

ls app/target/classes/com/sample/myapps/App.class

app/target/classes/com/sample/myapps/App.class


Thus, I can run this file. But I do not know how it is possible with command. 

mvn exec:java -Dexec.mainClass=com.sample.myapps.App


INFO] --- exec-maven-plugin:1.2.1:java (default-cli) @ app ---

Hello World!

[INFO] ------------------------------------------------------------------------

[INFO] BUILD SUCCESS


Look!, I get the result. It's works now. If you meet some error, please do mvn with "clean" and "compile" again.

mvn clean

# mvn compile


I used "mvn exec:java -Dexec.mainClass=com.sample.myapps.App" command with some option. It is not simple to re-write. Therefore, I can add some plugin in the pom.xml. I add "<build><plugins></plugins></build>"

# cat pom.xml

<project xmlns="http://maven.apache.org/POM/4.0.0" xmlns:xsi="http://www.w3.org/2001/XMLSchema-instance"

  xsi:schemaLocation="http://maven.apache.org/POM/4.0.0 http://maven.apache.org/maven-v4_0_0.xsd">

  <modelVersion>4.0.0</modelVersion>

  <groupId>com.sample.myapps</groupId>

  <artifactId>app</artifactId>

  <packaging>jar</packaging>

  <version>1.0-SNAPSHOT</version>

  <name>app</name>

  <url>http://maven.apache.org</url>

  <properties>

    <maven.compiler.source>1.6</maven.compiler.source>

    <maven.compiler.target>1.6</maven.compiler.target>

  </properties>

  <dependencies>

    ........................................................

  </dependencies>

  <build>

    <plugins>

    <plugin>

        <groupId>org.codehaus.mojo</groupId>

        <artifactId>exec-maven-plugin</artifactId>

        <version>1.2.1</version>

        <executions>

            <execution>

                <goals>

                    <goal>java</goal>

                </goals>

            </execution>

        </executions>

        <configuration>

            <mainClass>com.sample.myapps.App</mainClass>

        </configuration>

    </plugin>

    </plugins>

  </build>

</project>


Now I can run without the option.

mvn exec:java


In this documentation, this shows 5 ways to obtain the credential. 

1. Environment variables–AWS_ACCESS_KEY_ID and AWS_SECRET_ACCESS_KEY. 
2. Java system properties–aws.accessKeyId and aws.secretKey. 
3. The default credential profiles file– typically located at ~/.aws/credentials 
4. Amazon ECS container credentials
5. Instance profile credentials

These method has different class each to use. In this documentation, it shows how to setup for 1 and 3 above. I will use the "S3 list bucket" as sample code for this test. The sameple code is here. I copied and pasted in App.java.

vi src/main/java/com/sample/myapps/App.java

package com.sample.myapps;


import com.amazonaws.services.s3.AmazonS3;

import com.amazonaws.services.s3.AmazonS3ClientBuilder;

import com.amazonaws.services.s3.model.Bucket;

import java.util.List;


public class App

{

    public static void main( String[] args )

    {

        final AmazonS3 s3 = AmazonS3ClientBuilder.defaultClient();

        List<Bucket> buckets = s3.listBuckets();

        System.out.println("Your Amazon S3 buckets are:");

        for (Bucket b : buckets) {

           System.out.println("* " + b.getName());

        }

    }

}


# mvn clean compile

# mvn exec:java


Someone can get some error like below. There are several reasons. One of reasons is "credential" issue. Thus, my application does not get the correct credential information.

"InvocationTargetException: Failed to parse XML document with handler class com.amazonaws.services.s3.model.transform.XmlResponsesSaxParser$ListAllMyBucketsHandler: The entity "ntilde" was referenced, but not declared."

Look at this documentation. I think my sample code try to use environment variable. So I need to export some parameters like below.

export AWS_ACCESS_KEY_ID=xxxxxx

# export AWS_SECRET_ACCESS_KEY=xxxx

# export AWS_REGION=ap-northeast-2


After add this values, run "mvn exec:java". I can get finally the results.

mvn exec:java

Your Amazon S3 buckets are:

* cf-templates-16hzoxi2ozb3b-ap-northeast-1


At this time, I try to run with "~/.aws/credential" and "~/.aws/config". I add "[s3with]" on each like below. To use this profile, I need to export some values. I can see the some error messages like "InvocationTargetException: profile file cannot be null ".

# vi ~/.aws/credentials

[default]

aws_access_key_id=xxxxx

aws_secret_access_key=xxxxxxx


[s3with]

aws_access_key_id=yyyyyy

aws_secret_access_key=yyyyy


# vi ~/.aws/config

[default]

region=zzzzz


[s3with]

region=ap-northeast-2


# export AWS_PROFILE=s3with

# export AWS_CREDENTIAL_PROFILES_FILE=/home/ubuntu/.aws/credentials


Now, I need revise sample code. Please, note, I import more, "import com.amazonaws.auth.profile.ProfileCredentialsProvider;" and "import com.amazonaws.regions.Regions;".

## cat src/main/java/com/sample/myapps/App.java

package com.sample.myapps;


import com.amazonaws.services.s3.AmazonS3;

import com.amazonaws.services.s3.AmazonS3ClientBuilder;

import com.amazonaws.services.s3.model.Bucket;

import com.amazonaws.auth.profile.ProfileCredentialsProvider;

import com.amazonaws.regions.Regions;

import java.util.List;


public class App

{

    public static void main( String[] args )

    {

        final AmazonS3 s3 = AmazonS3ClientBuilder.standard()

                        .withRegion(Regions.AP_NORTHEAST_2)

                        .withCredentials(new ProfileCredentialsProvider("s3with"))

                        .build();

        List<Bucket> buckets = s3.listBuckets();

        System.out.println("Your Amazon S3 buckets are:");

        for (Bucket b : buckets) {

           System.out.println("* " + b.getName());

        }

    }

}


Now, Also I can get the results again. Another method is insert the credential into the code with "BasicAWSCredentials" and "AWSStaticCredentialsProvider"

import com.amazonaws.auth.BasicAWSCredentials;

import com.amazonaws.auth.AWSStaticCredentialsProvider;


And the sample code should be re-write like below.

# cat src/main/java/com/sample/myapps/App.java

package com.sample.myapps;


import com.amazonaws.services.s3.AmazonS3;

import com.amazonaws.services.s3.AmazonS3ClientBuilder;

import com.amazonaws.services.s3.model.Bucket;

import com.amazonaws.auth.BasicAWSCredentials;

import com.amazonaws.auth.AWSStaticCredentialsProvider;

import java.util.List;


public class App

{

    public static void main( String[] args )

    {

        BasicAWSCredentials awsCreds = new BasicAWSCredentials("xxxxx", "xxxxx");

        final AmazonS3 s3 = AmazonS3ClientBuilder.standard()

                        .withRegion(Regions.AP_NORTHEAST_2)

                        .withCredentials(new AWSStaticCredentialsProvider(awsCreds))

                        .build();

        List<Bucket> buckets = s3.listBuckets();

        System.out.println("Your Amazon S3 buckets are:");

        for (Bucket b : buckets) {

           System.out.println("* " + b.getName());

        }

    }

}


So far, I use profile for Credentials. And I use the static method for Region. I am some question for this. Is there anyway to use the profile for this Region field. "AwsProfileRegionProvider;" class offer it.


## cat src/main/java/com/sample/myapps/App.java

package com.sample.myapps;


import com.amazonaws.services.s3.AmazonS3;

import com.amazonaws.services.s3.AmazonS3ClientBuilder;

import com.amazonaws.services.s3.model.Bucket;


import com.amazonaws.auth.profile.ProfileCredentialsProvider;

import com.amazonaws.regions.AwsProfileRegionProvider;

import java.util.List;


public class App

{

    public static void main( String[] args )

    {


        AwsProfileRegionProvider r = new AwsProfileRegionProvider("s3with");

        String rs = r.getRegion();


        final AmazonS3 s3 = AmazonS3ClientBuilder.standard()

                        .withRegion(rs)

                        .withCredentials(new ProfileCredentialsProvider("s3with"))

                        .build();

        List<Bucket> buckets = s3.listBuckets();

        System.out.println("Your Amazon S3 buckets are:");

        for (Bucket b : buckets) {

           System.out.println("* " + b.getName());

        }


    }

}


# mvn clean compile

# mvn exec:java


So, Now, I can get the information about credential and reason with the profile. Please, note, I have define the information on "credentials" and "config". I need to add some Environment like below.


export AWS_CONFIG_FILE=/home/ubuntu/.aws/config 

# export AWS_CREDENTIAL_PROFILES_FILE=/home/ubuntu/.aws/credentials


If I am necessary, I can add these over my ".bashrc" file. Now, Enjoy the JAVA coding.


Reference 


[ 1 ] https://docs.aws.amazon.com/sdk-for-java/v1/developer-guide/setup-install.html

[ 2 ] https://docs.aws.amazon.com/sdk-for-java/v1/developer-guide/setup-project-maven.html

[ 3 ] https://maven.apache.org/index.html

[ 4 ] http://maven.apache.org/archetypes/maven-archetype-quickstart/

[ 5 ] https://mvnrepository.com/artifact/com.amazonaws/aws-java-sdk-bom

[ 6 ] https://github.com/spring-guides/gs-maven/issues/21

[ 7 ] https://docs.aws.amazon.com/sdk-for-java/v1/developer-guide/credentials.html

[ 8 ] https://docs.aws.amazon.com/sdk-for-java/v1/developer-guide/setup-credentials.html

[ 9 ] https://stackoverflow.com/questions/19850956/maven-java-the-parameters-mainclass-for-goal-org-codehaus-mojoexec-maven-p

[ 10 ] https://docs.aws.amazon.com/AWSJavaSDK/latest/javadoc/index.html?com/amazonaws/auth/profile/ProfileCredentialsProvider.html

How to Upload Object into S3 with multipart-upload using S3 API CLI


In this post, I will reproduce how to upload object with multipart. I can use the "awscli s3api" command for this. Before I study, I though AWS did all of process such as split, upload and resemble. However, it is not. (I am not sure if SDK can do all of these). I will write from split to complete multipart-upload.


1. Split object


Before upload object, I need to split object by the size which I want to upload. In my case, I define almost 40MB. And "split" command is used to split object by specific size. "split -b 40000000 sample/TWICE「BDZ」Music\ Video.mp4 splited" means that the "sample/TWICE「BDZ」Music\ Video.mp4" file will be splite by the size and the splited file names are prefixed with "splited". Therefore, I can see the 2 file which splited.


# split -b 40000000 sample/TWICE「BDZ」Music\ Video.mp4 splited


# ls -la spliteda*

-rw-r--r-- 1 root root 40000000 Sep 11 09:52 splitedaa

-rw-r--r-- 1 root root 21067922 Sep 11 09:52 splitedab


I will upload these files with multipart-upload.


2. Create Multipart-Upload


There are several stpes to use multipart-upload. At first, I create multi-part upload. This step will notice to S3 that I have something with large size to upload.


# aws s3api create-multipart-upload --bucket s3-multistore-bucket --key 'TWICE「BDZ」Music Video.mp4'

{

    "Bucket": "s3-multistore-bucket",

    "UploadId": "j.kLRorRoj1WEDV9iH1jrIeee5KETBL3raUH5odcycSxsl0RZY4p9Q.WK04lL9c7tsUxmDXwGEHwVlgm_MR.La4IHkM1M5xNQrCXossn5L_nXKJ0v.9_B3mNbL8GSoE8WBToEMPfELYF3VPh3g5PHg--",

    "Key": "TWICE「BDZ」Music Video.mp4"

}


After run this command, I can get "UploadId". Please note this value. This value will be used for next steps.


3. Upload-part


So far, any file is not uploaded. I need to upload these splited files with upload-part command. In this command, there are 2 options which I need to focus. They are "upload-id" and "part-number". "upload-id" is kind of the credential. "part-number" is the sequential value to assemble at end of process.


# aws s3api upload-part --bucket s3-multistore-bucket --key 'TWICE「BDZ」Music Video.mp4' --part-number 1 --body splitedaa --upload-id  "j.kLRorRoj1WEDV9iH1jrIeee5KETBL3raUH5odcycSxsl0RZY4p9Q.WK04lL9c7tsUxmDXwGEHwVlgm_MR.La4IHkM1M5xNQrCXossn5L_nXKJ0v.9_B3mNbL8GSoE8WBToEMPfELYF3VPh3g5PHg--"

{

    "ETag": "\"45de77ba3c71c3105a358971b7464b5a\""

}

root@ip-172-22-1-179:~# aws s3api upload-part --bucket s3-multistore-bucket --key 'TWICE「BDZ」Music Video.mp4' --part-number 2 --body splitedab --upload-id  "j.kLRorRoj1WEDV9iH1jrIeee5KETBL3raUH5odcycSxsl0RZY4p9Q.WK04lL9c7tsUxmDXwGEHwVlgm_MR.La4IHkM1M5xNQrCXossn5L_nXKJ0v.9_B3mNbL8GSoE8WBToEMPfELYF3VPh3g5PHg--"

{

    "ETag": "\"7fa82dacd6f59e523e60058660e1ab6f\""

}


I uploaded 2 files into S3. However, I can not see the S3 GUI. Because it is not completed object yet. So I need to finish this process.


4. Create "multipart" file


I have some questions. How does AWS know the order to assemble to make single object. I have already known there is part-number. However, this information is only used to mark this object. AWS can not know what is the begining and last. Because of this, I need to create "multipart" file to define single object. In this manual, there is format for this file.


# vi multipart.file

{

 "Parts":[

   {

      "ETag": "\"45de77ba3c71c3105a358971b7464b5a\"",

      "PartNumber" : 1

   },

   {

      "ETag": "\"7fa82dacd6f59e523e60058660e1ab6f\"",

      "PartNumber" : 2

   }

 ]

}


Now, I am ready to finish these multipart upload.


5. Complete multipart upload


I will run command "complet-multipart-upload" to finish all of process.


# aws s3api complete-multipart-upload --multipart-upload file://multipart.file --bucket s3-multistore-bucket --key 'TWICE「BDZ」Music Video.mp4' --upload-id j.kLRorRoj1WEDV9iH1jrIeee5KETBL3raUH5odcycSxsl0RZY4p9Q.WK04lL9c7tsUxmDXwGEHwVlgm_MR.La4IHkM1M5xNQrCXossn5L_nXKJ0v.9_B3mNbL8GSoE8WBToEMPfELYF3VPh3g5PHg--

{

    "ETag": "\"a1a27863cd20501d3e564e10b461d99f-2\"",

    "Bucket": "s3-multistore-bucket",

    "Location": "https://s3-multistore-bucket.s3.ap-northeast-2.amazonaws.com/TWICE%E3%80%8CBDZ%E3%80%8DMusic+Video.mp4",

    "Key": "TWICE「BDZ」Music Video.mp4"

}


Now, I can see this object on S3 GUI. Look at the "ETag", there is "-2". This means the object are uploaded with multipart-uplad and the splited objects was 2. This is the reason why the "ETag" of some objects is not matched. 


Reference


[ 1 ] https://docs.aws.amazon.com/cli/latest/reference/s3api/index.html

[ 2 ] https://www.computerhope.com/unix/usplit.htm

+ Recent posts