In this post, I will install the kubernetes with external etcd. Most of instrcution come from here. I will follow step by step as the beginner.
1. Pre-requsite
At first I need to prepare the hosts for Kubernetes components. In my case, I have 5 nodes, one for master, one for external etcd and three for workers. After I prepare these nodes. I need to update "/etc/hostname" and "/etc/hosts" files propertly. For example, I have to change hostname to "m1" as master node.
| # hostname m1 # vi /etc/hostname m1 # vi /etc/hosts 127.0.0.1 localhost m1 147.75.94.251 m1 147.75.92.69 e1 147.75.92.139 w1 147.75.92.71 w2 |
After this, I need to log-out and log-in again.
Kubernetes use Docker engine. Therefore, I need to install Docker. I will follow this instruction. In my case, I will run this kubernetes over Ubuntu 16.04. This is overview.
| sudo apt-get update sudo apt-get install -y \ apt-transport-https \ ca-certificates \ curl \ gnupg-agent \ software-properties-common curl -fsSL https://download.docker.com/linux/ubuntu/gpg | sudo apt-key add - sudo apt-key fingerprint 0EBFCD88 sudo add-apt-repository \ "deb [arch=amd64] https://download.docker.com/linux/ubuntu \ $(lsb_release -cs) \ stable" sudo apt-get update sudo apt-get install -y docker-ce docker-ce-cli containerd.io |
I need to check docker info. It will be like below. I need to check "Cgroup Driver: cgroupfs" as default.
| # docker info Server Version: 18.09.6 Storage Driver: overlay2 Backing Filesystem: extfs Supports d_type: true Native Overlay Diff: true Logging Driver: json-file Cgroup Driver: cgroupfs Plugins: Volume: local Network: bridge host macvlan null overlay Log: awslogs fluentd gcplogs gelf journald json-file local logentries splunk syslog Swarm: inactive |
From this instruction, I will change this driver from "cgroupsfs" to "systemd". This change affect lots of issue during Kubernetes installation. Therefore I need to remember this.
| cat > /etc/docker/daemon.json <{ "exec-opts": ["native.cgroupdriver=systemd"], "log-driver": "json-file", "log-opts": { "max-size": "100m" }, "storage-driver": "overlay2" } EOF mkdir -p /etc/systemd/system/docker.service.d systemctl daemon-reload systemctl restart docker |
After this, Cgroup Driver will be changed
| # docker info Cgroup Driver: systemd |
2. Install kubelet, kubeadm and kubectl
Kubelet (daemon on each node has the role to handle conatiner), kubeadm (daemon on each node has the role to setup master and workers) and kubectl (daemon on each node has the role to manage the cluster) are necessary components.
| apt-get update && apt-get install -y apt-transport-https curl curl -s https://packages.cloud.google.com/apt/doc/apt-key.gpg | apt-key add - cat </etc/apt/sources.list.d/kubernetes.list deb https://apt.kubernetes.io/ kubernetes-xenial main EOF apt-get update apt-get install -y kubelet kubeadm kubectl apt-mark hold kubelet kubeadm kubectl |
After installation, I need to check the directories which are created during the installation. "/etc/kubernetes/" and "/var/lib/kubelet/pki/" and "/etc/systemd/system/kubelet.service.d/" are created.
| # ls /etc/kubernetes/ manifests # ls /etc/kubernetes/manifests/ # ls /var/lib/kubelet/ pki # ls /var/lib/kubelet/pki/ kubelet.crt kubelet.key # ls /etc/systemd/system/kubelet.service.d/ 10-kubeadm.conf |
To work Kubernetes normally, Kubelet work normally at first. I can check the status with "systemctl status kubelet". At this moment, it is not activate.
|
# systemctl status kubelet kubelet.service - kubelet: The Kubernetes Node Agent Loaded: loaded (/lib/systemd/system/kubelet.service; enabled; vendor preset: enabled) Drop-In: /etc/systemd/system/kubelet.service.d └─10-kubeadm.conf Active: activating (auto-restart) (Result: exit-code) since Wed 2019-05-22 10:59:59 UTC; 2s ago Docs: https://kubernetes.io/docs/home/ Process: 12883 ExecStart=/usr/bin/kubelet $KUBELET_KUBECONFIG_ARGS $KUBELET_CONFIG_ARGS $KUBELET_KUBEADM_ARGS $KUBELET_EXTRA_ARGS (code= Main PID: 12883 (code=exited, status=255) May 22 10:59:59 e1 systemd[1]: kubelet.service: Main process exited, code=exited, status=255/n/a May 22 10:59:59 e1 systemd[1]: kubelet.service: Unit entered failed state. May 22 10:59:59 e1 systemd[1]: kubelet.service: Failed with result 'exit-code'. |
To see more details, I will look at the logs in "/var/log/syslog". From logs, I can check I need "config.yaml" file. Keep this issue and go to next step. This file will be created with "kubectl init" command later.
|
# tail -f /var/log/syslog systemd[1]: kubelet.service: Service hold-off time over, scheduling restart. systemd[1]: Stopped kubelet: The Kubernetes Node Agent. systemd[1]: Started kubelet: The Kubernetes Node Agent. kubelet[12865]: F0522 10:59:49.732907 12865 server.go:193] failed to load Kubelet config file /var/lib/kubelet/config.yaml, error failed to read kubelet config file "/var/lib/kubelet/config.yaml", error: open /var/lib/kubelet/config.yaml: no such file or directory systemd[1]: kubelet.service: Main process exited, code=exited, status=255/n/a systemd[1]: kubelet.service: Unit entered failed state. systemd[1]: kubelet.service: Failed with result 'exit-code'. |
I need to match the cgroup driver with the value "systemd". In the instruction, there is the comment like below.

However there are no "/etc/default/kubelet" and "/var/lib/kubelet/kubeadm-flags.env". So I can not update this with this instruction. Please look at the result from "systemctl status kubelet". I can see "/etc/systemd/system/kubelet.service.d/10-kubeadm.conf". This is the loaded file when kubelet is started.
|
# Note: This dropin only works with kubeadm and kubelet v1.11+ [Service] Environment="KUBELET_KUBECONFIG_ARGS=--bootstrap-kubeconfig=/etc/kubernetes/bootstrap-kubelet.conf --kubeconfig=/etc/kubernetes/kubelet.conf" Environment="KUBELET_CONFIG_ARGS=--config=/var/lib/kubelet/config.yaml" Environment="KUBELET_EXTRA_ARGS=--cgroup-driver=systemd" # This is a file that "kubeadm init" and "kubeadm join" generates at runtime, populating the KUBELET_KUBEADM_ARGS variable dynamically EnvironmentFile=-/var/lib/kubelet/kubeadm-flags.env # This is a file that the user can use for overrides of the kubelet args as a last resort. Preferably, the user should use # the .NodeRegistration.KubeletExtraArgs object in the configuration files instead. KUBELET_EXTRA_ARGS should be sourced from this file. EnvironmentFile=-/etc/default/kubelet ExecStart= ExecStart=/usr/bin/kubelet $KUBELET_KUBECONFIG_ARGS $KUBELET_CONFIG_ARGS $KUBELET_KUBEADM_ARGS $KUBELET_EXTRA_ARGS |
I will add the red text, Environment="KUBELET_EXTRA_ARGS=--cgroup-driver=systemd". And restart the kubelet with "systemctl daemon-reload" and "systemctl restart kubelet". However, it is still not activated due to no config.yaml.
3. Install external etcd cluster
I have alread posted in here. To create the etcd cluster, It is not easy. However, I can make these with this instruction easliy. This etcd will be created as one of container application which are managed by Kubernetes. On the external etcd node, I have to run command below.
|
cat << EOF > /etc/systemd/system/kubelet.service.d/20-etcd-service-manager.conf [Service] ExecStart= ExecStart=/usr/bin/kubelet --address=127.0.0.1 --pod-manifest-path=/etc/kubernetes/manifests --allow-privileged=true Restart=always EOF systemctl daemon-reload systemctl restart kubelet |
Please note that there is no option for cgroup drivers. Therefore, I need to change something.
|
Environment="KUBELET_EXTRA_ARGS=--cgroup-driver=systemd" |
The file name start with 20-etcd-service-manager.conf due to "20", so it has higher priority rather than 10-kubeadm.conf. After running this, I can check the "systemctl status kubelet" and "/var/log/syslog". The kubelet does not works with some error. This error is different from above. The first error above is happend after 10-kubeadm.conf loading. However this error is happend during 20-etcd-service-manager.conf loading. So I have to solve this error at first.
|
tail -f /var/log/syslog systemd[1]: kubelet.service: Service hold-off time over, scheduling restart. systemd[1]: Stopped kubelet: The Kubernetes Node Agent. systemd[1]: Started kubelet: The Kubernetes Node Agent. kubelet[28517]: Flag --address has been deprecated, This parameter should be set via the config file specified by the Kubelet's --config flag. See https://kubernetes.io/docs/tasks/administer-cluster/kubelet-config-file/ for more information. kubelet[28517]: Flag --pod-manifest-path has been deprecated, This parameter should be set via the config file specified by the Kubelet's --config flag. See https://kubernetes.io/docs/tasks/administer-cluster/kubelet-config-file/ for more information. kubelet[28517]: Flag --allow-privileged has been deprecated, will be removed in a future version kubelet[28517]: Flag --cgroup-driver has been deprecated, This parameter should be set via the config file specified by the Kubelet's --config flag. See https://kubernetes.io/docs/tasks/administer-cluster/kubelet-config-file/ for more information. systemd[1]: Started Kubernetes systemd probe. kubelet[28517]: I0522 14:05:31.497808 28517 server.go:417] Version: v1.14.2 kubelet[28517]: I0522 14:05:31.498194 28517 plugins.go:103] No cloud provider specified. kubelet[28517]: W0522 14:05:31.498229 28517 server.go:556] standalone mode, no API client kubelet[28517]: W0522 14:05:31.598549 28517 server.go:474] No api server defined - no events will be sent to API server. kubelet[28517]: I0522 14:05:31.598601 28517 server.go:625] --cgroups-per-qos enabled, but --cgroup-root was not specified. defaulting to / kubelet[28517]: F0522 14:05:31.599231 28517 server.go:265] failed to run Kubelet: Running with swap on is not supported, please disable swap! or set --fail-swap-on flag to false. /proc/swaps contained: [Filename#011#011#011#011Type#011#011Size#011Used#011Priority /dev/sda2 partition#0111996796#0110#011-1] systemd[1]: kubelet.service: Main process exited, code=exited, status=255/n/a systemd[1]: kubelet.service: Unit entered failed state. systemd[1]: kubelet.service: Failed with result 'exit-code'. |
There are some error and warning messages. To solve this, I have to create "kubeadmcfg.yaml" from this instruction. In my case, I will difference file name like below
|
# cat external-etcd-cfg.yaml |
"controlPlaneEndpoint: 147.75.94.251:6443" is master IP address and Port for API server. This parameter solve this warning "No api server defined - no events will be sent to API server.". 147.75.92.69 ip address is external etcd node interface IP addresss which is announced for outside. In this yaml file, some options are included. Therefore, I have to revise 20-etcd-service-manager.conf file like below.
Even if I added more options in yaml file, I do not handle root cause why the kubelet fail. In the syslog, "failed to run Kubelet: Running with swap on is not supported, please disable swap! or set --fail-swap-on flag to false" is the main reason. To solve this, there are 3 option.
|
# swapoff -a # vi /etc/fstab UUID=b7edcf12-2397-489a-bed1-4b5a3c4b1df3 / ext4 errors=remount-ro 0 1 # UUID=a3babb9d-5aee-4a1d-a894-02aa816ef6e7 none swap none 0 0 |
"swapoff -a" is temporary option. Comment "swap" in "/etc/fstab" is permenant option. Adding " --fail-swap-on=false" in 20-etcd-service-manager.conf is another permenant option. After then, the status of kubelet will be like this.
|
Environment="KUBELET_EXTRA_ARGS=--cgroup-driver=systemd" |
Now, I am ready to deploy etcd container deployment. I need certificate and private key for etcd cluster to work well. These values are located in "/etc/kubernetes/pki/etcd". However, you do not have this directory at this time. As the instruction, these file will be generated with command below.
| # kubeadm init phase certs etcd-ca [certs] Generating "etcd/ca" certificate and key # ls /etc/kubernetes/pki/etcd/ ca.crt ca.key |
If you are want to make cluster of etcd nodes, I have copy these files on each etcd nodes. However, it is not enough to work well. I need more certiface and key.
|
kubeadm init phase certs etcd-server --config=external-etcd-cfg.yaml kubeadm init phase certs etcd-peer --config=external-etcd-cfg.yaml kubeadm init phase certs etcd-healthcheck-client --config=external-etcd-cfg.yaml kubeadm init phase certs apiserver-etcd-client --config=external-etcd-cfg.yaml |
after then, serveral key will be generated. In fact, some of key is not necessary if you run single external etcd node. Now, I can run etcd container with command below
|
# kubeadm init phase etcd local --config=external-etcd-cfg.yaml # docker ps
# docker exec f7f427f30a04 etcdctl --cert-file /etc/kubernetes/pki/etcd/peer.crt --key-file /etc/kubernetes/pki/etcd/peer.key --ca-file /etc/kubernetes/pki/etcd/ca.crt --endpoints https://147.75.92.69:2379 cluster-health |
I can also check the health status.
4. Install master nodes
There are 2 instructions for master node, single master and cluser masters. To setup the master node, I need configuration file. I will refer from this instruction. This is the sample configuration yaml file what I have
|
cat < ./kubeadm-config.yaml apiVersion: kubeadm.k8s.io/v1beta1 kind: InitConfiguration localAPIEndpoint: advertiseAddress: 147.75.94.251 bindPort: 6443 --- apiVersion: kubeadm.k8s.io/v1beta1 kind: ClusterConfiguration kubernetesVersion: v1.14.1 clusterName: crenet-cluster controlPlaneEndpoint: 147.75.94.251:6443 networking: podSubnet: 10.244.0.0/16 controllerManager: extraArgs: deployment-controller-sync-period: "50s" --- EOF |
With this configuration above, I can run "kubeadm init". Please note that "mode: ipvs" will change the kube-proxy mode to work with "ipvsadm" kerneal module. In the post what I wrote, It will be undertand how kube-proxy work with this part. This is overview to install and load kernal module
|
apt-get install ipvsadm |
Sometimes, some module are not loaded. So I need to do manually with "modeprobe". If these module are not loaed when kubeadm init is started, I can see this message "kernel modules are not loaded: [ip_vs ip_vs_rr ip_vs_wrr ip_vs_sh]"
Now, it will load the file "/etc/systemd/system/kubelet.service.d/10-kubeadm.conf".
|
# cat /etc/systemd//system/kubelet.service.d/10-kubeadm.conf # Note: This dropin only works with kubeadm and kubelet v1.11+ [Service] Environment="KUBELET_KUBECONFIG_ARGS=--bootstrap-kubeconfig=/etc/kubernetes/bootstrap-kubelet.conf --kubeconfig=/etc/kubernetes/kubelet.conf" Environment="KUBELET_CONFIG_ARGS=--config=/var/lib/kubelet/config.yaml" Environment="KUBELET_EXTRA_ARGS=--cgroup-driver=systemd" # This is a file that "kubeadm init" and "kubeadm join" generates at runtime, populating the KUBELET_KUBEADM_ARGS variable dynamically EnvironmentFile=-/var/lib/kubelet/kubeadm-flags.env # This is a file that the user can use for overrides of the kubelet args as a last resort. Preferably, the user should use # the .NodeRegistration.KubeletExtraArgs object in the configuration files instead. KUBELET_EXTRA_ARGS should be sourced from this file. EnvironmentFile=-/etc/default/kubelet ExecStart= ExecStart=/usr/bin/kubelet $KUBELET_KUBECONFIG_ARGS $KUBELET_CONFIG_ARGS $KUBELET_KUBEADM_ARGS $KUBELET_EXTRA_ARGS |
With this configuration I can run "kubeadm init"
|
swapoff -a sudo kubeadm init --config=kubeadm-config.yaml --experimental-upload-certs |
before run kubeadm init, I need to "swapoff -a". I can get some error message without "swapoff -a"
|
[init] Using Kubernetes version: v1.14.1 [preflight] Running pre-flight checks error execution phase preflight: [preflight] Some fatal errors occurred: [ERROR Swap]: running with swap on is not supported. Please disable swap [preflight] If you know what you are doing, you can make a check non-fatal with `--ignore-preflight-errors=...` |
Anyway, I will get this result when I make master node succefully.
|
Your Kubernetes control-plane has initialized successfully! To start using your cluster, you need to run the following as a regular user: mkdir -p $HOME/.kube sudo cp -i /etc/kubernetes/admin.conf $HOME/.kube/config sudo chown $(id -u):$(id -g) $HOME/.kube/config You should now deploy a pod network to the cluster. Run "kubectl apply -f [podnetwork].yaml" with one of the options listed at: https://kubernetes.io/docs/concepts/cluster-administration/addons/ You can now join any number of the control-plane node running the following command on each as root: kubeadm join 147.75.94.251:6443 --token 9nbo8n.y8oke84pmjgaj3px \ --discovery-token-ca-cert-hash sha256:ac3693f08617ad045bf2e18a1ec0c3240e0651057dcd29e52daa21176a02b9f6 \ --experimental-control-plane --certificate-key 1eae6218e326a045b866b38e4c0b0135d49203073bfe4f06f602e415dcd9b7a6 Please note that the certificate-key gives access to cluster sensitive data, keep it secret! As a safeguard, uploaded-certs will be deleted in two hours; If necessary, you can use "kubeadm init phase upload-certs --experimental-upload-certs" to reload certs afterward. Then you can join any number of worker nodes by running the following on each as root: kubeadm join 147.75.94.251:6443 --token 9nbo8n.y8oke84pmjgaj3px \ --discovery-token-ca-cert-hash sha256:ac3693f08617ad045bf2e18a1ec0c3240e0651057dcd29e52daa21176a02b9f6 |
I need more steps. First I configure for "kubectl" enable.
|
mkdir -p $HOME/.kube sudo cp -i /etc/kubernetes/admin.conf $HOME/.kube/config sudo chown $(id -u):$(id -g) $HOME/.kube/config |
After this, I can use "kubectl" command. Sometimes, master status can be "NotReady". At this time, I should check the status of pods with "kubectl get pods --all-namespace"
|
# kubectl get nodes NAME STATUS ROLES AGE VERSION m1 NotReady master 4m43s v1.14.2
|
From this instruction, I need to POD network to solve this issue.

To install POD network, look at this instuction.
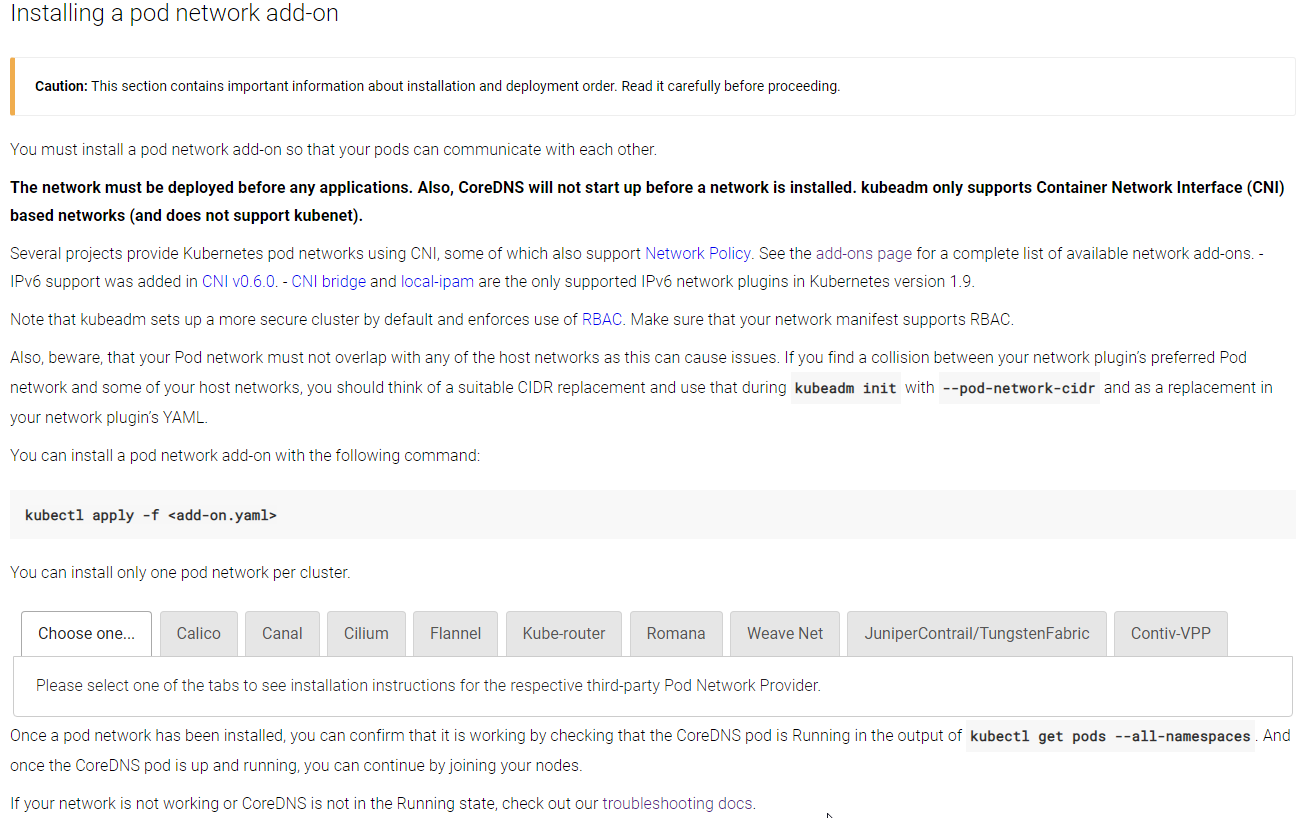
In my case, I will use "Flannel".
| echo "net.bridge.bridge-nf-call-iptables=1" >> /etc/sysctl.conf sysctl -p /etc/sysctl.conf wget https://raw.githubusercontent.com/coreos/flannel/62e44c867a2846fefb68bd5f178daf4da3095ccb/Documentation/kube-flannel.yml kubectl apply -f kube-flannel.yml |
And then, the master status is normal
|
# kubectl get pods --all-namespaces NAMESPACE NAME READY STATUS RESTARTS AGE kube-system coredns-fb8b8dccf-627rr 1/1 Running 0 16m kube-system coredns-fb8b8dccf-kwvb4 1/1 Running 0 16m kube-system etcd-m1 1/1 Running 0 15m kube-system kube-apiserver-m1 1/1 Running 0 15m kube-system kube-controller-manager-m1 1/1 Running 0 15m kube-system kube-flannel-ds-amd64-6s7xh 1/1 Running 0 54s kube-system kube-proxy-gm6bl 1/1 Running 0 16m kube-system kube-scheduler-m1 1/1 Running 0 15m
# kubectl get nodes NAME STATUS ROLES AGE VERSION m1 Ready master 17m v1.14.2 |
Oh It is work now. See status with more information
|
# systemctl status kubelet # cat /var/lib/kubelet/config.yaml | grep -i cgroup |
There is something strange. "cgroupDriver: cgroupfs" is strange. It should be "systemd", becuase I update "Environment="KUBELET_EXTRA_ARGS=--cgroup-driver=systemd" in "/etc/systemd/system/kubelet.service.d/10-kubeadm.conf". I think it is not work. I will update for this
|
# cat kubeadm-config.yaml apiVersion: kubeadm.k8s.io/v1beta1 kind: InitConfiguration localAPIEndpoint: advertiseAddress: 147.75.94.251 bindPort: 6443 --- apiVersion: kubeadm.k8s.io/v1beta1 kind: ClusterConfiguration kubernetesVersion: v1.14.1 clusterName: crenet-cluster controlPlaneEndpoint: 147.75.94.251:6443 networking: podSubnet: 10.244.0.0/16 controllerManager: extraArgs: deployment-controller-sync-period: "50s" --- apiVersion: kubelet.config.k8s.io/v1beta1 kind: KubeletConfiguration cgroupDriver: systemd ------ |
I will run "kubeadm reset" and "kubeadm init" again. Now
| # cat /var/lib/kubelet/config.yaml | grep -i cgroup cgroupDriver: systemd |
However, this is not all of things. I have alread made external etcd. I have not configure for this yet. Default, etcd conatiner is located on each master node. They are not clustered.
|
# kubectl get pods --all-namespaces NAMESPACE NAME READY STATUS RESTARTS AGE kube-system coredns-fb8b8dccf-627rr 1/1 Running 0 73m kube-system coredns-fb8b8dccf-kwvb4 1/1 Running 0 73m kube-system etcd-m1 1/1 Running 0 72m kube-system kube-apiserver-m1 1/1 Running 0 72m kube-system kube-controller-manager-m1 1/1 Running 0 72m kube-system kube-flannel-ds-amd64-6s7xh 1/1 Running 0 57m kube-system kube-proxy-gm6bl 1/1 Running 0 73m kube-system kube-scheduler-m1 1/1 Running 0 72m |
From this instruction, there are serveral step for this. At first I need to copy the certificate and key from etcd node.

Now, I need to update my configuration file
|
# cat kubeadm-config.yaml apiVersion: kubeadm.k8s.io/v1beta1 kind: InitConfiguration localAPIEndpoint: advertiseAddress: 147.75.94.251 bindPort: 6443 --- apiVersion: kubeadm.k8s.io/v1beta1 kind: ClusterConfiguration kubernetesVersion: v1.14.1 clusterName: crenet-cluster controlPlaneEndpoint: 147.75.94.251:6443 networking: podSubnet: 10.244.0.0/16 controllerManager: extraArgs: deployment-controller-sync-period: "50s" etcd: external: endpoints: - https://147.75.92.69:2379 caFile: /etc/kubernetes/pki/etcd/ca.crt certFile: /etc/kubernetes/pki/apiserver-etcd-client.crt keyFile: /etc/kubernetes/pki/apiserver-etcd-client.key --- apiVersion: kubelet.config.k8s.io/v1beta1 kind: KubeletConfiguration cgroupDriver: systemd --- --- |
Now, I will run "kubeadm reset" and "kubeadm init" again. Please note that the certificate and key will be remove when I run kubeadm reset. Therefore, I need to copy again from etcd node
| error execution phase preflight: [preflight] Some fatal errors occurred: [ERROR ExternalEtcdVersion]: couldn't load external etcd's server certificate /etc/kubernetes/pki/etcd/ca.crt: open /etc/kubernetes/pki/etcd/ca.crt: no such file or directory [ERROR ExternalEtcdClientCertificates]: /etc/kubernetes/pki/etcd/ca.crt doesn't exist [ERROR ExternalEtcdClientCertificates]: /etc/kubernetes/pki/apiserver-etcd-client.crt doesn't exist [ERROR ExternalEtcdClientCertificates]: /etc/kubernetes/pki/apiserver-etcd-client.key doesn't exist [preflight] If you know what you are doing, you can make a check non-fatal with `--ignore-preflight-errors=...` |
After I copy the certificate and key, I can check the status again
|
# kubectl get pods --all-namespaces NAMESPACE NAME READY STATUS RESTARTS AGE kube-system coredns-fb8b8dccf-nzv2s 0/1 Running 0 2m30s kube-system coredns-fb8b8dccf-v74jz 0/1 Running 0 2m30s kube-system kube-apiserver-m1 1/1 Running 0 113s kube-system kube-controller-manager-m1 1/1 Running 0 92s kube-system kube-flannel-ds-amd64-6sqzv 1/1 Running 0 18s kube-system kube-proxy-s6sj7 1/1 Running 0 2m29s kube-system kube-scheduler-m1 1/1 Running 0 94s |
etcd is not existed on master node.
5. Setup the Worker nodes
It is almost same. I need docker engin and kubeadm, kubectl, kubelet. I have already explain about these above. After creating master node, I can see the message like below
|
kubeadm join 147.75.94.251:6443 --token 9nbo8n.y8oke84pmjgaj3px \ --discovery-token-ca-cert-hash sha256:ac3693f08617ad045bf2e18a1ec0c3240e0651057dcd29e52daa21176a02b9f6 \ --experimental-control-plane --certificate-key 1eae6218e326a045b866b38e4c0b0135d49203073bfe4f06f602e415dcd9b7a6
kubeadm join 147.75.94.251:6443 --token 9nbo8n.y8oke84pmjgaj3px \ --discovery-token-ca-cert-hash sha256:ac3693f08617ad045bf2e18a1ec0c3240e0651057dcd29e52daa21176a02b9f6 |
First is for adding master node, second is for adding worker node. I need some information such as token.
|
# kubeadm token list TOKEN TTL EXPIRES USAGES DESCRIPTION EXTRA GROUPS seiuxa.fsaa2107s0vl10kg 1h 2019-05-22T19:27:32Z Proxy for managing TTL for the kubeadm-certs secret yo0mwz.5mc41r1gn90akio2 23h 2019-05-23T17:27:33Z authentication,signing system:bootstrappers:kubeadm:default-node-token
# openssl x509 -pubkey -in /etc/kubernetes/pki/ca.crt | openssl rsa -pubin -outform der 2>/dev/null | \ > openssl dgst -sha256 -hex | sed 's/^.* //' aeebcc777388b5ecde64801a51d2e37cf7ff2410e8e64f1832694fc3946d7c27 |
With these values, I can run command on each worker node. I will check the status of the cluster.
|
# kubectl get nodes NAME STATUS ROLES AGE VERSION m1 Ready master 24m v1.14.2 w1 Ready 39s v1.14.2 w2 Ready 36s v1.14.2 |
Now I made the kubernetes cluster.
Reference
[ 1 ] https://kubernetes.io/docs/setup/independent/install-kubeadm/#installing-kubeadm-kubelet-and-kubectl
[ 2 ] https://docs.docker.com/install/linux/docker-ce/ubuntu/
[ 3 ] https://kubernetes.io/docs/setup/cri/
[ 4 ] https://kubernetes.io/docs/setup/independent/setup-ha-etcd-with-kubeadm/
[ 5 ] https://createnetech.tistory.com/17?category=679927
[ 6 ] https://kubernetes.io/docs/setup/independent/create-cluster-kubeadm/
[ 7 ] https://kubernetes.io/docs/setup/independent/high-availability/
[ 8 ] https://godoc.org/k8s.io/kubernetes/cmd/kubeadm/app/apis/kubeadm/v1beta1
[ 10 ] https://kubernetes.io/docs/setup/independent/high-availability/#external-etcd-nodes
'Network Engineering > Docker and Kubernetes Learning' 카테고리의 다른 글
| How does the flannel work? (0) | 2019.01.09 |
|---|