When I send DNS request, I will get some response. At this time, I had some question if this answer come from cached information or not. Someone think like me.


When the DNS server can recurse (RA is set)

1. Even if the query is recursive or not, the DNS which recived refer to local cache to find out the A record.

2. If the DNS is not authoritative, it will be return cached.


Please Look at these Packets.

There are 2 answers. One is CNAME which has 300 TTL time, other is A which 30 TTL time. I try again. And then

Now, I can see CNAME which has 300 TTL time and A which 29 TTL time. 

In my test environment, I have DNS and GSLB. It has the role each like below. I dig to Authoritative DNS.

Thus, 

1. Authoritative DNS return the TTL time for CNAME. This is the configuration value. 

- In the response packet, Authoritative flag is set.

2. Authoritative DNS recurse to GSLB and cache the answer and return to client. So this TTL time will be counted down.

- In the response packet, Recursion Available is set. (The DNS can recurse)


The best way to find out the answer come from cached is watching "TTL time will be counted down or not".


This is the other case, I will try dig to "8.8.8.8" which is google DNS server. Even if there are lots of DNS server behind 8.8.8.8.

In this result above, Recursion Available is set, so the DNS is expected to cache answer. However, this is not Authoritative. Therefore, the CNAME and A should be counted down.


So far, I send recursive query. However, I want to see the same result with iterative query. In this post, I explained how to generate iterative query. I will use "dig +norecurse". Please note below


1. "dig with norecurse" show the result by DNS properies.

- Some DNS show the next query information, even if it has cached record.

- Some DNS show the cached answer.

- Some DNS show "server failed" result


Because of this, I did not recommend to use "dig with norecurse". Anyway, I will show when it works. I used same DNS server target.

When dig with no-recurse works, It show CNAME with counted TTL time down and A with counted TTL time down. With result, this DNS server has cached record value.


I have already told that different type of result can be shown with "norecurse" option. I will send query "www.google.com" to different DNS servers.


At first, Cached A record information is returned from DNS server. At this time, I can expect this DNS server has the cache. Please look at the next case,

There is no Answer field. There are next DNS server information to query. This is the reason why I do not recommend this norecursion option. Sometime, I can see the server fail like below.

This is my result. It is OK to use "norecurse" option for checking the cached return. However, it can can show different result what I do not expect. 


1. See the response packet field : RA is set

2. See the TTL time count down.


This is the prove to cached.


Reference

[ 1 ] superuser.com/questions/523917/dns-queries-returning-no-answer-section

[ 2 ] superuser.com/questions/681680/dns-making-iterative-requests/681710

[ 3 ] www.slashroot.in/difference-between-iterative-and-recursive-dns-query

[ 4 ] www.ateamsystems.com/tech-blog/using-dig-to-find-domain-dns-ttl/

Sometimes, I need to use "dig trace" command. I have known that it trace the DNS hop by hop. In this post, I will see the Packet level with this command.


1. First Packet of dig trace.


The first packet is look like. 

There are 3 properties. 


1. "Recursion Desired" is not set (I have alread posted about recursion and iterative flags.)

2. The request is not for A record. it is NS.

3. This request is for "root" domain such "dot ."


By 2 property. the DNS response NS answer. After then, the client start to send A and AAAA request to the same DNS.

In this case, Client send A and AAAA for m.root-servers.net. The DNS does not response. After 5 second, it will retry.

In the result, I can see "couldn't get address for m.root-server.net" (Anyway this is not normal case)

The below is normal case. It request A and AAAA requests to all of targets which the response of the first NS request.

There is the things important to see. In wireshark, I estimate the time from request and response. 

The client choose the fastest one. In this sample, it will be "198.97.190.53". 


2. Second Reqeust for target domain


I think this is first step for the domain what I lookup. I have known that "198.97.190.53" is the namesever for next step. Therefore, I send the A record request to this DNS server.

Please not that "This is A record request with no-recursion". The below is the response packet.

There is no answer field in this response. Also, this server does not recursion available and is not Authoritative.

The DNS response with "Authoritative nameserver" list to client. The client must request other DNS server to find out.

Client send the nameserver (8.8.8.8) to find out A record for this nameserver list received. This is almost same with first one.

During these step, the client also choose the fastest one. At this time, it is "210.101.60.1"

With this value, the client try again.

However, there is no answer filed at this time. There are "authoritative nameservers list" again. Client will repeate above step.


3. Finally Request for A record.


The client send the A record request without recursion to 211.188.180.21 name server. It response like below.

At this time, there is "answer filed". Becuse of this, dig trace will be stoped. However, this is not A record. It is CNAME record with "authoritative nameservers" for this CNAME.

(Please note that "Authoritative is set" even if the A record is not responsed.) This measn that CNAME is valuable like A record.

Client must repeat this CNAME domain request again. It is the same above step.


[ Reference ]


[ 1 ] createnetech.tistory.com/60


In the past, I posted "how to configure bind9". During writing, I did not understand fully the concept of the recursion, even if there are simple explain like others.

I will see the some packet in this post. It is much easier.


1. General DNS Standard Query (Default Reqeust)


Normally, the servers are set the "/etc/resolv.conf" file to customize DNS server. In my case, I set "8.8.8.8" as the resolver.

It is everything which I can do simply. And then I use without any recognization. This is the Request Packet

In DNS packet, there is flags field. "Recursion Desired is set". This is what I want to find. Because of this, the DNS server (the request packeted is received) will try to recurse. 

In the received packet, there are lot of informations. I can estimate DNS properites such as "Authoritative" and "Recursion option".

This is the Default Reqeust Packet. Therefore, the DNS will do recursion and caching.


2. No Recursion DNS Reqeust (Iterative Request)


At this time, I want to send "no recursion DNS request". I mean iterative request. The simple way is to use "dig" command with "norecursion". Please look the manual page.

I will try "dig +norecurse" like below.

That is so strange. There is no answer for A record. "This imply that there is no cached A record for this domain", Becuase this DNS server does not do recursion. If the DNS has the cached A record. It looks like below.

In this case, the DNS has the cached A record. It returned the response. Look at the packet.

With "norecursion", "Recursion desired flag" is not set. This is the important factor to understand. 

In the response, the flags values are same as the above. Please look at the Answer. This means that "DNS server (8.8.8.8) give me 2 types of answers, first is CNAME and second is A record for the CNAME". This A record is cached value. Because This DNS server can recursion by the flag.


Reference 

[ 1 ] help.fasthosts.co.uk/app/answers/detail/a_id/1276/~/what-is-recursive-dns-and-why-is-it-not-recommended%3F


How to upgrade DNSSEC for bind9?


In this post, I wrote how to configure DNS servers (Bind9). In this post, I will setup the DNSSEC to enforce DNS secrutiy from the attacker. In fact, I am not friendly with DNS element. So I will follow this instruction.


1. Pre-requisite 


I need DNS servers (master, slave and caching). I can build from this instruction simply.


2. Edit Master DNS server configuration


At first, I need to update master DNS server configuration to enable DNSSEC function. Open "/etc/bind/named.conf.option" and update like below (red text)

# cat /etc/bind/named.conf.options

options {

        directory "/var/cache/bind";

        recursion no;

        listen-on port 53 { 10.10.0.124; };

        allow-transfer { none; };

        dnssec-enable yes;

        dnssec-validation yes;

        dnssec-lookaside auto;

        auth-nxdomain no;    # conform to RFC1035

        listen-on-v6 { any; };

};

DNSSEC required the ZSK KEY (Zone Signing Key) and KSK KEY (Key Signing Key). Both key are called as DNSKEY. I have to generated these. To generate encryption key, I need entropy algorithm. "havedged" is good solution for this.

# apt-get install haveged

Now, I can generate. Please note that Key files should be located on the same directory of zone files.

# cd /var/cache/bind/zones

After run command to geneate, I can see the 2 files like below. These file are Zone Signing Key.

dnssec-keygen -a NSEC3RSASHA1 -b 2048 -n ZONE db.g.crenet.com            

Generating key pair......+++ ...............+++

K%2Fvar%2Fcache%2Fbind%2Fzones%2Fdb.g.crenet.com.+007+49394


root@master:/var/cache/bind/zones# ls

Kg.crenet.com.+007+01898.key

Kg.crenet.com.+007+01898.private

Now I will create Key Signing Key like below. After running, I can another 2 files.

dnssec-keygen -f KSK -a NSEC3RSASHA1 -b 4096 -n ZONE g.crenet.com

Generating key pair............................++ .........................................................................++

K%2Fvar%2Fcache%2Fbind%2Fzones%2Fdb.g.crenet.com.+007+56676


root@master:/var/cache/bind/zones# ls

Kg.crenet.com.+007+01898.key  Kg.crenet.com.+007+01898.private  Kg.crenet.com.+007+33324.key  Kg.crenet.com.+007+33324.private

All of these step are for creating signed zone file. Therefore, I will update zone file from now. Open zone file what I make secure and Include the key files above.

root@master:/var/cache/bind/keys# cat ../zones/db.g.crenet.com

$TTL    30

@       IN      SOA     g.crenet.com. admin.g.crenet.com. (

                              3         ; Serial

                         604800         ; Refresh

                          86400         ; Retry

                        2419200         ; Expire

                         604800 )       ; Negative Cache TTL

;

        IN      NS      ns1.g.crenet.com.

        IN      NS      ns2.g.crenet.com.

ns1.g.crenet.com. IN A 10.10.0.124

ns2.g.crenet.com. IN A 10.10.0.225

;

www.g.crenet.com. IN A 10.10.0.10

$INCLUDE /var/cache/bind/keys/Kg.crenet.com.+007+01898.key

$INCLUDE /var/cache/bind/keys/Kg.crenet.com.+007+33324.key

Now, I am ready to sign the zone file. I will run "dnssec-signzone -3 <salt> -A -N INCREMENT -o <zonename> -t <zonefilename>". "<Salt>" value is the random number. I can generate like below

# head -c 1000 /dev/random | sha1sum | cut -b 1-16

643f8a18458c3fbd

With this value, I can complete the command above

# cd ../zones

# dnssec-signzone -3  643f8a18458c3fbd -A -N INCREMENT -o g.crenet.com -t db.g.crenet.com
Verifying the zone using the following algorithms: NSEC3RSASHA1.
Zone fully signed:
Algorithm: NSEC3RSASHA1: KSKs: 1 active, 0 stand-by, 0 revoked
                         ZSKs: 1 active, 0 stand-by, 0 revoked
db.g.crenet.com.signed
Signatures generated:                       12
Signatures retained:                         0
Signatures dropped:                          0
Signatures successfully verified:            0
Signatures unsuccessfully verified:          0
Signing time in seconds:                 0.017
Signatures per second:                 685.910
Runtime in seconds:                      0.023


# ls
db.g.crenet.com         dsset-g.crenet.com.           Kg.crenet.com.+007+01898.private  Kg.crenet.com.+007+33324.private
db.g.crenet.com.signed  Kg.crenet.com.+007+01898.key  Kg.crenet.com.+007+33324.key

"db.g.crenet.com.signed" and "dsset-g.crenet.com." files are created. I will update to target this signed zone file in "named.conf.local"

# cat /etc/bind/named.conf.local

zone g.crenet.com {

   type master;

   file "/var/cache/bind/zones/db.g.crenet.com.signed";

   allow-transfer { 10.10.0.225; };

};

Service restart and dig the DNS query with this Master DNS server.

# service bind9 restart

# dig DNSKEY g.crenet.com @10.10.0.124 +multiline

; <<>> DiG 9.10.3-P4-Ubuntu <<>> DNSKEY g.crenet.com @10.10.0.124 +multiline
;; global options: +cmd
;; Got answer:
;; ->>HEADER<<- opcode: QUERY, status: NOERROR, id: 31480
;; flags: qr aa rd; QUERY: 1, ANSWER: 2, AUTHORITY: 0, ADDITIONAL: 1
;; WARNING: recursion requested but not available

;; OPT PSEUDOSECTION:
; EDNS: version: 0, flags:; udp: 4096
;; QUESTION SECTION:
;g.crenet.com.          IN DNSKEY

;; ANSWER SECTION:
g.crenet.com.           30 IN DNSKEY 257 3 7 (
                                AwEAAZxSkIvePjPUR+SDp7Dyf9NUVdVN2x250Ipqf/Oj
                                JFbq3Wl6b+97lZtSCkQIwa4llL6BHtXMfWWY70qx8hn6
                                q3lBVXR4XQcsloe16YHDucO8x5MW+o+l61yspKeEj4ZH
                                rb9msIW0AY4vGKj6xofTza/RFI2iiBiLzrCelgYWP2IG
                                hemeYMfUP3y0RNnsNB9ozh8O1uA2PocTwDaKWqkI0a41
                                Up/Ea41VKy97ZZgz2duafCkWrrFOAGMbR6M1+P3Glay5
                                Sj1vLHt1jUcCKk7RnjvlMTuZ74jGu/8IcotMZsna8nwe
                                jZB4Scm4Y/gr1xo+5CkJ9lzsdz8oMHAdwNE+CqDag24C
                                7gisB81zl1qtNOuSlVGO1TPdriH+Y3da+kCfNj6Q+vLi
                                rtoNlY6/WfmYtr9KzhnthDkoz3HVCJguv2ThUL62La2Z
                                GHyFtYeiyQ0Oa7y6z0VtrQZ/qn/BwmnWqDOCdQLqu7m4
                                k4zqoknGZ1BbUK77DQ1R08yfOYTbIOJlHHHgGuVWHAIo
                                XrhjbwQYvNXtFgCn+w60zB8uxQcctIX2PiOj0WRtOJkN
                                5mcrL5sYGNVETQ3k73MzE0WAOUTpQQoT+uD8OnTSaw3p
                                dHB12PL+swVQKn/LzBxhXCn9/A39vOUkJ7PyYkfn2Ej/
                                aLNb5+F5LIDB57UqPv5I2T4p0rYr
                                ) ; KSK; alg = NSEC3RSASHA1; key id = 33324
g.crenet.com.           30 IN DNSKEY 256 3 7 (
                                AwEAAcDZ5SCeLN0IhLoRKm/BKVPRJuc/ufMXOJivmXHH
                                O4oRLXFwTq1Xe+TLN+cRmOQiBCO3FTN1rMgNxgts7u6u
                                /RVTZnBNvKdcLVbayzE3fsMQrXxFho3fg5zEsF2xORve
                                K+f5fUWxfNl/cduzz6PplU82xznhMyYvrirGV2SN6v7w
                                IP+eZNqUyrcaUdBWCv3t+jZnTWdd4zOPkkv1EGSG0mMR
                                memYJIL66M2eFl4uQyShAqjzVWOpTyDWeKaaB4R2GB0g
                                LiKNZuiIUr+5V+Lmk/a3qsd26DGu3wU2z/MApwPucrLF
                                0vDdGocpS1Vk6Da7QgcI7ZNQnJWmMa/z7FeBbb8=
                                ) ; ZSK; alg = NSEC3RSASHA1; key id = 1898

Now, The DNSSEC in master DNS server is worked.


3. Edit Slave DNS server configuration


There is not complicated. Just enable "named.conf.option" in Slave DNS server.

# cat /etc/bind/named.conf.options

options {

        directory "/var/cache/bind";

        recursion no;

        listen-on port 53 { 10.10.0.225; };

        dnssec-enable yes;

        dnssec-validation yes;

        dnssec-lookaside auto;

        auth-nxdomain no;    # conform to RFC1035

        listen-on-v6 { any; };

};

Also, change file value in "named.conf.local" of Slave DNS server.

# cat /etc/bind/named.conf.local

zone g.crenet.com {

   type slave;

   file "db.g.crenet.com.signed";

   masters { 10.10.0.124; };

};

Now, I have restart bind9 and reload zone file. I can see downloaded file which is signed.

# service bind9 restart

# rndc reload

server reload successful


# ls

db.g.crenet.com  db.g.crenet.com.signed  managed-keys.bind  managed-keys.bind.jnl

4. Edit Caching DNS server configuration


I have alread update this file to work DNSSEC function. Please check "/etc/bind/named.conf.option" file.

# cat /etc/bind/named.conf.options

acl trusted {

   178.128.21.101;

   10.10.0.204;

   10.10.0.124;

   10.10.0.225;

};

options {

        directory "/var/cache/bind";

        recursion yes;                 # enables resursive queries

        allow-recursion { trusted; };  # allows recursive queries from "trusted" clients

        listen-on port 53 { 10.10.0.204; };   # ns1 private IP address - listen on private network only

        allow-transfer { none; };      # disable zone transfers by default

        dnssec-enable yes;

        dnssec-validation yes;

        dnssec-lookaside auto;

        dump-file "/var/cache/bind/dumps/named_dump.db";

        auth-nxdomain no;    # conform to RFC1035

        listen-on-v6 { any; };

};


5. Configure DS records with the registrar.


When I create Signed zone file, "dsset-g.crenet.com" file is also generated which include "DS" record. 

# cat dsset-g.crenet.com.

g.crenet.com.           IN DS 33324 7 1 CFE9B08DB55C9EF23AAE19979FB2A48467C1061E

g.crenet.com.           IN DS 33324 7 2 1245F5EB80E7A2F6CE9A64A9C69A94EFBC800D60EA4065B96B7FF501 AB6816D2

To publish this DNS server with DNSSEC, I have to offer these DS record to my DNS registrar. (DNS registrar mean the represtative compay which has the role to register DNS, such as GoDaddy or Gabia.


Reference 

[ 1 ] https://createnetech.tistory.com/46

[ 2 ] https://www.digitalocean.com/community/tutorials/how-to-setup-dnssec-on-an-authoritative-bind-dns-server--2 


How to configure DNS bind9 configuration in Ubuntu


Recently, I need to learn about DNS system. In fact, I have not considered about this system so far. To understand about this as the begineer. I will memorize how to configure simply.


1. Pre-requisite.

I have four servers with Ubuntu 16.04 in AWS. Each server has the Public IP address.


2. Installation of bind9 packages


In fact, I do not know anything at this time. I need some instructions. I will follow this instruction basically. At first I need to update hosts name.

# hostname ns1

hostname ns2

hostname ns3

And I will update repository and install the bind packages like below. I will repeate this step in each servers, ns2 and ns3 also.

# apt-get update

sudo apt-get install bind9 bind9utils bind9-doc

Installation is completed. I can see the directory and files under /etc/bind directory.

# ls /etc/bind
bind.keys  db.127  db.empty  db.root     named.conf.default-zones  named.conf.options  zones.rfc1918
db.0       db.255  db.local  named.conf  named.conf.local          rndc.key


3. Configuration Primary DNS Server


At first, I will edit "named.conf.options". In this file, I will add some options to work well as the DNS server. This configuration is not applied to only primary. I will edit all of servers. 

# For Caching DNS server

acl "trusted" {
        10.10.0.72;
        10.10.0.99;
        10.10.0.39;
}

options {
        directory "/var/cache/bind";

        recursion yes;
        allow-recursion { trusted; };
        listen-on port 53 { 10.10.0.72; };
        allow-transfer { 10.10.0.99; 10.10.0.39; }; 
        forwarders {
                8.8.8.8;
                8.8.4.4;
        };
};

# For Authoritative DNS servers

options { 
        directory "/var/cache/bind"; 

        recursion no;  
        listen-on port 53 { 10.10.0.72; }; 
        allow-transfer { 10.10.0.99; 10.10.0.39; }; 
};

In above, there is "acl" field. It is the represatative name for allow-recursion. "recursion yes" means enable the recurive query from other DNS servers which is defined in "allow-recursion". In this instrucion, It shows what the recursive query is.

In this instruction, it is more simple contexts comparing with "iterative request".

If I do not want to use this recursion, I can change to "recursion no;" In my case, my authoritative DNS servers will be end of step for Domain. So I will disable the recursion. "allow-transfer { 10.10.0.99; 10.10.0.39; };" means transfering zone file to listed DNS servers which are refered as slave servers. 

# Master DNS (Authoritative DNS) server

options {
        directory "/var/cache/bind";

        recursion no;
        listen-on port 53 { 10.10.0.72; };
        allow-transfer { 10.10.0.99; 10.10.0.39; };

        dnssec-validation auto;

        auth-nxdomain no;    # conform to RFC1035
        listen-on-v6 { any; };
};

# Slave DNS (Authoritative DNS) servers

options {
        directory "/var/cache/bind";

        recursion no;
        listen-on port 53 { 10.10.0.72; };

        dnssec-validation auto;

        auth-nxdomain no;    # conform to RFC1035
        listen-on-v6 { any; };
};

After these configurations, I can check the configuration is correct or not.

# service bind9 restart

# # named-checkconf named.conf.options

If I do not get any answer or failed message, It works correct. In above, I defined "allow-transfer" like "allow-transfer { 10.10.0.99; 10.10.0.39; };". This parameter is the global value. Therefore, it is applied for all of zone files. It need to be limited sometimes. In the instructionallow-transfer { none; }; is recommended.

# Master DNS (Authoritative DNS) server

options { 
        directory "/var/cache/bind"; 

        recursion no; 
        listen-on port 53 { 10.10.0.72; }; 
        allow-transfer { none };

        dnssec-validation auto; 

        auth-nxdomain no;    # conform to RFC1035 
        listen-on-v6 { any; }; 
}; 

# Slave DNS (Authoritative DNS) servers

options { 
        directory "/var/cache/bind"; 

        recursion no; 
        listen-on port 53 { 10.10.0.72; }; 

        dnssec-validation auto; 

        auth-nxdomain no;    # conform to RFC1035 
        listen-on-v6 { any; }; 
}; 

I will define "allow-transfer" in "named.conf.local" individually in every zone difinition. I will edit the "named.conf.local". It looks like below.

# Master DNS (Authoritative DNS) server

zone "dizigo.shop" {
    type master;
    file "/etc/bind/zones/db.dizigo.shop";
    allow-transfer { 10.10.0.99; 10.10.0.39; };
};
zone "10.10.in-addr.arpa" {
    type master;
    file "/etc/bind/zones/db.10.10";
    allow-transfer { 10.10.0.99; 10.10.0.39; };
};

# Slave DNS (Authoritative DNS) servers 

zone "dizigo.shop" {
    type slave;
    file "db.dizigo.shop";
    masters { 10.10.0.72; };
};
zone "10.10.in-addr.arpa" {
    type slave;
    file "db.10.10";
    masters { 10.10.0.72; };
};

In above, I defined "forward zone" and "reverse zone". (Please this does not mean zone file) I suppose the one of 10.10.0.0/16 ip addresses will be mapped with Domain. In this file, It show how many zone file are existed and the each properties. I wrote 2 types of configuration for master and slave. In this "master", I can define "allow-transfer { 10.10.0.99; 10.10.0.39; };" in each zone definition. (Even if I will explain later in this post) In "slave", I can define "masters" as the source.

I will locate the zone file under "/etc/bind/zones". If you do not have zone directory, I need to create before.

# mkdir -r /etc/bind/zones

After these configurations, I can check the configuration is correct or not.

# service bind9 restart

# named-checkconf named.conf.local

named-checkconf


3. Createing the Forward and reverse zone files.


Under the "/etc/bind" directory, there is the sample file for these.

# Forward zone file sample

root@ns1:/etc/bind# cat /etc/bind/db.local
$TTL    604800
@       IN      SOA     localhost. root.localhost. (
                              2         ; Serial
                         604800         ; Refresh
                          86400         ; Retry
                        2419200         ; Expire
                         604800 )       ; Negative Cache TTL
;
@       IN      NS      localhost.
@       IN      A       127.0.0.1
@       IN      AAAA    ::1

# Reverse zone file sample 

root@ns1:/etc/bind# cat /etc/bind/db.127
$TTL    604800
@       IN      SOA     localhost. root.localhost. (
                              1         ; Serial
                         604800         ; Refresh
                          86400         ; Retry
                        2419200         ; Expire
                         604800 )       ; Negative Cache TTL
;
@       IN      NS      localhost.
1.0.0   IN      PTR     localhost.

I will copy and edit this files for my zone file. This step is depends on your environments. It will be different from me

# cp db.local /etc/bind/zones/db.dizigo.shop

# cp db.127 /etc/bind/zones/db.10.10

Open the forward zone file and edit at first. It looks like below.

$TTL    60

@       IN      SOA     ns1.dizigo.shop admin.dizigo.shop. (

                              3         ; Serial

                         604800         ; Refresh

                          86400         ; Retry

                        2419200         ; Expire

                         604800 )       ; Negative Cache TTL


; name servers - NS records

       IN      NS      ns1.dizigo.shop.

       IN      NS      ns2.dizigo.shop.

       IN      NS      ns3.dizigo.shop.


; name servers - A records

ns1.dizigo.shop.       IN     A    10.10.0.72

ns2.dizigo.shop.       IN     A    10.10.0.99

ns3.dizigo.shop.       IN     A    10.10.0.39


; sample - A records

www.dizigo.shop.       IN     A    10.128.100.101

ftp.dizigo.shop.       IN     A    10.128.200.101 

I edit the TTL time for caching. If there is the caching DNS server in front of these authoritative DNS servers, the Caching server does not ask again during this time. I will adjust for 60 seconds. Serail number is increased. Every time, I edit zone file, I have to increase this number. This number is used for the slave servers to determince download zone file or not. I added all of name servers in end of SOA field.  For reverse zone file, it is similar with forward zone file. It looks like below.

$TTL    60
@       IN      SOA      ns1.dizigo.shop. admin.dizigo.shop. (
                              2         ; Serial
                         604800         ; Refresh
                          86400         ; Retry
                        2419200         ; Expire
                         604800 )       ; Negative Cache TTL

; name servers - NS records
       IN      NS      ns1.dizigo.shop.
       IN      NS      ns2.dizigo.shop.
       IN      NS      ns3.dizigo.shop.

; PTR Records
72.0      IN   PTR  ns1.dizigo.shop.
99.0      IN   PTR  ns2.dizigo.shop.
39.0      IN   PTR  ns3.dizigo.shop.

Most of values are same. Add all of name servers end of SOA field, then add PTR records. After all of these, I can check my configuration.

# named-checkconf

# named-checkzone dizigo.shop ./zones/db.dizigo.shop

zone dizigo.shop/IN: loaded serial 3

OK


# named-checkzone 10.10.in-addr.arpa ./zones/db.10.10

zone 10.10.in-addr.arpa/IN: loaded serial 2

OK

If there are no errors, I will restart the daemon.

# service bind9 restart


4. Configuration Secondary(Slave) DNS Server


I will do these on ns2 and ns3 in my case. It is almost same as the master DNS server. I have already written above. For "named.conf.options",

# Slave DNS (Authoritative DNS) servers

options { 
        directory "/var/cache/bind"; 

        recursion no; 
        listen-on port 53 { 10.10.0.72; }; 

        dnssec-validation auto; 

        auth-nxdomain no;    # conform to RFC1035 
        listen-on-v6 { any; }; 
}; 

For "named.conf.local",

# Slave DNS (Authoritative DNS) servers 

zone "dizigo.shop" { 
    type slave; 
    file "db.dizigo.shop"; 
    masters { 10.10.0.72; }; 
}; 
zone "10.10.in-addr.arpa" { 
    type slave; 
    file "db.10.10"; 
    masters { 10.10.0.72; }; 
}; 

In this "named.conf.local", the file field is not a certain path. Now, I have slave DNS servers.


5. Verfication the Master and Slave DNS server.


Before I verify this. I need to download zone file from master to slave. On slaves, I run this command.

rndc reload
server reload successful


# ls -la /var/cache/bind/
total 24
drwxrwxr-x  2 root bind 4096 Sep 11 19:20 .
drwxr-xr-x 10 root root 4096 Sep 11 08:52 ..
-rw-r--r--  1 bind bind  411 Sep 11 19:12 db.10.10
-rw-r--r--  1 bind bind  420 Sep 11 19:12 db.dizigo.shop
-rw-r--r--  1 bind bind  821 Sep 11 19:20 managed-keys.bind
-rw-r--r--  1 bind bind  512 Sep 11 19:20 managed-keys.bind.jnl

In the /var/cache/bind/, I can see the zone file downloaded. Now I can Domain lookup from remote clients.

# dig +short ns2.dizigo.shop @54.180.126.68
10.10.0.99
# dig +short ns1.dizigo.shop @13.125.70.251
10.10.0.72


6. Create Caching DNS server without zone file (Only Forwarding caching DNS server)


Now, I create the Caching DNS server in front of Authoritative DNS servers. I will refere this instruction. Most of steps are similar with above. I have already written above. 

# For Caching DNS server

acl "trusted" { 
        10.10.0.72; 
        10.10.0.99; 
        10.10.0.39; 
} 

options { 
        directory "/var/cache/bind"; 

        recursion yes; 
        allow-recursion { trusted; }; 
        listen-on port 53 { 10.10.0.72; }; 
        allow-transfer { 10.10.0.99; 10.10.0.39; }; 
        forwarders { 
                8.8.8.8; 
                8.8.4.4; 
        }; 
};

In the instrucion, there is another term, "allow-query". This is same with "allow-recursion". So In my case I will use again in this post. I need to define "forwarders" which point to DNS server whiech handdle the recursive query. In my case, the authoritative DNS servers are listed in here

At this time, I want to make this Caching server to work as forwarder (This server does not response against the query reqeust itself). So I will add "forward only;" option. Final thing I need to edit is dnssec. In fact, I do not know what this is exactly. Anyway, this part make the server and client more secure. So, the my configuration of "named.conf.opiton" look like below.

acl trusted {

        10.10.0.37;

        178.128.21.101;

        49.174.202.137;

};

options {

        recursion yes;                 # enables resursive queries

        allow-recursion { trusted; };  # allows recursive queries from "trusted" clients

        listen-on port 53 { 10.10.0.37; };   # ns1 private IP address - listen on private network only

        allow-transfer { none; };      # disable zone transfers by default

        forwarders {

               10.10.0.99;

               10.10.0.72;

        };

        forward only;

        dnssec-enable yes;

        dnssec-validation yes;

        auth-nxdomain no;    # conform to RFC1035

        listen-on-v6 { any; };

};

After this configuration, I need to check the configuration with "named-checkconf" and restart bind

# named-checkconf

# service bind9 restart


7. Verfication of Caching server (Clean cached DB)


In this blog, there is the way to view cahce status. 

# Run Command

# rndc dumpdb -cache


# Log messages (Error)

Sep 13 14:38:25 cache kernel: [195574.027929] audit: type=1400 audit(1568385505.800:83): apparmor="DENIED" operation="mknod" profile="/usr/sbin/named" name="/named_dump.db" pid=25682 comm="named" requested_mask="c" denied_mask="c" fsuid=112 ouid=112
Sep 13 14:38:25 cache named[25678]: received control channel command 'dumpdb -cache'
Sep 13 14:38:25 cache named[25678]: could not open dump file 'named_dump.db': permission denied

This error happend due to permission of file location which is created by the command. Therefore, I need to re-define the path for the dump file in the configuration. Please read this instruction.

acl trusted {

        10.10.0.37;

        178.128.21.101;

        49.174.202.137;

};

options {

        recursion yes;                 # enables resursive queries

        allow-recursion { trusted; };  # allows recursive queries from "trusted" clients

        listen-on port 53 { 10.10.0.37; };   # ns1 private IP address - listen on private network only

        allow-transfer { none; };      # disable zone transfers by default

        forwarders {

               10.10.0.99;

               10.10.0.72;

        };

        forward only;

        dnssec-enable yes;

        dnssec-validation yes;

        dump-file "/var/cache/bind/dumps/named_dump.db";

        auth-nxdomain no;    # conform to RFC1035

        listen-on-v6 { any; };

};

"dump-file "/var/cache/bind/dumps/named_dump.db";" is added int the configuration. After then, check configuration and restart. (Please note that the file should be located under /var/cache/bind directory)

# Run Command

# rndc dumpdb -cache


# /var/cache/bind/dumps# ls
named_dump.db

I can see the file created. I can also read this file. The result look like below

# cat named_dump.db

;

; Start view _default

;

;

; Cache dump of view '_default' (cache _default)

;

$DATE 20190913145755

; authanswer

www.dizigo.shop.        56      IN A    10.128.100.101

;

; Address database dump

;

; [edns success/4096 timeout/1432 timeout/1232 timeout/512 timeout]

; [plain success/timeout]

;

;

; Unassociated entries

;

;       10.10.0.99 [srtt 232] [flags 00004000] [edns 1/0/0/0/0] [plain 0/0] [udpsize 512] [ttl 1796]

;       10.10.0.72 [srtt 29] [flags 00000000] [edns 0/0/0/0/0] [plain 0/0] [ttl 1796]

;

; Bad cache

;

;

; Start view _bind

;

;

; Cache dump of view '_bind' (cache _bind)

;

$DATE 20190913145755

;

; Address database dump

;

; [edns success/4096 timeout/1432 timeout/1232 timeout/512 timeout]

; [plain success/timeout]

;

;

; Unassociated entries

;

;

; Bad cache

;

; Dump complete

If I want to clean this db and caching. I can run like below. Flush and service restarted are necessary.

# rndc flush

# service bind9 restart


8. Create Caching DNS server with zone file (Delegating sub-domain)


Please note that I can not delegate other domain. I can only delegate sub-domain. For example, "some-name.origin-domain.com --> some-domain.com" is not possible.  "some-name.origin-domain.com --> some-name.sub-domain.origin-domain.com" is only possible

Because of above, I use another name "ozigo.shop". (So far, I used "dizigo.shop")


I will follow this instruction. Caching DNS server can have zone file and handle the query directly. For this, I will do some of changes. First I will remove "forward only;" and "forwarders". Therefore  "named.conf.option" is look like below

acl trusted {

        10.10.0.37;

        178.128.21.101;

        49.174.202.137;

};

options {

        recursion yes;                 # enables resursive queries

        allow-recursion { trusted; };  # allows recursive queries from "trusted" clients

        listen-on port 53 { 10.10.0.37; };   # ns1 private IP address - listen on private network only

        allow-transfer { none; };      # disable zone transfers by default

        dnssec-enable yes;

        dnssec-validation yes;

        dump-file "/var/cache/bind/dumps/named_dump.db";

        auth-nxdomain no;    # conform to RFC1035

        listen-on-v6 { any; };

};

And then, I need other configuration file and zone file, "named.conf.local" and "zone file included sub-domain"

# cat named.conf.local

zone "ozigo.shop" {

    type master;

    file "/etc/bind/zones/db.ozigo.shop";

};

I used "$ORIGIN" term to seperate zone between ozigo.shop and ns.ozigo.shop. The red text show how to delegate sub-domain reqursion. The request query for "ns.ozigo.shop" will be sent to "ns1.ns.ozigo.shop" which has 10.10.0.72 IP address.  The authoritative DNS which has zone file will be like below.

root@cache:/var/cache/bind/zones# cat db.crenet.com
$ORIGIN crenet.com.
$TTL    10
@       IN      SOA     crenet.com. admin.crenet.com. (
                              3         ; Serial
                         604800         ; Refresh
                          86400         ; Retry
                        2419200         ; Expire
                         604800 )       ; Negative Cache TTL
;
        IN      NS      ns1.crenet.com.
ns1.crenet.com. IN A 10.10.0.204

;
www.crenet.com. IN CNAME www.g.crenet.com.

$ORIGIN g.crenet.com.
@       IN      NS      ns1.g.crenet.com.
        IN      NS      ns2.g.crenet.com.
ns1.g.crenet.com. IN A 10.10.0.124
ns2.g.crenet.com. IN A 10.10.0.225

# cat zones/db.ns.ozigo.shop

$TTL    60

@       IN      SOA     ns1.ns.ozigo.shop. admin.ns.ozigo.shop. (

                              3         ; Serial

                         604800         ; Refresh

                          86400         ; Retry

                        2419200         ; Expire

                         604800 )       ; Negative Cache TTL

; name servers - NS records

       IN      NS      ns1.ns.ozigo.shop.

; name servers - A records

ns1.ns.ozigo.shop.       IN     A    10.10.0.72

; sample - A records

recursion.ns.ozigo.shop.  IN     A    200.200.200.200

My final goal is looking up "recursion.ozigo.shop". When I try to dig from remote client, the result should be like below.

# dig recursion.ns.ozigo.shop @54.180.154.199

; <<>> DiG 9.11.3-1ubuntu1.8-Ubuntu <<>> recursion.ns.ozigo.shop @54.180.154.199

;; global options: +cmd

;; Got answer:

;; ->>HEADER<<- opcode: QUERY, status: NOERROR, id: 46798

;; flags: qr rd ra; QUERY: 1, ANSWER: 1, AUTHORITY: 1, ADDITIONAL: 2

;; OPT PSEUDOSECTION:

; EDNS: version: 0, flags:; udp: 4096

;; QUESTION SECTION:

;recursion.ns.ozigo.shop.       IN      A

;; ANSWER SECTION:

recursion.ns.ozigo.shop. 60     IN      A       200.200.200.200

;; AUTHORITY SECTION:

ns.ozigo.shop.          60      IN      NS      ns1.ns.ozigo.shop.

;; ADDITIONAL SECTION:

ns1.ns.ozigo.shop.      60      IN      A       10.10.0.72

;; Query time: 104 msec

;; SERVER: 54.180.154.199#53(54.180.154.199)

;; WHEN: Fri Sep 13 20:31:49 UTC 2019

;; MSG SIZE  rcvd: 102


9. TroubleShooting.


When I can meet some errors like below during checking zone file configuration in cache server.

# named-checkzone crenet.com db.crenet.com

zone crenet.com/IN: getaddrinfo(ns1.g.crenet.com) failed: Temporary failure in name resolution

zone crenet.com/IN: getaddrinfo(ns2.g.crenet.com) failed: Temporary failure in name resolution

zone crenet.com/IN: loaded serial 3

OK

In my case, I update /etc/resolv.conf file like below. I update the nameserver with my local private IP address.

# cat /etc/resolv.conf  

nameserver 10.10.0.204


Reference


[ 1 ] https://www.digitalocean.com/community/tutorials/how-to-configure-bind-as-a-private-network-dns-server-on-ubuntu-18-04

[ 2 ] https://kifarunix.com/configure-bind-as-slave-dns-server-on-ubuntu-18-04/

[ 3 ] https://help.fasthosts.co.uk/app/answers/detail/a_id/1276/~/what-is-recursive-dns-and-why-is-it-not-recommended%3F

[ 4 ] https://www.slashroot.in/difference-between-iterative-and-recursive-dns-query

[ 5 ] https://help.fasthosts.co.uk/app/answers/detail/a_id/1276/~/what-is-recursive-dns-and-why-is-it-not-recommended%3F

[ 6 ] https://www.digitalocean.com/community/tutorials/how-to-configure-bind-as-a-caching-or-forwarding-dns-server-on-ubuntu-14-04

[ 7 ] https://linuxconfig.org/how-to-view-and-clear-bind-dns-server-s-cache-on-linux 

[ 8 ] https://bugzilla.redhat.com/show_bug.cgi?id=112350

[ 9 ] http://www.zytrax.com/books/dns/ch9/delegate.html


How install oracle 11g on Windows 2012 R2?  (Enable archive log and Supplemental log)?


Recently, I need to learn the oracle to migrate data from on-prem to aws. In fact, I am not the DBA, therefore, I can not handle deep dive. I hope the I can help someone like me who is the first time about oracle.


1. Pre-requsite.


I have Windows 2012 R2 which supports oracle database 11g. For successful installation, I need the ".Netframe 3.5" installed. In server manager. Click "Add Roles and Features" at first.

In Features, choose the ".NET Framework 3.5 Feature" and Install this.

After then, I am ready to install oracle database.


2. Install oracle database.


The reason why I select Windows is simple to consist rather than Linux. I will follow two instructions mainly. https://www.youtube.com/watch?v=YgFfjLHY-wE is helpful for me. At the beginning, I need installation file. I can download from oralce site.

In my case, I will download "Microsoft Windows (X64)". There are two files. After extract both of files, I need to merge and make together in same directory. I copied and pasted whole directory from secondary to first.

After merge, I can see the directory inside. There is the "setup" icon. Click it.

Click Run and Start Installation for oracle database.

Depends on the system environments, Installer make warnning messages like this. However, I can ignore this, Click "yes"

Uncheck "I wish to receive security updates via My Oracle support", because I do not need this feature. It does not matter for next step. In email field, I can leave with empty. Just click "Next"

After Next, the warning message come. However it is also not matter for next step. Just click "yes".

Choose "Create and configure as a database". Because this is first installtion on this server. Click "Next".

In my case, my operating system is windows 2012 R2 server. Therefore, I will choose "Sever class".

I will install with standalone mode. Choose "single instance database installation" and click "Next".

Choose "Advanced Install" and Next.

This step is more important rather than before. In this insturction, there are some explain about the fields. I overview about below. 

Select "Langurage"

I will select "Standard Edition One" (Please note I can select what I want as the oracle database engine).

I select my custom home directory like below.

Select configuration type. In my case, I will choose genera purpose.

"Global database name" is not SID. However, I choosed single instance mode. Becuase of this, the SID can be same as Global database name. However, I can make different in Advanced mode.


I will adjust some paramters for memory, characters set, security and sample schema.

I will UTF-8 for character sets.

I will not make sample schema. Un-check "Create database with sample schema"

During this installation, Oracle Enterprise Manager will be installed, even if I do not want. Just click Next

Select File system. Usually it is better to seperate from root disk.

This is the back up configuration. I don't want this at this time.

When I select "Typical Installation". There are Administrative password which is default password for schema (=users)

However, In Advanced mode, I can set password individually like below.


If you use simple password, the warnning message happen like below. In my case, this is test oracle database. I will ignore this. Click yes.

In advaced mode
In typical mode

This is summary, Click Finish to installation.

During installation, I can see the configuration assistant process like below.

During the installation, warnning message like below can be occure. In this case, I need to set variable in windows.

I will handle this later. At this time, just click next. I registered the "Administrative password" before. I have told it will be used as default password. However, I have another change to set the password for each schema (=user).

Click Password Management. I will set individual password for "SYS" and "SYSTEM". If you want more, you can set the password more. In oracle database, there are serveral sample test schema such as "HR" and "SCOTT".

Continue with Yes.


3. Access database


Now, I can access database. At this time, I can use sqlplus which is installed with.

I can access with SYSTEM schema account like below

4. Verify the oracle environment for enterprise manager.


During the installation, I see warning message below. Because of this, I need to check environment variables.

In this page, I need to check the status with "emctl status dbconsole"

In this case, I need to set environment value. Properties > Advanced system settings.

In Advanced tap, there are environment value button.

I will add some values in User vriables for Administrator.

For the first issue, I will add "ORACLE_UNQNAME". 

I will reference the value from db_unique_name. In fact, there is value when environment is not set. run "select name,db_unique_name from v$database;".

I will try again "emctl status dbconsole". At this time, there is "Not found" error. 

Go into the directory. Thre is no localhost. Instead, 11.0.0.131 is existed.

To resolve this, I will add "ORACLE_HOSTNAME" like below.

After then, It will be like below. This is normal. However, It look like not perfect. "EM Daemon is not running" is happen.

I followed this video. To make success, I have to start service manually. At this time, I can not start after right button.

Find the file below. In emd properites file, "agentTZRegion=+06:00" should be adjusted with OS time.

I adjust the time 

Now, I can use this.


5. Oralce database stop, start and restart


In this instruction, there are several way to stop and start. In this part, I will overview sqlplus to stop and start.

6. Enable/Disable Archive log Mode


Sometime, it is necessary to enable this feature. It is utilized to synchronize databases with log-miner. For this, I will follow this instruction. run "archive log list". The result is displaied. It is not enabled default.

I need to shutdown with "shutdown immediate". My status is changed to "nolog".

I have to change the status to "mount", which I can change configuration on. Run "startup mount".

Run "alter database archivelog;" to enable

After then, I open the database "alter database open;"

If you want to disable, I use "alter database noarchivelog;"


7. Enable/Disable supplemental logging 


This action should be done in database. To check the status, run "select supplemental_log_data_min from v$database;"

To enable and disable, run query like below.

This is the basic configuration for the installation. 


Reference 


[ 1 ] https://www.youtube.com/watch?v=YgFfjLHY-wE

[ 2 ] https://medium.com/@Dracontis/how-to-install-oracle-11g-database-on-windows-server-2012-a4d30d4dc727

[ 3 ] https://www.oracle.com/technetwork/database/enterprise-edition/downloads/index.html

[ 4 ] https://docs.oracle.com/cd/E25178_01/server.1111/e10897/install.htm

[ 5 ] http://www.dba-oracle.com/t_oracle_unqname.htm

[ 6 ] http://blog.mclaughlinsoftware.com/2012/08/23/whats-oracle_unqname/

[ 7 ] https://www.youtube.com/watch?v=Y8i41J7aLwo

[ 8 ] https://docs.oracle.com/cd/B14117_01/win.101/b10113/admin.htm#CDCEJADC

[ 9 ] http://www.oracledistilled.com/oracle-database/backup-and-recovery/enabledisable-archive-log-mode-10g11g/


How to user the Oracle View and Joins (Inner and outer)


Recently, I have been studying about the Oracle Database. In this post, I wrote about the basic concept. In this post, I will handle about View and Joins.


1. Pre-requisite


I will create 2 tables like below.

create table MYADMIN.users ( name varchar2(15), id number(10) ) tablespace myspace;
create table MYADMIN.lessons ( id number(10), lessons varchar2(15), day varchar2(15) ) tablespace myspace;

insert into MYADMIN.users (name, id) values ( 'ant', 101 );
insert into MYADMIN.users (name, id) values ( 'bee', 102 );
insert into MYADMIN.users (name, id) values ( 'dog', 104 );


insert into MYADMIN.lessons (id, lessons, day) values ( 101, 'math', 'monday' );
insert into MYADMIN.lessons (id, lessons, day) values ( 102, 'art', 'tuseday' );
insert into MYADMIN.lessons (id, lessons, day) values ( 103, 'music', 'friday' );
insert into MYADMIN.lessons (id, lessons, day) values ( 105, 'exec', 'sunday' );

After run these command, I can get the tables with datas


Now, I am ready to start.


2. Inner and  Right, Left, Full Joins


I will follow this instructions. In this instructions, It has more detail. In this post, I will handle the way how to use this. Joins are one of filters with tables. Therefore, I can extract the matched data from tables.


2-1. Inner Join


As the figure, It shows the result after Inner Join. I can extract the matched data as intersection. This is the command. 

select name from MYADMIN.users inner join MYADMIN.lessons on MYADMIN.users.id = MYADMIN.lessons.id; 

This command means that I can extract intersection from both of "MYADMIN.users" table and "MYADMIN.lessons" table.


2-2. Left outer Join


With this option, Left side of tables are the source. This source start to compare data of the Right side of tables. When condition is matched. It extract matched data from both of table. However, the condition is not matched, the data from the source can be obtained but the data from right side of table inserted as the "<null>"

select MYADMIN.users.name, MYADMIN.lessons.day from MYADMIN.users left outer join MYADMIN.lessons on MYADMIN.users.id = MYADMIN.lessons.id; 


2-3. Right outer Join

This is reverse concept of the left outer join above. At this time, left side of tables is the source. Therefore, the value could be "<null>" from right side of tables, when condition does not match.

select MYADMIN.users.name, MYADMIN.lessons.day from MYADMIN.users right outer join MYADMIN.lessons on MYADMIN.users.id = MYADMIN.lessons.id; 

2-4. Full outer Join

With this option, left side and right side can be source. If the column from left side which does not exist in right side, this is the source. If the column from right side which does not exist in left side, this is also the source.  

select MYADMIN.users.name, MYADMIN.lessons.day from MYADMIN.users full outer join MYADMIN.lessons on MYADMIN.users.id = MYADMIN.lessons.id; 


3. Views


I will follow this instruction for this part. Views is the virtual table which is not existed in real. Sometime, I need to combine or make complex database query. In this case, this views is quite useful. For example, I will create view with the query of full outer join.

# create view

create view matched_info as select MYADMIN.users.name, MYADMIN.lessons.day from MYADMIN.users full outer join MYADMIN.lessons on MYADMIN.users.id = MYADMIN.lessons.id;


# select for query

select * from matched_info; 

I have already told that the view is not real table. Thus, I can not find out the information from "user_tables".

However, I can see the view information from "user_views". In the "TEXT", I can see the query which I used to create.

I think "the views is belonged to the schema (=user), even if it is virtual table". I can give some grant option like below.

grant select on MYADMIN.matched_info to MYUSER;


After login again with "MYUSER" account, I can show the data from this view also.

However, I can not show any detail information with "user_views" or "user_table".

Because, it only show the data whch is created by "schema". Therefore, if you want to see, you need to search through grant option like below.

If I want delete (drop) the view, Use this command below

drop view MYADMIN.matched_info;


Reference 


[ 1 ] https://www.techonthenet.com/oracle/joins.php

[ 2 ] https://createnetech.tistory.com/32

[ 3 ] https://www.techonthenet.com/oracle/views.php


How to use the Oracle database basically?


Recently, I need to study about the Oracle Database. In fact, I am not DBA. In this post, I will write the database queries to use later. I will use the Oracle SQL developer for this test.


1. Download and Connect database


I followed this instruction, which introduce how to connect to database. I need to download Oracle SQL developer from here. After download, I can connect database with connect button on the left of top.


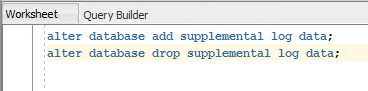
2. Check the Database Properties.


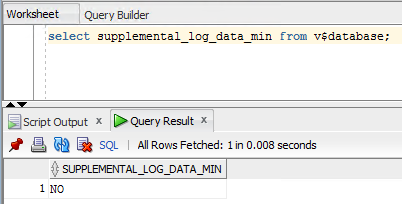
select * from database_properties;


I can see configuration or properties from query like below. For example, I can see the "Default Temp Tablespace" which the user information is stored in.


3. Create (Drop) User


This is important part to understand about Oracle Database. In Oracle, there is "schema" term. I think this is also user. All of objects such as table are connected to this schema. For example, "schema.table_name" is used as the table name when I create table. This instruction show how to create user.


select * from dba_users;


I can get the all of users information in this database like below.


Now, I will create new user which is identified by the password.


create user virginiauser identified by password1;


I can see the new user created with "select * from dba_users;".


If you want to remove or revoke user, follows the command below.


drop user virginiauser;


4. Grant Privileges and role.


However, this user does not have any role and privileges. In this instruction, there are comments for roles.  


Role NameCreated By (Script)Description

CONNECT

SQL.BSQ

Includes the following system privileges: ALTER SESSION, CREATE CLUSTER, CREATE DATABASE LINK, CREATE SEQUENCE, CREATE SESSION, CREATE SYNONYM, CREATE TABLE, CREATE VIEW

RESOURCE

SQL.BSQ

Includes the following system privileges: CREATE CLUSTER, CREATE INDEXTYPE, CREATE OPERATOR, CREATE PROCEDURE, CREATE SEQUENCE, CREATE TABLE, CREATE TRIGGER, CREATE TYPE

DBA

SQL.BSQ

All system privileges WITH ADMIN OPTION

Note: The previous three roles are provided to maintain compatibility with previous versions of Oracle and may not be created automatically in future versions of Oracle. Oracle Corporation recommends that you design your own roles for database security, rather than relying on these roles.

EXP_FULL_DATABASE

CATEXP.SQL

Provides the privileges required to perform full and incremental database exports. Includes: SELECT ANY TABLE, BACKUP ANY TABLE, EXECUTE ANY PROCEDURE, EXECUTE ANY TYPE, ADMINISTER RESOURCE MANAGER, and INSERT, DELETE, and UPDATE on the tables SYS.INCVID, SYS.INCFIL, and SYS.INCEXP. Also the following roles: EXECUTE_CATALOG_ROLE and SELECT_CATALOG_ROLE.

IMP_FULL_DATABASE

CATEXP.SQL

Provides the privileges required to perform full database imports. Includes an extensive list of system privileges (use view DBA_SYS_PRIVS to view privileges) and the following roles: EXECUTE_CATALOG_ROLE and SELECT_CATALOG_ROLE.

DELETE_CATALOG_ROLE

SQL.BSQ

Provides DELETE privilege on the system audit table (AUD$)

EXECUTE_CATALOG_ROLE

SQL.BSQ

Provides EXECUTE privilege on objects in the data dictionary. Also, HS_ADMIN_ROLE.

SELECT_CATALOG_ROLE

SQL.BSQ

Provides SELECT privilege on objects in the data dictionary. Also, HS_ADMIN_ROLE.

RECOVERY_CATALOG_OWNER

CATALOG.SQL

Provides privileges for owner of the recovery catalog. Includes: CREATE SESSION, ALTER SESSION, CREATE SYNONYM, CREATE VIEW, CREATE DATABASE LINK, CREATE TABLE, CREATE CLUSTER, CREATE SEQUENCE, CREATE TRIGGER, and CREATE PROCEDURE

HS_ADMIN_ROLE

CATHS.SQL

Used to protect access to the HS (Heterogeneous Services) data dictionary tables (grants SELECT) and packages (grants EXECUTE). It is granted to SELECT_CATALOG_ROLE and EXECUTE_CATALOG_ROLE such that users with generic data dictionary access also can access the HS data dictionary.

AQ_USER_ROLE

CATQUEUE.SQL

Obsoleted, but kept mainly for release 8.0 compatibility. Provides execute privilege on DBMS_AQ and DBMS_AQIN.

AQ_ADMINISTRATOR_ROLE

CATQUEUE.SQL

Provides privileges to administer Advance Queuing. Includes ENQUEUE ANY QUEUE, DEQUEUE ANY QUEUE, and MANAGE ANY QUEUE, SELECT privileges on AQ tables and EXECUTE privileges on AQ packages.

SNMPAGENT

CATSNMP.SQL

This role is used by Enterprise Manager/Intelligent Agent. Includes ANALYZE ANY and grants SELECT on various views.


In my case, I am AWS Oracle RDS database. Look at the role assigned.


select * from dba_role_privs;


There are so many roles assigned.  There is no any role in user created before. However, there are so many role assigned for 'RDSADMIN' and master account.


RDSADMIN CRENETADMIN
XDBADMIN XDBADMIN
EXECUTE_CATALOG_ROLE EXECUTE_CATALOG_ROLE
CTXAPP CTXAPP
DATAPUMP_IMP_FULL_DATABASE DATAPUMP_EXP_FULL_DATABASE
OPTIMIZER_PROCESSING_RATE OPTIMIZER_PROCESSING_RATE
CAPTURE_ADMIN CAPTURE_ADMIN
IMP_FULL_DATABASE IMP_FULL_DATABASE
AQ_ADMINISTRATOR_ROLE AQ_ADMINISTRATOR_ROLE
EM_EXPRESS_BASIC EM_EXPRESS_BASIC
EM_EXPRESS_ALL EM_EXPRESS_ALL
DELETE_CATALOG_ROLE DELETE_CATALOG_ROLE
SODA_APP SODA_APP
RECOVERY_CATALOG_USER RECOVERY_CATALOG_USER
CONNECT CONNECT
OEM_ADVISOR OEM_ADVISOR
OEM_MONITOR OEM_MONITOR
SELECT_CATALOG_ROLE SELECT_CATALOG_ROLE
HS_ADMIN_SELECT_ROLE HS_ADMIN_SELECT_ROLE
DBA DBA
RESOURCE RESOURCE
  RDS_MASTER_ROLE
DATAPUMP_EXP_FULL_DATABASE DATAPUMP_IMP_FULL_DATABASE
XDB_SET_INVOKER XDB_SET_INVOKER
GATHER_SYSTEM_STATISTICS GATHER_SYSTEM_STATISTICS
SCHEDULER_ADMIN SCHEDULER_ADMIN
RECOVERY_CATALOG_OWNER RECOVERY_CATALOG_OWNER
HS_ADMIN_EXECUTE_ROLE HS_ADMIN_EXECUTE_ROLE
AQ_USER_ROLE AQ_USER_ROLE
EXP_FULL_DATABASE EXP_FULL_DATABASE


Now I will give 3 role for user which I created like below.


grant connect, resource, dba to virginiauser;


After this I can check the role status.


So far, I studied how to grant the privileges. However, I need to revoke these sometimes. 


revoke connect, resource, dba from virginiauser;


After granting roles to user, I need to give some privileges to this user. In oracle, there are two types of privileges, system and table.  At first, I will grant some privileges for the system.


RDSADMIN CRENETADMIN
INHERIT ANY PRIVILEGES  
GRANT ANY OBJECT PRIVILEGE GRANT ANY OBJECT PRIVILEGE
DROP ANY DIRECTORY DROP ANY DIRECTORY
UNLIMITED TABLESPACE UNLIMITED TABLESPACE
EXEMPT REDACTION POLICY EXEMPT REDACTION POLICY
CHANGE NOTIFICATION CHANGE NOTIFICATION
FLASHBACK ANY TABLE FLASHBACK ANY TABLE
ALTER SYSTEM  
ALTER PUBLIC DATABASE LINK ALTER PUBLIC DATABASE LINK
EXEMPT ACCESS POLICY EXEMPT ACCESS POLICY
ALTER DATABASE  
SELECT ANY TABLE SELECT ANY TABLE
RESTRICTED SESSION RESTRICTED SESSION
ALTER DATABASE LINK ALTER DATABASE LINK
CREATE EXTERNAL JOB  
EXEMPT IDENTITY POLICY EXEMPT IDENTITY POLICY
ADMINISTER DATABASE TRIGGER  
GRANT ANY ROLE  


I can give(remove) some system privileges like below.


grant UNLIMITED TABLESPACE TO myadmin;

revoke UNLIMITED TABLESPACE from myadmin;


After this, I can verify the status with "select * from dba_sys_privs" query.


Now, the table privileges left. In fact, I can not explain about this without the table. I will add more detail later in this post. Just look at the command how to see.


select * from dba_tab_privs where grantee='CRENETADMIN';


5. Create(Drop) Table


Before I create the Data table, I need to create table space. In this instruction, what kinds of parameters are required is explained. This command show the table spaces list. 


select * from dba_tablespaces;


There are some necessary factor for this table space. Fist is "Contents". There are three values to category. In the instruction, there are comments like below.


A permanent tablespace contains persistent schema objects. Objects in permanent tablespaces are stored in datafiles.


An undo tablespace is a type of permanent tablespace used by Oracle Database to manage undo data if you are running your database in automatic undo management mode. Oracle strongly recommends that you use automatic undo management mode rather than using rollback segments for undo.


A temporary tablespace contains schema objects only for the duration of a session. Objects in temporary tablespaces are stored in tempfiles. 


From this statements above, "Undo tablespace" is not friendly rather than others. Please, read these instructions, https://oracle-base.com/articles/9i/automatic-undo-management and https://docs.oracle.com/cd/B28359_01/server.111/b28310/undo002.htm#ADMIN11462. For this "Undo tablespace",  "automatic undo management" is required. The recently version is set as defaults. Also, I tried to change this configuration in AWS RDS. Howerer, I can not alter this.


Second is the datafile conecpt such as "bigfile" or "smallfile". In this instruction


A bigfile tablespace contains only one datafile or tempfile, which can contain up to approximately 4 billion (232) blocks. The maximum size of the single datafile or tempfile is 128 terabytes (TB) for a tablespace with 32K blocks and 32TB for a tablespace with 8K blocks.


A smallfile tablespace is a traditional Oracle tablespace, which can contain 1022 datafiles or tempfiles, each of which can contain up to approximately 4 million (222) blocks. 


From this statements, I can not understand "smallfile tablespace can contain multiple datafiles". Please look at this link


create tablespace homeworkts 

datafile 'D:\oradata\orcl\df1.dbf' size 4m, 

         'D:\oradata\orcl\df2.dbf' size 4m, 

         'D:\oradata\orcl\df3.dbf' size 4m; 


However, this command does not work in AWS RDS. Because RDS does not give any permission for this like below. I can not create the datafile.


There are so many options, however I can not handle all of things. I think I can create tablespace with these information. I hope this instruction will be helpful.


# Permament-Bigfile tablespace

create bigfile tablespace myspace;


# Permament-Bigfile tablespace

create bigfile temporary tablespace mytemp;


After this command, I can see the "select * from dba_tablespaces;" and "select * from dba_data_files;"


select tablespace_name,contents,bigfile from dba_tablespaces;


select file_name,tablespace_name,autoextensible from dba_data_files;


Now, I created table spaces. I can start to create table. Please look at this, there are sample example to create table. 


create table user.info ( name varchar2(15), id number(10) ) tablespace myspace;


This command create "error" like below. This error is occurred by table name.


In oracle, table name must be "schema (=user)"+"table name". This is the reason why the schema (=user) is import. Because of this, I have to revise the command below. "MYADMIN" is created user before.


create table MYADMIN.user_info ( name varchar2(15), id number(10) );


After this command I can see the table information with "select * from dba_tables;"


select * from dba_tables;

select * from dba_tables where owner='MYADMIN';


There are 2 things special. I insert "MYADMIN.user_info" as the table name. Howerver, oracle re-arrange this table name with "owner" and "table_name". Also, "USERS" tablespace is allocated for this table, which is default permanent tablespace. However I want that this table is located in "MYSAPCE" table space. Thus, it should be revised like below.


create table MYADMIN.user_info ( name varchar2(15), id number(10) ) tablespace myspace;


However, I can create this. Because this table name has already existed. Thus I need to drop this table with this command.


drop table MYADMIN.user_info;


Now, this is what I want.


6. Insert, Update, Delete Data


Before start this part, I need to covert account with "MYADMIN", which is used as the "schema name".


select * from user_tables;


"user_tables" show the information which belonged to logon account. If I can see table only I create, it is OK.


However, there is other way to find out logon current user. In this instruction, "select user from dual;" is command.


select user from dual;


I will follow this instruction. At first, I will try to insert some data into "user_info" table;


insert into user_info (id, name) values (101,'fox');

insert into MYADMIN.user_info (id, name) values (102,'wolf');


Please note that I can use both of "schema+table name" and "table name", because the current user is same as the schema name. After this command, look at the table information like below.


select * from MYADMIN.user_info;


Now, I will update the data. Please note I use "schema+table name" as the table name. It does not affect the result.


update MYADMIN.user_info set ID=103 where name='wolf';


Finally, Delete is left. This is not difficult to run.


delete from user_info where id=103;


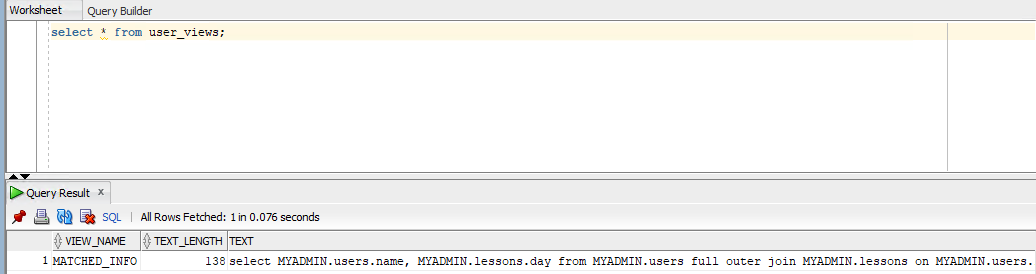
7. Troubleshooting. (table privileges with other schema)


I am happy to learn how to insert, update and delete data. However, I need to think about my privileges. So far, I did not give any permission about table. The reason why this can be done is that this user is the "schema user". It look like admin user for this table. If I create another user (=schema), I wonder if this user can insert, update and delete with this table.


# create new (another) user

create user myuser indentified by myuser;


This user does not any role and privileges at the beginning. 


I can not logon into the Database. I add the role with "connect"


grant connect to myuser;


Now, I can login. However, I can not select, insert, update and delete over table. I need to give some privileges.


With administrator account, I will give this user some permissions. Please, look at the this instruction.


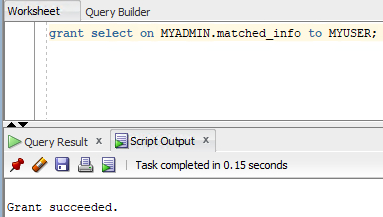
grant select, insert, update, delete on MYADMIN.user_info to MYUSER;

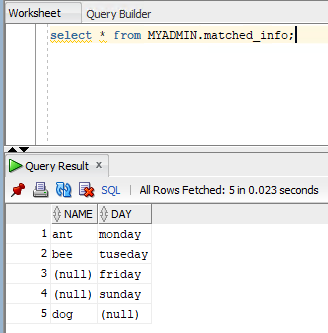
Now, I can select, insert, update and delete.


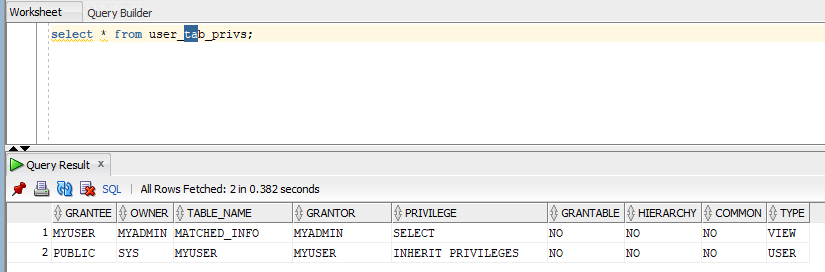
If I want to know what kinds of table privileges does this user has, use this command


select * from dba_tab_privs where grantee='MYUSER';


This is basic oracle database concept. I hope it will be helpful. If I have enough time to learn, I will handle more. However, I am not DBA engineer. I hope I can keep touch about this part again.


Reference


[ 1 ] https://docs.aws.amazon.com/ko_kr/AmazonRDS/latest/UserGuide/USER_ConnectToOracleInstance.html

[ 2 ] https://www.oracle.com/technetwork/developer-tools/sql-developer/downloads/index.html

[ 3 ] https://docs.oracle.com/cd/B28359_01/server.111/b28286/statements_8003.htm#SQLRF01503

[ 4 ] https://chartio.com/resources/tutorials/how-to-create-a-user-and-grant-permissions-in-oracle/

[ 5 ] https://docs.oracle.com/cd/B19306_01/server.102/b14200/statements_7003.htm

[ 6 ] https://stackoverflow.com/questions/8496152/how-to-create-a-tablespace-with-multiple-datafiles

[ 7 ] https://docs.oracle.com/en/database/oracle/oracle-database/12.2/sqlrf/CREATE-TABLESPACE.html#GUID-51F07BF5-EFAF-4910-9040-C473B86A8BF9

[ 8 ] https://www.java2s.com/Code/Oracle/User-Previliege/Getcurrentusername.htm

[ 9 ] https://www.oracle-dba-online.com/sql/insert_update_delete_merge.htm

How to install self-signed certification on Windows 2012 R2 for RDP?


Recently, I have some issue about the RDP security. I try to find out how to use my own certification. Please note that it is not recommend that I use self-signed certification. Because it can make more complex trouble. However, I do not have any certification. So I will use self-signed certification for this post.


1. Pre-requisite


Before I start this post. I need to prepare the self-signed certification. In this post, I will write how to create certification with openssl. In addition, I need to merge and covert from "cert (crt)" to "pfx". In windows, the matched private key is necessary according to certification which I want to insert. 


# create CSR (Certificate Signing Request) file

openssl req -new -key crenet-pri.pem -out crenet.csr


# create certificate file

openssl x509 -req -days 365 -in crenet.csr -signkey crenet-pri.pem -out crenet.crt


# create "pfx" file 

openssl pkcs12 -export -in crenet.crt -inkey crenet-pri.pem -out crenet.pfx


2. Install certification feature and Import certificate file.


Run "mmc" and open the console. In here, I can install and configure the certification.


There is nothing at first. I need to install the certification. 


I need to follow "File > Add/Remove Snap-ins"


And choose the what I want to install. In my case, Certificates is chosen. After "Add the Certificate for Snap-in". I can see the menu like below. Select "Computer account".


Select "Local computer"


After finishing the above steps, I can see the "Certificates" category on the left of side. In "Certificates > Personal > All Tasks > Import", I can see my self-signed certificate.


Now, I can start the "Certificate Import Wizard". Click "Next"


There is the form to insert the path for certificate which is the "pfx" file.


Input the optional values if I used the values.


Select the location which the certificate is located in. In this case, "Personal" is used.


Now I can check all of information.


Click Finish. I can check the certification which is located in Personal like below.


Now, I have done to insert my certificate.


3. Check the certification status and activate the certification.


After installation and import process above, I can check the detail of certification which is installed with "double click".  If it is status is good. I can see the comment "You have a private key that corresponds to this certificate".


Now, self-signed certification is imported with correct steps and status. Now, I need to check "Thumbprint" to activate and covert this certification from default. In Details, I can see the "Thumbprint" like below.


This value of "Thumbprint" is necessary. This value is used with command line below. There are two types of command. In my case, I will use "Command mode"


# Command mode 

wmic /namespace:\\root\cimv2\TerminalServices PATH Win32_TSGeneralSetting Set SSLCertificateSHA1Hash="THUMBPRINT" 


# Powershell mode

$path = (Get-WmiObject -class "Win32_TSGeneralSetting" -Namespace root\cimv2\terminalservices -Filter "TerminalName='RDP-tcp'").__path Set-WmiInstance -Path $path -argument @{SSLCertificateSHA1Hash="THUMBPRINT"}


In the CMD, I can run like below and I will confirm that "Update is successful".


4. Access the Remote Desktop


Now, I will access and I can confirm the certification is changed like below.


Basically, RDP is encrypted by TLS. With the steps above. It is more customized.


I can see the TLS handshake by the wireshark packets.


5. (Optional) Enforce the RDP data and connection encryption level.


In this post. there are several steps to make more secure RDP connection. In the middle of contents, "Local Group Policy Editor" are used to enhance the security. Run "gpedit.msc" at first.


In "Computer Configuration > Administrative Templates > Windows Components > Remote Desktop Services > Remote Desktop Session Host > Security", there are several parameter which I have to change.


1. Set Client Connection Encryption Level (Enable/High Level)

2. Require Secure RPC communication. (Enable)

3. Require Use of Specific Security Layer for Remote (RDP) connections. (Enable/SSL)

4. Require user authentication for remote connections by using Network Level Authentication (Enable)


Reference 


[ 1 ] https://www.geocerts.com/support/how-to-export-import-ssl-certificate-between-windows-servers 

[ 2 ] https://www.youtube.com/watch?v=qDwF0_ax6_w

[ 3 ] http://createnetech.tistory.com/12?category=679927

[ 4 ] https://www.ssl.com/how-to/create-a-pfx-p12-certificate-file-using-openssl/

[ 5 ] https://www.howtogeek.com/175087/how-to-enable-and-secure-remote-desktop-on-windows/ 

How to use etcd (multi-machine cluster TLS/SSL security mode) in Ubuntu?


From this post, I run multi-machine cluster basic mode. Now, I will run multi-machine cluster with TLS/SSL security. I am not the security engineer. I am not friendly about TLS/SSL concepts. I studied about key and chain concept before, however it still difficult to understand it. In this documentation, there are 2 things required,  a unique key pair (member.crt, member.key) and shared cluster CA certificate (ca.crt). In this post, I address how to create these.


1. Overview the command for multi-machine cluster with TLS/SSL.


From this documentation, the commands are look like below.


etcd --name infra0 --initial-advertise-peer-urls https://172.22.0.96:2380 \

  --listen-peer-urls https://172.22.0.96:2380 \

  --listen-client-urls https://172.22.0.96:2379,https://127.0.0.1:2379 \

  --advertise-client-urls https://172.22.0.96:2379 \

  --initial-cluster-token etcd-cluster-1 \

  --initial-cluster infra0=https://172.22.0.96:2380,infra1=https://172.22.0.33:2380,infra2=https://172.22.0.133:2380 \

  --initial-cluster-state new \

  --client-cert-auth --trusted-ca-file=/path/to/ca-client.crt \

  --cert-file=/path/to/infra0-client.crt --key-file=/path/to/infra0-client.key \

  --peer-client-cert-auth --peer-trusted-ca-file=ca-peer.crt \

  --peer-cert-file=/path/to/infra0-peer.crt --peer-key-file=/path/to/infra0-peer.key


etcd --name infra1 --initial-advertise-peer-urls https://172.22.0.33:2380 \

  --listen-peer-urls https://172.22.0.33:2380 \

  --listen-client-urls https://172.22.0.33:2379,https://127.0.0.1:2379 \

  --advertise-client-urls https://172.22.0.33:2379 \

  --initial-cluster-token etcd-cluster-1 \

  --initial-cluster infra0=https://172.22.0.96:2380,infra1=https://172.22.0.33:2380,infra2=https://172.22.0.133:2380 \

  --initial-cluster-state new \

  --client-cert-auth --trusted-ca-file=/path/to/ca-client.crt \

  --cert-file=/path/to/infra1-client.crt --key-file=/path/to/infra1-client.key \

  --peer-client-cert-auth --peer-trusted-ca-file=ca-peer.crt \

  --peer-cert-file=/path/to/infra1-peer.crt --peer-key-file=/path/to/infra1-peer.key


etcd --name infra2 --initial-advertise-peer-urls https://172.22.0.133:2380 \

  --listen-peer-urls https://172.22.0.133:2380 \

  --listen-client-urls https://172.22.0.133:2379,https://127.0.0.1:2379 \

  --advertise-client-urls https://172.22.0.133:2379 \

  --initial-cluster-token etcd-cluster-1 \

  --initial-cluster infra0=https://172.22.0.96:2380,infra1=https://172.22.0.33:2380,infra2=https://172.22.0.133:2380 \

  --initial-cluster-state new \

  --client-cert-auth --trusted-ca-file=/path/to/ca-client.crt \

  --cert-file=/path/to/infra2-client.crt --key-file=/path/to/infra2-client.key \

  --peer-client-cert-auth --peer-trusted-ca-file=ca-peer.crt \

  --peer-cert-file=/path/to/infra2-peer.crt --peer-key-file=/path/to/infra2-peer.key 


From command line above, there is something unknown like below. I need certificate. However, I do not know how and what can I obtain these.


  --client-cert-auth --trusted-ca-file=/path/to/ca-client.crt \

  --cert-file=/path/to/infra2-client.crt --key-file=/path/to/infra2-client.key \

  --peer-client-cert-auth --peer-trusted-ca-file=ca-peer.crt \

  --peer-cert-file=/path/to/infra2-peer.crt --peer-key-file=/path/to/infra2-peer.key  


"cfssl" can do for these. In this Git link, there are introduction about "cfssl" like below.


This demonstrates using Cloudflare's cfssl to easily generate certificates for an etcd cluster. 


2. Download and install the "cfssl"


In this documentation, there are installation guide and usage


mkdir ~/bin

curl -s -L -o ~/bin/cfssl https://pkg.cfssl.org/R1.2/cfssl_linux-amd64

curl -s -L -o ~/bin/cfssljson https://pkg.cfssl.org/R1.2/cfssljson_linux-amd64

chmod +x ~/bin/{cfssl,cfssljson} 

export PATH=$PATH:~/bin 


It is so simple. I verify the version.


# cfssl version

Version: 1.2.0

Revision: dev

Runtime: go1.6


3. Create root certificate (CA).


In the command, there are 2 root certificate, ca-client.crt and ca-peer.crt. It will be shared between all hosts. Thus, I create these certificate on single host and copy into others. To create root certificate, I need 2 files, "config.json" and "csr.json". The contents is here.


# vi ca-client-config.json

{

  "signing": {

    "default": {

        "usages": [

          "signing",

          "key encipherment",

          "server auth",

          "client auth"

        ],

        "expiry": "8760h"

    }

  }

}


# vi ca-client-csr.json

{ "CN": "CA Client", "key": { "algo": "ecdsa", "size": 384 }, "names": [ { "O": "Honest Achmed's Used Certificates", "OU": "Hastily-Generated Values Divison", "L": "San Francisco", "ST": "California", "C": "US" } ] }


I create "ca-client-config.json" and "ca-client-csr.json" for ca-client certificate. I have to create more for ca-peer certificate. CN name should be different.


# vi ca-peer-config.json

{

  "signing": {

    "default": {

        "usages": [

          "signing",

          "key encipherment",

          "server auth",

          "client auth"

        ],

        "expiry": "8760h"

    }

  }

}


# vi ca-peer-csr.json

{ "CN": "CA Peer", "key": { "algo": "ecdsa", "size": 384 }, "names": [ { "O": "Honest Achmed's Used Certificates", "OU": "Hastily-Generated Values Divison", "L": "San Francisco", "ST": "California", "C": "US" } ] }


Now, I can generate with files above. Please, note that I will obtain some files which is named "ca.csr", "ca-key.pem" and "ca.pem"


# cfssl gencert -initca ca-client-csr.json | cfssljson -bare ca-client -

# cfssl gencert -initca ca-peer-csr.json | cfssljson -bare ca-peer -


I can verify this is normally good or not. 


# openssl x509 -noout -text -in ca-client.pem

# openssl x509 -noout -text -in ca-peer.pem


It's good. I can generate intermediate certification with this certificate. Therefore I need to copy these files into other hosts. I move files on each directory like below. (I create these directory on every hosts)


# mkdir ~/cert/clientm

# cp ca-client* ~/cert/client/

# ls ~/cert/client/

ca-client-key.pem ca-client.pem ca-client-config.json


# mkdir ~/cert/peer

# cp ca-peer* ~/cert/peer/

# ls ~/cert/peer/

ca-peer-key.pem  ca-peer.pem 


In this documentation, there are several security models. Example 2 (Red) and Example 3(Blue) are matched with the command above.


etcd --name infra0 --initial-advertise-peer-urls https://172.22.0.96:2380 \

  --listen-peer-urls https://172.22.0.96:2380 \

  --listen-client-urls https://172.22.0.96:2379,https://127.0.0.1:2379 \

  --advertise-client-urls https://172.22.0.96:2379 \

  --initial-cluster-token etcd-cluster-1 \

  --initial-cluster infra0=https://172.22.0.96:2380,infra1=https://172.22.0.33:2380,infra2=https://172.22.0.133:2380 \

  --initial-cluster-state new \

  --client-cert-auth --trusted-ca-file=/path/to/ca-client.crt \

  --cert-file=/path/to/infra0-client.crt --key-file=/path/to/infra0-client.key \

  --peer-client-cert-auth --peer-trusted-ca-file=ca-peer.crt \

  --peer-cert-file=/path/to/infra0-peer.crt --peer-key-file=/path/to/infra0-peer.key 


At first, In example 2, I need server to run "etcd" and I need client certificate to get response. And second, In example 3, I need peer certificate to communicate between hosts.


4. Create server, client and peer certificate.


Look at this post, there are way to generate each certificate. I create server certificate. To create, I need to "server.json" file. In this Git, there are sample JSON file. For server.json, hosts information are most important.


IP's currently in the config should be replaced/added with IP addresses of each cluster node, please note 127.0.0.1 is always required for loopback  


# cat server.json

{

  "CN": "infra0-client",

  "hosts": [

    "172.22.0.96",

    "127.0.0.1"

  ],

  "key": {

    "algo": "ecdsa",

    "size": 384

  },

  "names": [

    {

      "O": "autogenerated",

      "OU": "etcd cluster",

      "L": "the internet"

    }

  ]

}


# cat server.json

{

  "CN": "infra1-client",

  "hosts": [

    "172.22.0.33",

    "127.0.0.1"

  ],

  "key": {

    "algo": "ecdsa",

    "size": 384

  },

  "names": [

    {

      "O": "autogenerated",

      "OU": "etcd cluster",

      "L": "the internet"

    }

  ]

}


# cat server.json { "CN": "infra2-client", "hosts": [ "172.22.0.133", "127.0.0.1" ], "key": { "algo": "ecdsa", "size": 384 }, "names": [ { "O": "autogenerated", "OU": "etcd cluster", "L": "the internet" } ] }


I will generate server certificate. Please note that the command above use the name "infra-client", however, this is server certification, it is not client certificate.


# cfssl gencert -ca=client/ca-client.pem -ca-key=client/ca-client-key.pem -config=client/ca-client-config.json -profile=server server.json | cfssljson -bare infra0-client

# mv infra0-client* client/


# cfssl gencert -ca=client/ca-client.pem -ca-key=client/ca-client-key.pem -config=client/ca-client-config.json -profile=server server.json | cfssljson -bare infra1-client

# mv infra1-client* client/


# cfssl gencert -ca=client/ca-client.pem -ca-key=client/ca-client-key.pem -config=client/ca-client-config.json -profile=server server.json | cfssljson -bare infra2-client

# mv infra2-client* client/


"-profile=server" option makes server certificate. Next, I create the peer certificate. Also I need "peer.json" file. This file is similar with "server.json". However, CommonName (CN) should be different.


# cat peer.json

{

  "CN": "infra0-peer",

  "hosts": [

    "172.22.0.96",

    "127.0.0.1"

  ],

  "key": {

    "algo": "ecdsa",

    "size": 384

  },

  "names": [

    {

      "O": "autogenerated",

      "OU": "etcd cluster",

      "L": "the internet"

    }

  ]

}


# cat peer.json

{

  "CN": "infra1-peer",

  "hosts": [

    "172.22.0.33",

    "127.0.0.1"

  ],

  "key": {

    "algo": "ecdsa",

    "size": 384

  },

  "names": [

    {

      "O": "autogenerated",

      "OU": "etcd cluster",

      "L": "the internet"

    }

  ]

}


# cat peer.json { "CN": "infra2-peer", "hosts": [ "172.22.0.133", "127.0.0.1" ], "key": { "algo": "ecdsa", "size": 384 }, "names": [ { "O": "autogenerated", "OU": "etcd cluster", "L": "the internet" } ] }


I generate peer certificate with peer.json file above. "-profile=peer" is adopted at this time.


# cfssl gencert -ca=peer/ca-peer.pem -ca-key=peer/ca-peer-key.pem -config=peer/ca-peer-config.json -profile=peer peer.json | cfssljson -bare infra0-peer

# mv infra0-peer* peer/


# cfssl gencert -ca=peer/ca-peer.pem -ca-key=peer/ca-peer-key.pem -config=peer/ca-peer-config.json -profile=peer peer.json | cfssljson -bare infra1-peer

# mv infra1-peer* peer/


# cfssl gencert -ca=peer/ca-peer.pem -ca-key=peer/ca-peer-key.pem -config=peer/ca-peer-config.json -profile=peer peer.json | cfssljson -bare infra2-peer

# mv infra2-peer* peer/


I create server certificate and peer certificate. Therefore, I can run "etcd" with both certificate. However, I need client certificate to obtain response. I will use same root certificate of the server. I need "client.json" file.


# cat client.json { "CN": "infra0", "hosts": [""], "key": { "algo": "ecdsa", "size": 384 }, "names": [ { "O": "autogenerated", "OU": "etcd cluster", "L": "the internet" } ] }


# cat client.json
{
  "CN": "infra1",
  "hosts": [""],
  "key": {
    "algo": "ecdsa",
    "size": 384
  },
  "names": [
    {
      "O": "autogenerated",
      "OU": "etcd cluster",
      "L": "the internet"
    }
  ]
}

# cat client.json
{
  "CN": "infra2",
  "hosts": [""],
  "key": {
    "algo": "ecdsa",
    "size": 384
  },
  "names": [
    {
      "O": "autogenerated",
      "OU": "etcd cluster",
      "L": "the internet"
    }
  ]
}


I generate peer certificate with client.json file above. "-profile=client" is adopted at this time.


# cfssl gencert -ca=client/ca-client.pem -ca-key=client/ca-client-key.pem -config=client/ca-client-config.json -profile=client client.json | cfssljson -bare infra0


# cfssl gencert -ca=client/ca-client.pem -ca-key=client/ca-client-key.pem -config=client/ca-client-config.json -profile=client client.json | cfssljson -bare infra1


# cfssl gencert -ca=client/ca-client.pem -ca-key=client/ca-client-key.pem -config=client/ca-client-config.json -profile=client client.json | cfssljson -bare infra2


5. Run etcd in security mode.


I ready all certificate to run in security mode. Final command looks like below.


etcd --name infra0 --initial-advertise-peer-urls https://172.22.0.96:2380 \

  --listen-peer-urls https://172.22.0.96:2380 \

  --listen-client-urls https://172.22.0.96:2379,https://127.0.0.1:2379 \

  --advertise-client-urls https://172.22.0.96:2379 \

  --initial-cluster-token etcd-cluster-1 \

  --initial-cluster infra0=https://172.22.0.96:2380,infra1=https://172.22.0.33:2380,infra2=https://172.22.0.133:2380 \

  --initial-cluster-state new \

  --client-cert-auth --trusted-ca-file=client/ca-client.pem \

  --cert-file=client/infra0-client.pem --key-file=client/infra0-client-key.pem \

  --peer-client-cert-auth --peer-trusted-ca-file=peer/ca-peer.pem \

  --peer-cert-file=peer/infra0-peer.pem --peer-key-file=peer/infra0-peer-key.pem


etcd --name infra1 --initial-advertise-peer-urls https://172.22.0.33:2380 \

  --listen-peer-urls https://172.22.0.33:2380 \

  --listen-client-urls https://172.22.0.33:2379,https://127.0.0.1:2379 \

  --advertise-client-urls https://172.22.0.33:2379 \

  --initial-cluster-token etcd-cluster-1 \

  --initial-cluster infra0=https://172.22.0.96:2380,infra1=https://172.22.0.33:2380,infra2=https://172.22.0.133:2380 \

  --initial-cluster-state new \

  --client-cert-auth --trusted-ca-file=client/ca-client.pem \

  --cert-file=client/infra1-client.pem --key-file=client/infra1-client-key.pem \

  --peer-client-cert-auth --peer-trusted-ca-file=peer/ca-peer.pem \

  --peer-cert-file=peer/infra1-peer.pem --peer-key-file=peer/infra1-peer-key.pem


etcd --name infra2 --initial-advertise-peer-urls https://172.22.0.133:2380 \

  --listen-peer-urls https://172.22.0.133:2380 \

  --listen-client-urls https://172.22.0.133:2379,https://127.0.0.1:2379 \

  --advertise-client-urls https://172.22.0.133:2379 \

  --initial-cluster-token etcd-cluster-1 \

  --initial-cluster infra0=https://172.22.0.96:2380,infra1=https://172.22.0.33:2380,infra2=https://172.22.0.133:2380 \

  --initial-cluster-state new \

  --client-cert-auth --trusted-ca-file=client/ca-client.pem \

  --cert-file=client/infra2-client.pem --key-file=client/infra2-client-key.pem \

  --peer-client-cert-auth --peer-trusted-ca-file=peer/ca-peer.pem \

  --peer-cert-file=peer/infra2-peer.pem --peer-key-file=peer/infra2-peer-key.pem


At this time, I do not know command line to put and get. However, there is sample curl command in this documentation (Example 2).


curl --cacert client/ca-client.pem --cert infra0.pem --key infra0-key.pem -L https://172.22.0.96:2379/v2/keys/foo -XPUT -d value=bar -v 


# curl --cacert client/ca-client.pem --cert infra0.pem --key infra0-key.pem -L https://172.22.0.96:2379/v2/keys/foo -XPUT -d value=bar -v * Trying 172.22.0.96... * Connected to 172.22.0.96 (172.22.0.96) port 2379 (#0) * found 1 certificates in client/ca-client.pem * found 592 certificates in /etc/ssl/certs * ALPN, offering http/1.1 * SSL connection using TLS1.2 / ECDHE_ECDSA_AES_128_GCM_SHA256 * server certificate verification OK * server certificate status verification SKIPPED * common name: infra0-client (matched) * server certificate expiration date OK * server certificate activation date OK * certificate public key: EC * certificate version: #3 * subject: L=the internet,O=autogenerated,OU=etcd cluster,CN=infra0-client * start date: Fri, 19 Oct 2018 16:34:00 GMT * expire date: Sat, 19 Oct 2019 16:34:00 GMT * issuer: C=US,ST=California,L=San Francisco,O=Honest Achmed's Used Certificates,OU=Hastily-Generated Values Divison,CN=CA Client * compression: NULL * ALPN, server did not agree to a protocol > PUT /v2/keys/foo HTTP/1.1 > Host: 172.22.0.96:2379 > User-Agent: curl/7.47.0 > Accept: */* > Content-Length: 9 > Content-Type: application/x-www-form-urlencoded > * upload completely sent off: 9 out of 9 bytes < HTTP/1.1 201 Created < Content-Type: application/json < X-Etcd-Cluster-Id: e3631873cee60c62 < X-Etcd-Index: 17 < X-Raft-Index: 26 < X-Raft-Term: 47 < Date: Fri, 19 Oct 2018 17:33:13 GMT < Content-Length: 90 < {"action":"set","node":{"key":"/foo","value":"bar","modifiedIndex":17,"createdIndex":17}}


# curl --cacert client/ca-client.pem --cert infra0.pem --key infra0-key.pem -L https://172.22.0.96:2379/v2/keys/foo

{"action":"get","node":{"key":"/foo","value":"bar","modifiedIndex":17,"createdIndex":17}}


I can see the result {"action":"set","node":{"key":"/foo","value":"bar","modifiedIndex":17,"createdIndex":17}}. It's works now.


6. Run automatic certificate mode


So far, I do so many step to run in security mode. It's is not simple. Because of this, etcd offers automatic certificate mode. In this mode, etcd create certificate automatically. "--auto-tls" and "--peer-auto-tls" are replaced instead of part for certificate.


etcd --name infra0 --initial-advertise-peer-urls https://172.22.0.96:2380 \

  --listen-peer-urls https://172.22.0.96:2380 \

  --listen-client-urls https://172.22.0.96:2379,https://127.0.0.1:2379 \

  --advertise-client-urls https://172.22.0.96:2379 \

  --initial-cluster-token etcd-cluster-1 \

  --initial-cluster infra0=https://172.22.0.96:2380,infra1=https://172.22.0.33:2380,infra2=https://172.22.0.133:2380 \

  --initial-cluster-state new \

  --auto-tls \

  --peer-auto-tls


etcd --name infra1 --initial-advertise-peer-urls https://172.22.0.33:2380 \

  --listen-peer-urls https://172.22.0.33:2380 \

  --listen-client-urls https://172.22.0.33:2379,https://127.0.0.1:2379 \

  --advertise-client-urls https://172.22.0.33:2379 \

  --initial-cluster-token etcd-cluster-1 \

  --initial-cluster infra0=https://172.22.0.96:2380,infra1=https://172.22.0.33:2380,infra2=https://172.22.0.133:2380 \

  --initial-cluster-state new \

  --auto-tls \

  --peer-auto-tls


etcd --name infra2 --initial-advertise-peer-urls https://172.22.0.133:2380 \

  --listen-peer-urls https://172.22.0.133:2380 \

  --listen-client-urls https://172.22.0.133:2379,https://127.0.0.1:2379 \

  --advertise-client-urls https://172.22.0.133:2379 \

  --initial-cluster-token etcd-cluster-1 \

  --initial-cluster infra0=https://172.22.0.96:2380,infra1=https://172.22.0.33:2380,infra2=https://172.22.0.133:2380 \

  --initial-cluster-state new \

  --auto-tls \

  --peer-auto-tls


In Example 4 of this documentation, "curl -k https://127.0.0.1:2379/v2/keys/foo -Xput -d value=bar -v" command is used. (This site also useful)


# curl -k -X "PUT" https://127.0.0.1:2379/v2/keys/seoul -d value='seoul'

{"action":"set","node":{"key":"/seoul","value":"seoul","modifiedIndex":18,"createdIndex":18}}


# curl -k https://127.0.0.1:2379/v2/keys/seoul

{"action":"get","node":{"key":"/seoul","value":"seoul","modifiedIndex":18,"createdIndex":18}}


# curl -k -X "DELETE" https://127.0.0.1:2379/v2/keys/seoul


Now, I can use with simple model.


Reference


[ 1 ] http://createnetech.tistory.com/16

[ 2 ] http://createnetech.tistory.com/14

[ 3 ] http://createnetech.tistory.com/12

[ 4 ] https://github.com/etcd-io/etcd/blob/master/Documentation/op-guide/clustering.md

[ 5 ] https://coreos.com/etcd/docs/latest/op-guide/security.html

[ 6 ] https://github.com/etcd-io/etcd/blob/master/Documentation/op-guide/security.md

[ 7 ] https://coreos.com/os/docs/latest/generate-self-signed-certificates.html

[ 8 ] https://github.com/etcd-io/etcd/tree/master/hack/tls-setup

[ 9 ] https://coreos.com/etcd/docs/latest/demo.html

[ 10 ] https://www.mkyong.com/web/curl-put-request-examples/

+ Recent posts