How install oracle 11g on Windows 2012 R2?  (Enable archive log and Supplemental log)?


Recently, I need to learn the oracle to migrate data from on-prem to aws. In fact, I am not the DBA, therefore, I can not handle deep dive. I hope the I can help someone like me who is the first time about oracle.


1. Pre-requsite.


I have Windows 2012 R2 which supports oracle database 11g. For successful installation, I need the ".Netframe 3.5" installed. In server manager. Click "Add Roles and Features" at first.

In Features, choose the ".NET Framework 3.5 Feature" and Install this.

After then, I am ready to install oracle database.


2. Install oracle database.


The reason why I select Windows is simple to consist rather than Linux. I will follow two instructions mainly. https://www.youtube.com/watch?v=YgFfjLHY-wE is helpful for me. At the beginning, I need installation file. I can download from oralce site.

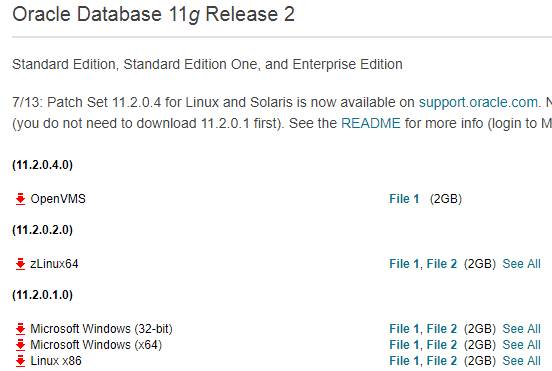
In my case, I will download "Microsoft Windows (X64)". There are two files. After extract both of files, I need to merge and make together in same directory. I copied and pasted whole directory from secondary to first.

After merge, I can see the directory inside. There is the "setup" icon. Click it.

Click Run and Start Installation for oracle database.

Depends on the system environments, Installer make warnning messages like this. However, I can ignore this, Click "yes"

Uncheck "I wish to receive security updates via My Oracle support", because I do not need this feature. It does not matter for next step. In email field, I can leave with empty. Just click "Next"

After Next, the warning message come. However it is also not matter for next step. Just click "yes".

Choose "Create and configure as a database". Because this is first installtion on this server. Click "Next".

In my case, my operating system is windows 2012 R2 server. Therefore, I will choose "Sever class".

I will install with standalone mode. Choose "single instance database installation" and click "Next".

Choose "Advanced Install" and Next.

This step is more important rather than before. In this insturction, there are some explain about the fields. I overview about below. 

Select "Langurage"

I will select "Standard Edition One" (Please note I can select what I want as the oracle database engine).

I select my custom home directory like below.

Select configuration type. In my case, I will choose genera purpose.

"Global database name" is not SID. However, I choosed single instance mode. Becuase of this, the SID can be same as Global database name. However, I can make different in Advanced mode.


I will adjust some paramters for memory, characters set, security and sample schema.

I will UTF-8 for character sets.

I will not make sample schema. Un-check "Create database with sample schema"

During this installation, Oracle Enterprise Manager will be installed, even if I do not want. Just click Next

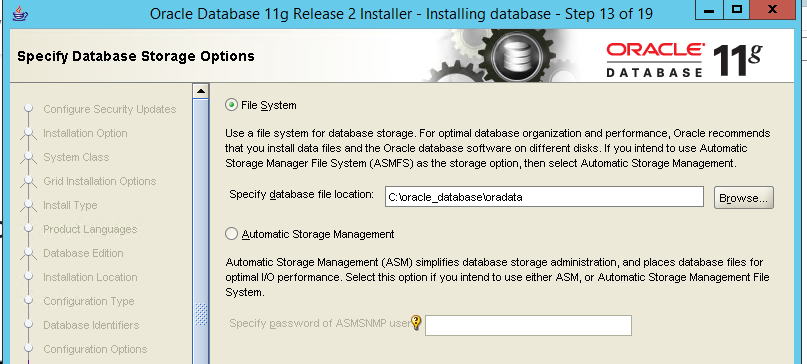
Select File system. Usually it is better to seperate from root disk.

This is the back up configuration. I don't want this at this time.

When I select "Typical Installation". There are Administrative password which is default password for schema (=users)

However, In Advanced mode, I can set password individually like below.


If you use simple password, the warnning message happen like below. In my case, this is test oracle database. I will ignore this. Click yes.

In advaced mode
In typical mode

This is summary, Click Finish to installation.

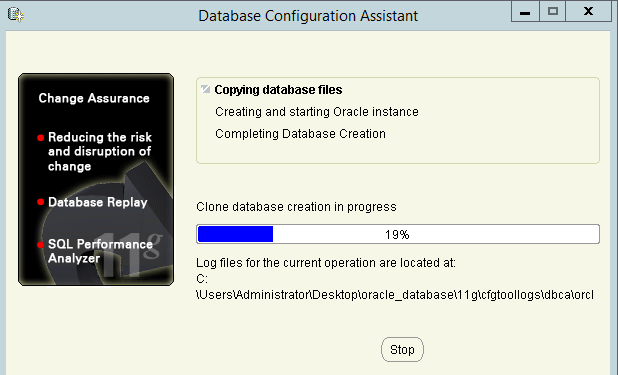
During installation, I can see the configuration assistant process like below.

During the installation, warnning message like below can be occure. In this case, I need to set variable in windows.

I will handle this later. At this time, just click next. I registered the "Administrative password" before. I have told it will be used as default password. However, I have another change to set the password for each schema (=user).

Click Password Management. I will set individual password for "SYS" and "SYSTEM". If you want more, you can set the password more. In oracle database, there are serveral sample test schema such as "HR" and "SCOTT".

Continue with Yes.


3. Access database


Now, I can access database. At this time, I can use sqlplus which is installed with.

I can access with SYSTEM schema account like below

4. Verify the oracle environment for enterprise manager.


During the installation, I see warning message below. Because of this, I need to check environment variables.

In this page, I need to check the status with "emctl status dbconsole"

In this case, I need to set environment value. Properties > Advanced system settings.

In Advanced tap, there are environment value button.

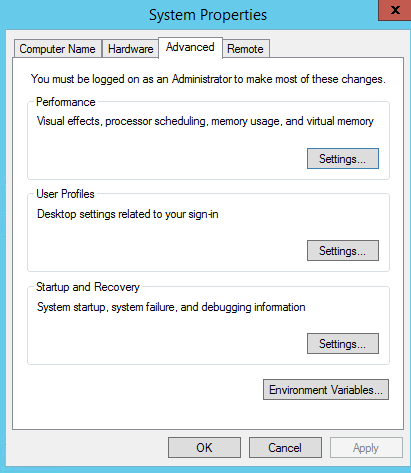
I will add some values in User vriables for Administrator.

For the first issue, I will add "ORACLE_UNQNAME". 

I will reference the value from db_unique_name. In fact, there is value when environment is not set. run "select name,db_unique_name from v$database;".

I will try again "emctl status dbconsole". At this time, there is "Not found" error. 

Go into the directory. Thre is no localhost. Instead, 11.0.0.131 is existed.

To resolve this, I will add "ORACLE_HOSTNAME" like below.

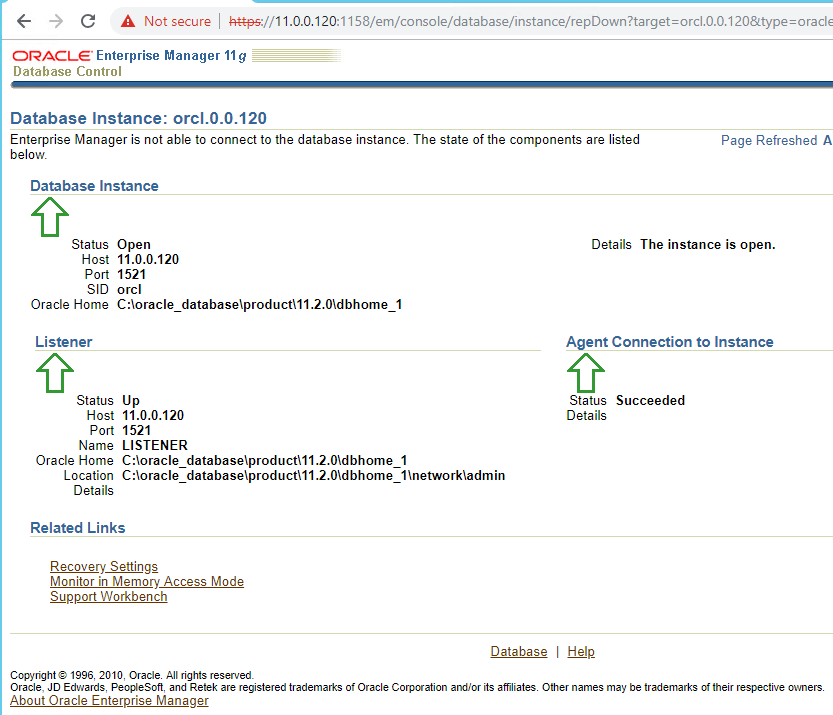
After then, It will be like below. This is normal. However, It look like not perfect. "EM Daemon is not running" is happen.

I followed this video. To make success, I have to start service manually. At this time, I can not start after right button.

Find the file below. In emd properites file, "agentTZRegion=+06:00" should be adjusted with OS time.

I adjust the time 

Now, I can use this.


5. Oralce database stop, start and restart


In this instruction, there are several way to stop and start. In this part, I will overview sqlplus to stop and start.

6. Enable/Disable Archive log Mode


Sometime, it is necessary to enable this feature. It is utilized to synchronize databases with log-miner. For this, I will follow this instruction. run "archive log list". The result is displaied. It is not enabled default.

I need to shutdown with "shutdown immediate". My status is changed to "nolog".

I have to change the status to "mount", which I can change configuration on. Run "startup mount".

Run "alter database archivelog;" to enable

After then, I open the database "alter database open;"

If you want to disable, I use "alter database noarchivelog;"


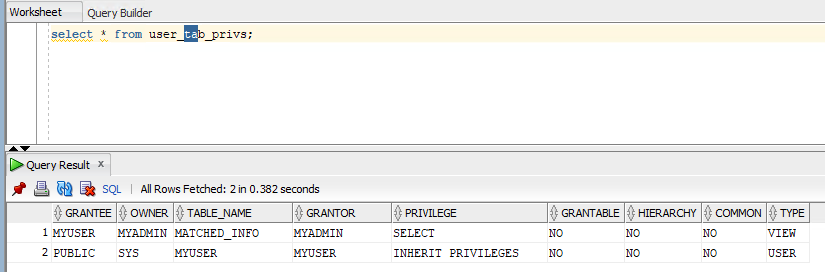
7. Enable/Disable supplemental logging 


This action should be done in database. To check the status, run "select supplemental_log_data_min from v$database;"

To enable and disable, run query like below.

This is the basic configuration for the installation. 


Reference 


[ 1 ] https://www.youtube.com/watch?v=YgFfjLHY-wE

[ 2 ] https://medium.com/@Dracontis/how-to-install-oracle-11g-database-on-windows-server-2012-a4d30d4dc727

[ 3 ] https://www.oracle.com/technetwork/database/enterprise-edition/downloads/index.html

[ 4 ] https://docs.oracle.com/cd/E25178_01/server.1111/e10897/install.htm

[ 5 ] http://www.dba-oracle.com/t_oracle_unqname.htm

[ 6 ] http://blog.mclaughlinsoftware.com/2012/08/23/whats-oracle_unqname/

[ 7 ] https://www.youtube.com/watch?v=Y8i41J7aLwo

[ 8 ] https://docs.oracle.com/cd/B14117_01/win.101/b10113/admin.htm#CDCEJADC

[ 9 ] http://www.oracledistilled.com/oracle-database/backup-and-recovery/enabledisable-archive-log-mode-10g11g/


How to user the Oracle View and Joins (Inner and outer)


Recently, I have been studying about the Oracle Database. In this post, I wrote about the basic concept. In this post, I will handle about View and Joins.


1. Pre-requisite


I will create 2 tables like below.

create table MYADMIN.users ( name varchar2(15), id number(10) ) tablespace myspace;
create table MYADMIN.lessons ( id number(10), lessons varchar2(15), day varchar2(15) ) tablespace myspace;

insert into MYADMIN.users (name, id) values ( 'ant', 101 );
insert into MYADMIN.users (name, id) values ( 'bee', 102 );
insert into MYADMIN.users (name, id) values ( 'dog', 104 );


insert into MYADMIN.lessons (id, lessons, day) values ( 101, 'math', 'monday' );
insert into MYADMIN.lessons (id, lessons, day) values ( 102, 'art', 'tuseday' );
insert into MYADMIN.lessons (id, lessons, day) values ( 103, 'music', 'friday' );
insert into MYADMIN.lessons (id, lessons, day) values ( 105, 'exec', 'sunday' );

After run these command, I can get the tables with datas


Now, I am ready to start.


2. Inner and  Right, Left, Full Joins


I will follow this instructions. In this instructions, It has more detail. In this post, I will handle the way how to use this. Joins are one of filters with tables. Therefore, I can extract the matched data from tables.


2-1. Inner Join


As the figure, It shows the result after Inner Join. I can extract the matched data as intersection. This is the command. 

select name from MYADMIN.users inner join MYADMIN.lessons on MYADMIN.users.id = MYADMIN.lessons.id; 

This command means that I can extract intersection from both of "MYADMIN.users" table and "MYADMIN.lessons" table.


2-2. Left outer Join


With this option, Left side of tables are the source. This source start to compare data of the Right side of tables. When condition is matched. It extract matched data from both of table. However, the condition is not matched, the data from the source can be obtained but the data from right side of table inserted as the "<null>"

select MYADMIN.users.name, MYADMIN.lessons.day from MYADMIN.users left outer join MYADMIN.lessons on MYADMIN.users.id = MYADMIN.lessons.id; 


2-3. Right outer Join

This is reverse concept of the left outer join above. At this time, left side of tables is the source. Therefore, the value could be "<null>" from right side of tables, when condition does not match.

select MYADMIN.users.name, MYADMIN.lessons.day from MYADMIN.users right outer join MYADMIN.lessons on MYADMIN.users.id = MYADMIN.lessons.id; 

2-4. Full outer Join

With this option, left side and right side can be source. If the column from left side which does not exist in right side, this is the source. If the column from right side which does not exist in left side, this is also the source.  

select MYADMIN.users.name, MYADMIN.lessons.day from MYADMIN.users full outer join MYADMIN.lessons on MYADMIN.users.id = MYADMIN.lessons.id; 


3. Views


I will follow this instruction for this part. Views is the virtual table which is not existed in real. Sometime, I need to combine or make complex database query. In this case, this views is quite useful. For example, I will create view with the query of full outer join.

# create view

create view matched_info as select MYADMIN.users.name, MYADMIN.lessons.day from MYADMIN.users full outer join MYADMIN.lessons on MYADMIN.users.id = MYADMIN.lessons.id;


# select for query

select * from matched_info; 

I have already told that the view is not real table. Thus, I can not find out the information from "user_tables".

However, I can see the view information from "user_views". In the "TEXT", I can see the query which I used to create.

I think "the views is belonged to the schema (=user), even if it is virtual table". I can give some grant option like below.

grant select on MYADMIN.matched_info to MYUSER;


After login again with "MYUSER" account, I can show the data from this view also.

However, I can not show any detail information with "user_views" or "user_table".

Because, it only show the data whch is created by "schema". Therefore, if you want to see, you need to search through grant option like below.

If I want delete (drop) the view, Use this command below

drop view MYADMIN.matched_info;


Reference 


[ 1 ] https://www.techonthenet.com/oracle/joins.php

[ 2 ] https://createnetech.tistory.com/32

[ 3 ] https://www.techonthenet.com/oracle/views.php


How to use the Oracle database basically?


Recently, I need to study about the Oracle Database. In fact, I am not DBA. In this post, I will write the database queries to use later. I will use the Oracle SQL developer for this test.


1. Download and Connect database


I followed this instruction, which introduce how to connect to database. I need to download Oracle SQL developer from here. After download, I can connect database with connect button on the left of top.


2. Check the Database Properties.


select * from database_properties;


I can see configuration or properties from query like below. For example, I can see the "Default Temp Tablespace" which the user information is stored in.


3. Create (Drop) User


This is important part to understand about Oracle Database. In Oracle, there is "schema" term. I think this is also user. All of objects such as table are connected to this schema. For example, "schema.table_name" is used as the table name when I create table. This instruction show how to create user.


select * from dba_users;


I can get the all of users information in this database like below.


Now, I will create new user which is identified by the password.


create user virginiauser identified by password1;


I can see the new user created with "select * from dba_users;".


If you want to remove or revoke user, follows the command below.


drop user virginiauser;


4. Grant Privileges and role.


However, this user does not have any role and privileges. In this instruction, there are comments for roles.  


Role NameCreated By (Script)Description

CONNECT

SQL.BSQ

Includes the following system privileges: ALTER SESSION, CREATE CLUSTER, CREATE DATABASE LINK, CREATE SEQUENCE, CREATE SESSION, CREATE SYNONYM, CREATE TABLE, CREATE VIEW

RESOURCE

SQL.BSQ

Includes the following system privileges: CREATE CLUSTER, CREATE INDEXTYPE, CREATE OPERATOR, CREATE PROCEDURE, CREATE SEQUENCE, CREATE TABLE, CREATE TRIGGER, CREATE TYPE

DBA

SQL.BSQ

All system privileges WITH ADMIN OPTION

Note: The previous three roles are provided to maintain compatibility with previous versions of Oracle and may not be created automatically in future versions of Oracle. Oracle Corporation recommends that you design your own roles for database security, rather than relying on these roles.

EXP_FULL_DATABASE

CATEXP.SQL

Provides the privileges required to perform full and incremental database exports. Includes: SELECT ANY TABLE, BACKUP ANY TABLE, EXECUTE ANY PROCEDURE, EXECUTE ANY TYPE, ADMINISTER RESOURCE MANAGER, and INSERT, DELETE, and UPDATE on the tables SYS.INCVID, SYS.INCFIL, and SYS.INCEXP. Also the following roles: EXECUTE_CATALOG_ROLE and SELECT_CATALOG_ROLE.

IMP_FULL_DATABASE

CATEXP.SQL

Provides the privileges required to perform full database imports. Includes an extensive list of system privileges (use view DBA_SYS_PRIVS to view privileges) and the following roles: EXECUTE_CATALOG_ROLE and SELECT_CATALOG_ROLE.

DELETE_CATALOG_ROLE

SQL.BSQ

Provides DELETE privilege on the system audit table (AUD$)

EXECUTE_CATALOG_ROLE

SQL.BSQ

Provides EXECUTE privilege on objects in the data dictionary. Also, HS_ADMIN_ROLE.

SELECT_CATALOG_ROLE

SQL.BSQ

Provides SELECT privilege on objects in the data dictionary. Also, HS_ADMIN_ROLE.

RECOVERY_CATALOG_OWNER

CATALOG.SQL

Provides privileges for owner of the recovery catalog. Includes: CREATE SESSION, ALTER SESSION, CREATE SYNONYM, CREATE VIEW, CREATE DATABASE LINK, CREATE TABLE, CREATE CLUSTER, CREATE SEQUENCE, CREATE TRIGGER, and CREATE PROCEDURE

HS_ADMIN_ROLE

CATHS.SQL

Used to protect access to the HS (Heterogeneous Services) data dictionary tables (grants SELECT) and packages (grants EXECUTE). It is granted to SELECT_CATALOG_ROLE and EXECUTE_CATALOG_ROLE such that users with generic data dictionary access also can access the HS data dictionary.

AQ_USER_ROLE

CATQUEUE.SQL

Obsoleted, but kept mainly for release 8.0 compatibility. Provides execute privilege on DBMS_AQ and DBMS_AQIN.

AQ_ADMINISTRATOR_ROLE

CATQUEUE.SQL

Provides privileges to administer Advance Queuing. Includes ENQUEUE ANY QUEUE, DEQUEUE ANY QUEUE, and MANAGE ANY QUEUE, SELECT privileges on AQ tables and EXECUTE privileges on AQ packages.

SNMPAGENT

CATSNMP.SQL

This role is used by Enterprise Manager/Intelligent Agent. Includes ANALYZE ANY and grants SELECT on various views.


In my case, I am AWS Oracle RDS database. Look at the role assigned.


select * from dba_role_privs;


There are so many roles assigned.  There is no any role in user created before. However, there are so many role assigned for 'RDSADMIN' and master account.


RDSADMIN CRENETADMIN
XDBADMIN XDBADMIN
EXECUTE_CATALOG_ROLE EXECUTE_CATALOG_ROLE
CTXAPP CTXAPP
DATAPUMP_IMP_FULL_DATABASE DATAPUMP_EXP_FULL_DATABASE
OPTIMIZER_PROCESSING_RATE OPTIMIZER_PROCESSING_RATE
CAPTURE_ADMIN CAPTURE_ADMIN
IMP_FULL_DATABASE IMP_FULL_DATABASE
AQ_ADMINISTRATOR_ROLE AQ_ADMINISTRATOR_ROLE
EM_EXPRESS_BASIC EM_EXPRESS_BASIC
EM_EXPRESS_ALL EM_EXPRESS_ALL
DELETE_CATALOG_ROLE DELETE_CATALOG_ROLE
SODA_APP SODA_APP
RECOVERY_CATALOG_USER RECOVERY_CATALOG_USER
CONNECT CONNECT
OEM_ADVISOR OEM_ADVISOR
OEM_MONITOR OEM_MONITOR
SELECT_CATALOG_ROLE SELECT_CATALOG_ROLE
HS_ADMIN_SELECT_ROLE HS_ADMIN_SELECT_ROLE
DBA DBA
RESOURCE RESOURCE
  RDS_MASTER_ROLE
DATAPUMP_EXP_FULL_DATABASE DATAPUMP_IMP_FULL_DATABASE
XDB_SET_INVOKER XDB_SET_INVOKER
GATHER_SYSTEM_STATISTICS GATHER_SYSTEM_STATISTICS
SCHEDULER_ADMIN SCHEDULER_ADMIN
RECOVERY_CATALOG_OWNER RECOVERY_CATALOG_OWNER
HS_ADMIN_EXECUTE_ROLE HS_ADMIN_EXECUTE_ROLE
AQ_USER_ROLE AQ_USER_ROLE
EXP_FULL_DATABASE EXP_FULL_DATABASE


Now I will give 3 role for user which I created like below.


grant connect, resource, dba to virginiauser;


After this I can check the role status.


So far, I studied how to grant the privileges. However, I need to revoke these sometimes. 


revoke connect, resource, dba from virginiauser;


After granting roles to user, I need to give some privileges to this user. In oracle, there are two types of privileges, system and table.  At first, I will grant some privileges for the system.


RDSADMIN CRENETADMIN
INHERIT ANY PRIVILEGES  
GRANT ANY OBJECT PRIVILEGE GRANT ANY OBJECT PRIVILEGE
DROP ANY DIRECTORY DROP ANY DIRECTORY
UNLIMITED TABLESPACE UNLIMITED TABLESPACE
EXEMPT REDACTION POLICY EXEMPT REDACTION POLICY
CHANGE NOTIFICATION CHANGE NOTIFICATION
FLASHBACK ANY TABLE FLASHBACK ANY TABLE
ALTER SYSTEM  
ALTER PUBLIC DATABASE LINK ALTER PUBLIC DATABASE LINK
EXEMPT ACCESS POLICY EXEMPT ACCESS POLICY
ALTER DATABASE  
SELECT ANY TABLE SELECT ANY TABLE
RESTRICTED SESSION RESTRICTED SESSION
ALTER DATABASE LINK ALTER DATABASE LINK
CREATE EXTERNAL JOB  
EXEMPT IDENTITY POLICY EXEMPT IDENTITY POLICY
ADMINISTER DATABASE TRIGGER  
GRANT ANY ROLE  


I can give(remove) some system privileges like below.


grant UNLIMITED TABLESPACE TO myadmin;

revoke UNLIMITED TABLESPACE from myadmin;


After this, I can verify the status with "select * from dba_sys_privs" query.


Now, the table privileges left. In fact, I can not explain about this without the table. I will add more detail later in this post. Just look at the command how to see.


select * from dba_tab_privs where grantee='CRENETADMIN';


5. Create(Drop) Table


Before I create the Data table, I need to create table space. In this instruction, what kinds of parameters are required is explained. This command show the table spaces list. 


select * from dba_tablespaces;


There are some necessary factor for this table space. Fist is "Contents". There are three values to category. In the instruction, there are comments like below.


A permanent tablespace contains persistent schema objects. Objects in permanent tablespaces are stored in datafiles.


An undo tablespace is a type of permanent tablespace used by Oracle Database to manage undo data if you are running your database in automatic undo management mode. Oracle strongly recommends that you use automatic undo management mode rather than using rollback segments for undo.


A temporary tablespace contains schema objects only for the duration of a session. Objects in temporary tablespaces are stored in tempfiles. 


From this statements above, "Undo tablespace" is not friendly rather than others. Please, read these instructions, https://oracle-base.com/articles/9i/automatic-undo-management and https://docs.oracle.com/cd/B28359_01/server.111/b28310/undo002.htm#ADMIN11462. For this "Undo tablespace",  "automatic undo management" is required. The recently version is set as defaults. Also, I tried to change this configuration in AWS RDS. Howerer, I can not alter this.


Second is the datafile conecpt such as "bigfile" or "smallfile". In this instruction


A bigfile tablespace contains only one datafile or tempfile, which can contain up to approximately 4 billion (232) blocks. The maximum size of the single datafile or tempfile is 128 terabytes (TB) for a tablespace with 32K blocks and 32TB for a tablespace with 8K blocks.


A smallfile tablespace is a traditional Oracle tablespace, which can contain 1022 datafiles or tempfiles, each of which can contain up to approximately 4 million (222) blocks. 


From this statements, I can not understand "smallfile tablespace can contain multiple datafiles". Please look at this link


create tablespace homeworkts 

datafile 'D:\oradata\orcl\df1.dbf' size 4m, 

         'D:\oradata\orcl\df2.dbf' size 4m, 

         'D:\oradata\orcl\df3.dbf' size 4m; 


However, this command does not work in AWS RDS. Because RDS does not give any permission for this like below. I can not create the datafile.


There are so many options, however I can not handle all of things. I think I can create tablespace with these information. I hope this instruction will be helpful.


# Permament-Bigfile tablespace

create bigfile tablespace myspace;


# Permament-Bigfile tablespace

create bigfile temporary tablespace mytemp;


After this command, I can see the "select * from dba_tablespaces;" and "select * from dba_data_files;"


select tablespace_name,contents,bigfile from dba_tablespaces;


select file_name,tablespace_name,autoextensible from dba_data_files;


Now, I created table spaces. I can start to create table. Please look at this, there are sample example to create table. 


create table user.info ( name varchar2(15), id number(10) ) tablespace myspace;


This command create "error" like below. This error is occurred by table name.


In oracle, table name must be "schema (=user)"+"table name". This is the reason why the schema (=user) is import. Because of this, I have to revise the command below. "MYADMIN" is created user before.


create table MYADMIN.user_info ( name varchar2(15), id number(10) );


After this command I can see the table information with "select * from dba_tables;"


select * from dba_tables;

select * from dba_tables where owner='MYADMIN';


There are 2 things special. I insert "MYADMIN.user_info" as the table name. Howerver, oracle re-arrange this table name with "owner" and "table_name". Also, "USERS" tablespace is allocated for this table, which is default permanent tablespace. However I want that this table is located in "MYSAPCE" table space. Thus, it should be revised like below.


create table MYADMIN.user_info ( name varchar2(15), id number(10) ) tablespace myspace;


However, I can create this. Because this table name has already existed. Thus I need to drop this table with this command.


drop table MYADMIN.user_info;


Now, this is what I want.


6. Insert, Update, Delete Data


Before start this part, I need to covert account with "MYADMIN", which is used as the "schema name".


select * from user_tables;


"user_tables" show the information which belonged to logon account. If I can see table only I create, it is OK.


However, there is other way to find out logon current user. In this instruction, "select user from dual;" is command.


select user from dual;


I will follow this instruction. At first, I will try to insert some data into "user_info" table;


insert into user_info (id, name) values (101,'fox');

insert into MYADMIN.user_info (id, name) values (102,'wolf');


Please note that I can use both of "schema+table name" and "table name", because the current user is same as the schema name. After this command, look at the table information like below.


select * from MYADMIN.user_info;


Now, I will update the data. Please note I use "schema+table name" as the table name. It does not affect the result.


update MYADMIN.user_info set ID=103 where name='wolf';


Finally, Delete is left. This is not difficult to run.


delete from user_info where id=103;


7. Troubleshooting. (table privileges with other schema)


I am happy to learn how to insert, update and delete data. However, I need to think about my privileges. So far, I did not give any permission about table. The reason why this can be done is that this user is the "schema user". It look like admin user for this table. If I create another user (=schema), I wonder if this user can insert, update and delete with this table.


# create new (another) user

create user myuser indentified by myuser;


This user does not any role and privileges at the beginning. 


I can not logon into the Database. I add the role with "connect"


grant connect to myuser;


Now, I can login. However, I can not select, insert, update and delete over table. I need to give some privileges.


With administrator account, I will give this user some permissions. Please, look at the this instruction.


grant select, insert, update, delete on MYADMIN.user_info to MYUSER;

Now, I can select, insert, update and delete.


If I want to know what kinds of table privileges does this user has, use this command


select * from dba_tab_privs where grantee='MYUSER';


This is basic oracle database concept. I hope it will be helpful. If I have enough time to learn, I will handle more. However, I am not DBA engineer. I hope I can keep touch about this part again.


Reference


[ 1 ] https://docs.aws.amazon.com/ko_kr/AmazonRDS/latest/UserGuide/USER_ConnectToOracleInstance.html

[ 2 ] https://www.oracle.com/technetwork/developer-tools/sql-developer/downloads/index.html

[ 3 ] https://docs.oracle.com/cd/B28359_01/server.111/b28286/statements_8003.htm#SQLRF01503

[ 4 ] https://chartio.com/resources/tutorials/how-to-create-a-user-and-grant-permissions-in-oracle/

[ 5 ] https://docs.oracle.com/cd/B19306_01/server.102/b14200/statements_7003.htm

[ 6 ] https://stackoverflow.com/questions/8496152/how-to-create-a-tablespace-with-multiple-datafiles

[ 7 ] https://docs.oracle.com/en/database/oracle/oracle-database/12.2/sqlrf/CREATE-TABLESPACE.html#GUID-51F07BF5-EFAF-4910-9040-C473B86A8BF9

[ 8 ] https://www.java2s.com/Code/Oracle/User-Previliege/Getcurrentusername.htm

[ 9 ] https://www.oracle-dba-online.com/sql/insert_update_delete_merge.htm

+ Recent posts